2 4 0 T U R B O . C O M
D A V E ' S V O L V O P A G E

S L I D E S H O W W I L L B E G I N A U T O M A T I C A L L Y I N A M O M E N T
|
|


|
UPDATED: January 28, 2026
CONTACT

|
D O
M A I N S 
 |
|||
 |
 |
 |
 |
 |
 |
|
 |
 |
 |
 |

|

|
|
 |
 |
 |

|
|
 |
 |
 |

|
 |
 |
 |
 |
 |
 alternators are known for poor voltage.") |
 |
 |
 |
 |
 |
 |

|

|
 |
 |

|
 |
 |
 |
 |
 |
| S E A R C H
D A V E ' S V O L V O P A
G E S B E L O W
|

 850 or V70 TAILGATE REPAIR |
 New 50 mm CHROME or BLACK EMBLEMS |
 Pin function info: 240 Ignition KEY Switch |

TAILLIGHT PAGE and Diagrams |
SLANTED BODY EMBLEMS |
 240 FULL SVEND |
.
WHY IS A 240 SPECIAL?

If
you read the actual TEXT in this ad you'll realize the
intercooler description is technically INCORRECT. I guess ad
writers and engineers didn't talk
to each other much. We still love the 240.
I've been a fan of 240s since before I ever owned my first one in 1990. The TURBOS were too expensive for me when they were new, so I had to buy one of those later. If you have an affection for the 240 or wonder why so many people do, read Chris Driver's blog linked below. I think you'll share a similar opinion.
And here's a good video: Why the Volvo 240 is Actually a Good Enthusiast Car + Walkthrough and Drive
240 VIN Decoding Page
|
Full boost for an early 240 Turbo (B21FT) was set at 6 PSI. Later versions with the intercooler boost system had 7.1 to 8.2 PSI (late 1984-85) . Maximum power for the early B21FT was about 131 HP and 155 ft lbs torque, or about 162 HP and 181 ft lbs. torque for later versions with the intercooler boost system.
The European version 240 Turbo (with B21ET) offered more turbo boost than a U.S.A. car. About 9.2 to 10.1 PSI, which gave the B21ET more power: 145 HP and 167 ft lbs.torque. Later B21ET cars were never officially fitted with intercoolers from the factory, but later B19ET cars were fitted (for the Italian market). The B19ET was the same as a B21ET, except with a smaller bore, which was required to satisfy strict Italian tax regulations. The later intercooled B19ET cars had 11 to 12.1 PSI (76 to 82 kPa) and developed 170 HP and 184 ft lbs. torque .
|
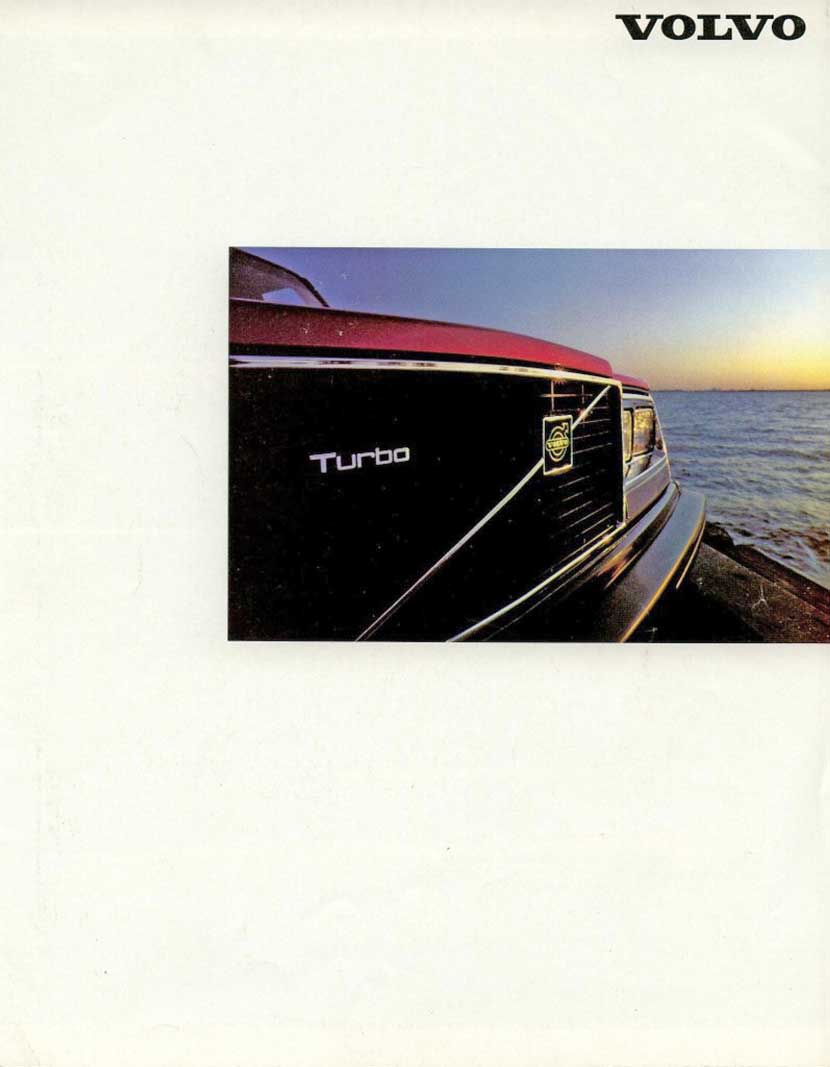
240 GENERAL SPECS: The below image (reproduced from a 1983 US and Canada sales brochure) shows advertised specifications for 1983 240 models. 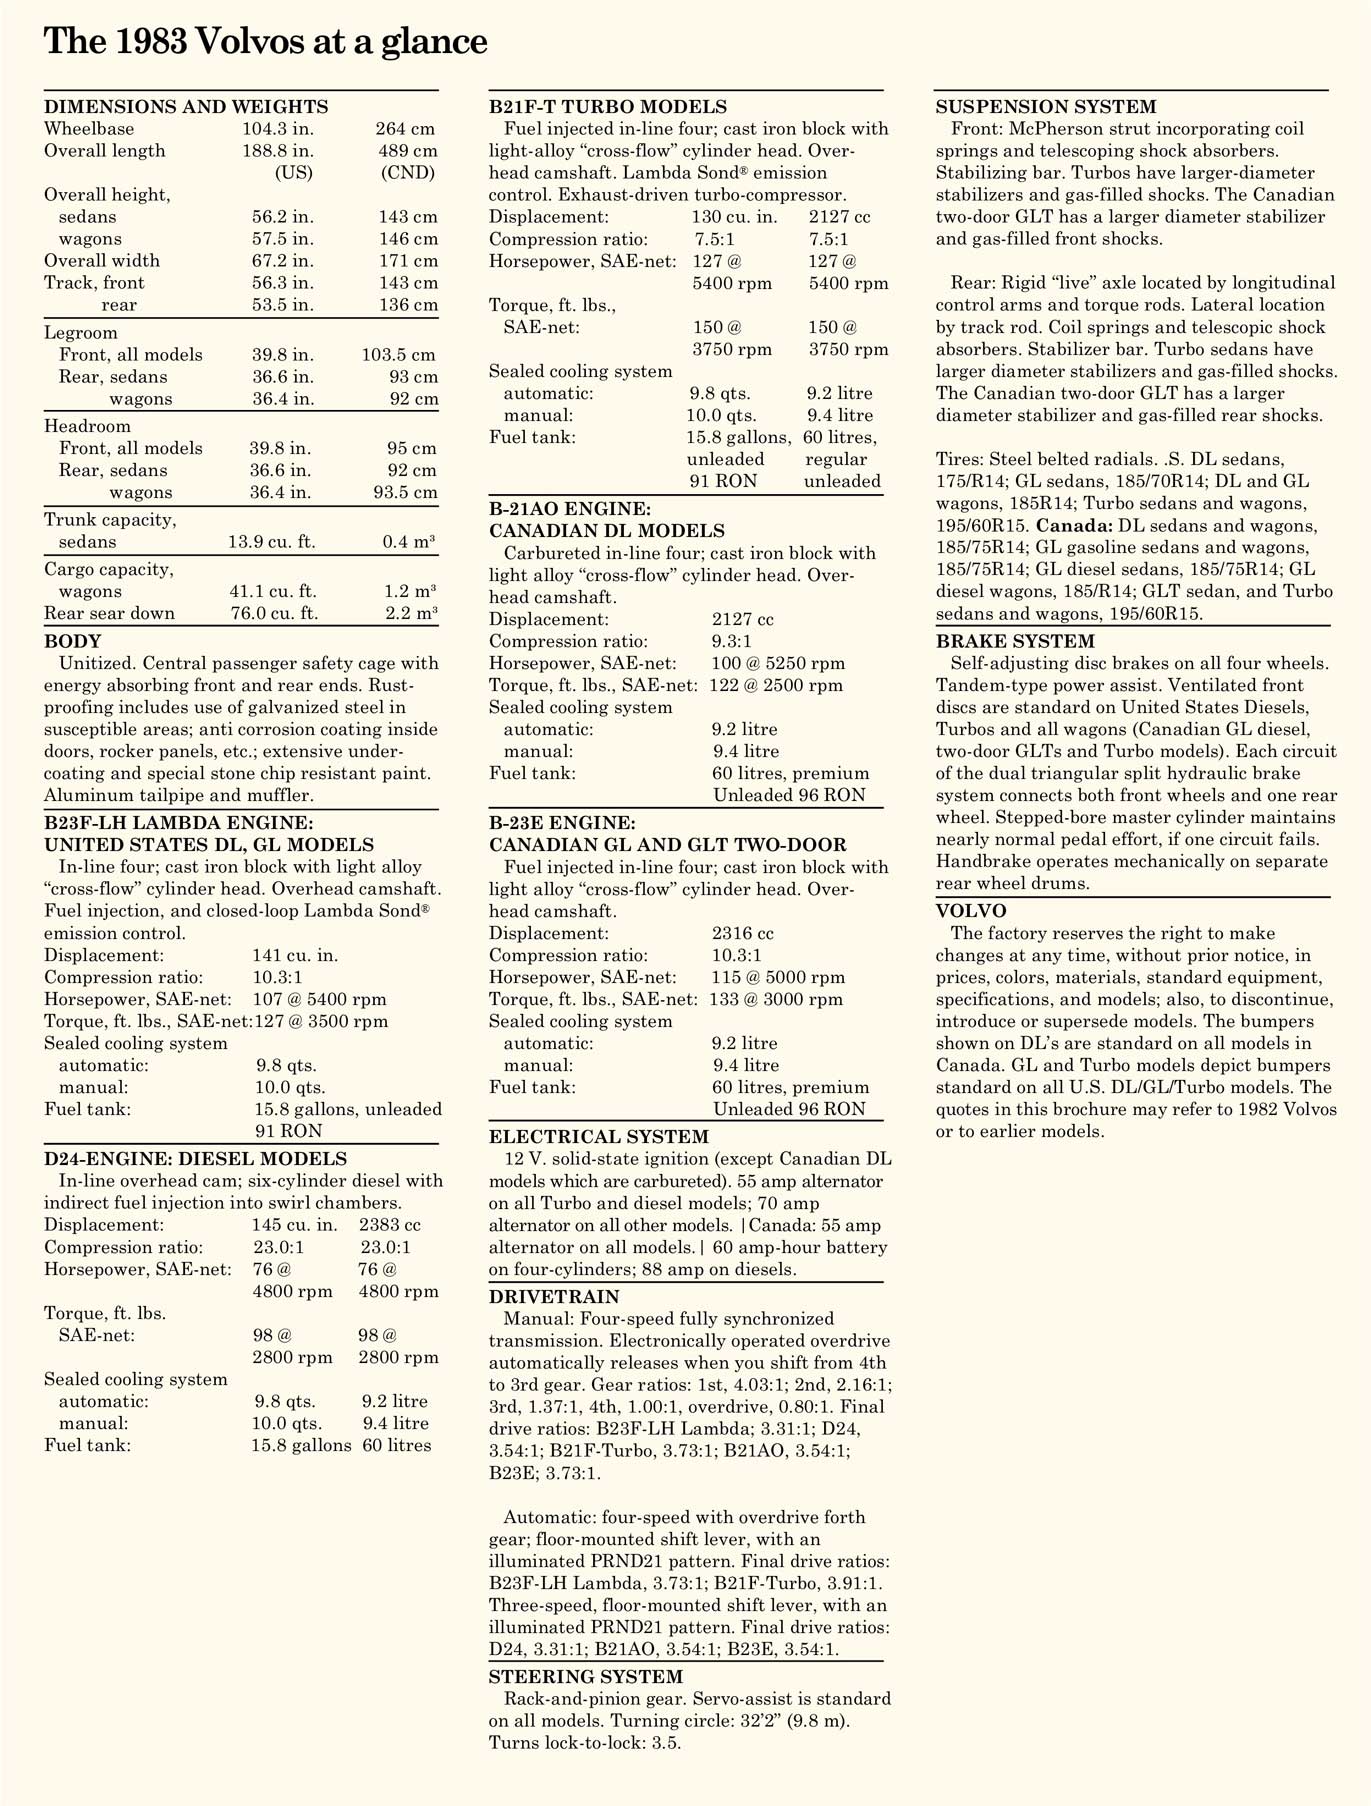 |
|
240 Model Sales Brochure 1983
 |
240 Accessory Brochure |
I'm a Volvo 240 hobbyist.
|
I've been playing with Volvos (mostly
240s) since 1988. My pages here are an attempt
to share my experience with other Volvo enthusiasts and
to chronicle the knowledge and information I've
gathered over the years so it can help others with their 240s.
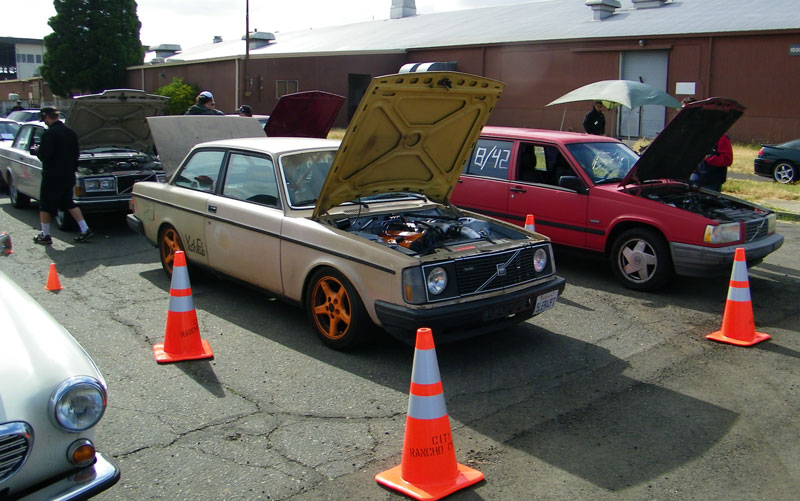
I've owned 10 Volvos since 1988. I'll show you some of them below . . . . This was my second Volvo (my first 240). A white 1983 244 DL. I bought it in 1990 and it died in 1996. 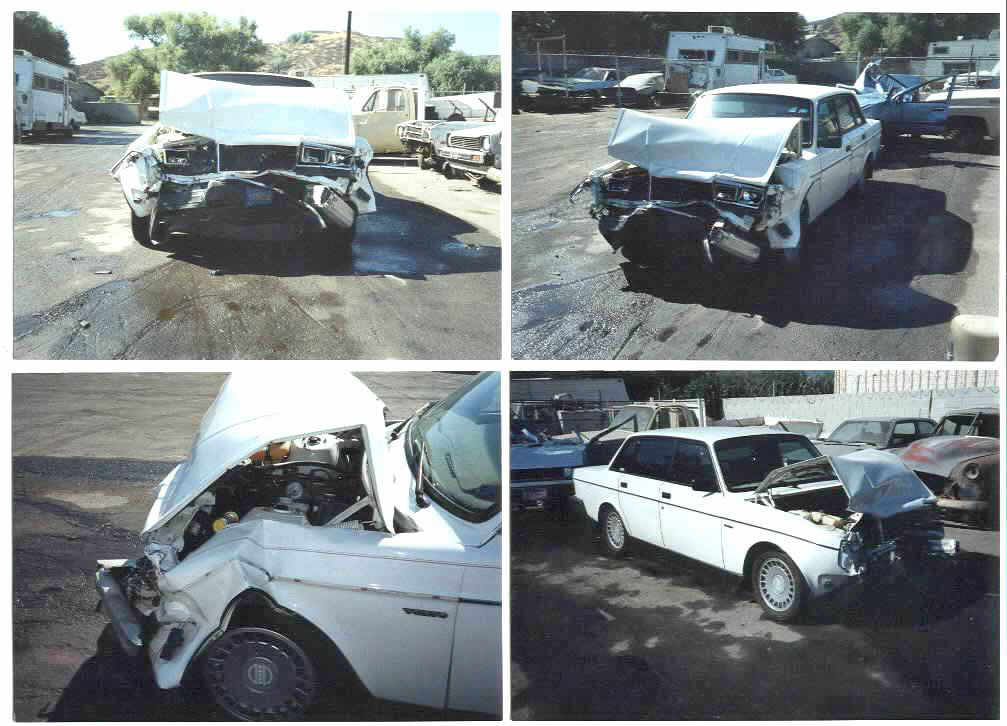 A non-sunroof 240 DL with roll-up windows, auto trans, marginal AC, fair gas mileage (20 mpg highway). This 240 was exceptionally clean with only 50k miles when I found it in 1990 in Huntington Beach, CA. Cost: $5,000. Already being an avid iPd customer, this car soon got their anti-sway bars, sport springs and Bilstein HD shocks, as well and a few other fun goodies. I also bought the back half of a 240 Turbo exhaust from a salvage yard and I installed it on this car from the cat-back. That gave a small improvement in response and gas mileage. More 240 exhaust stuff can be found in my 240 Exhaust Page. This 240 originally came with 14 inch steels wheels with beauty rings and hubcaps. I installed those newer 15 inch alloy wheels from my '88 760 Turbo, which I bought in 1988. I drove this car everywhere for 6 years and put over 100,000 miles on it. In 1996 I gave it to my daughter when she got her drivers license. Unfortunately it was destroyed a few months later when some nit-wit pulled out directly in front of her in a Chevy Caprice. She couldn't avoid the Caprice and hit it broadside at about 50 mph. |
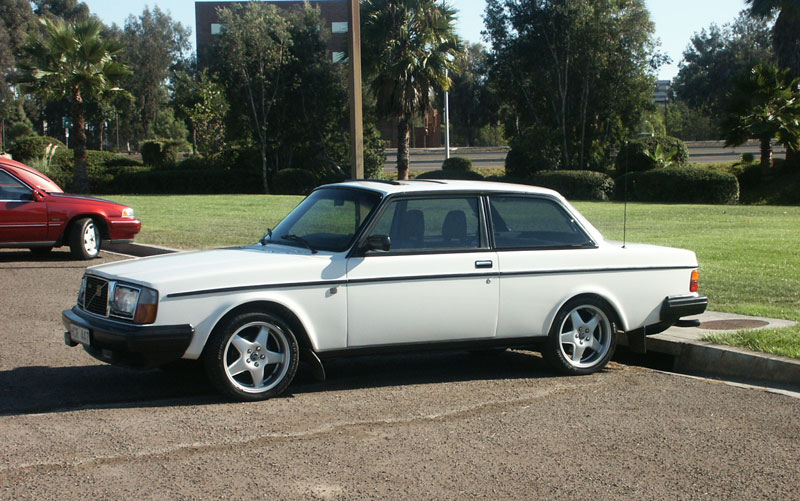
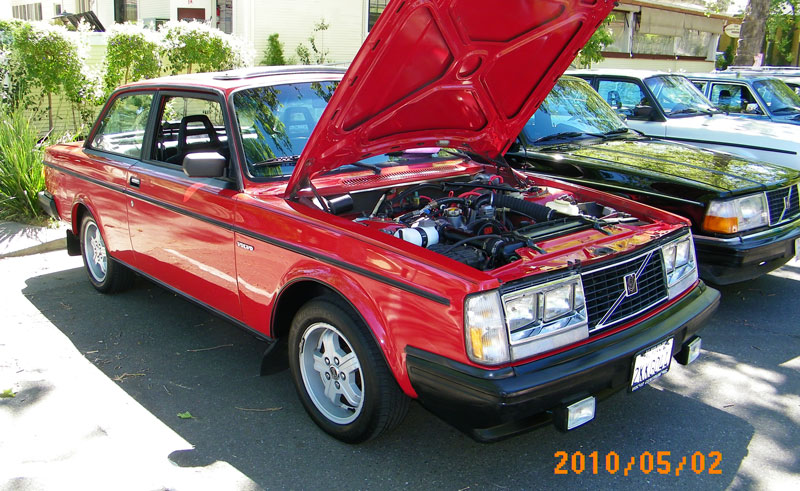
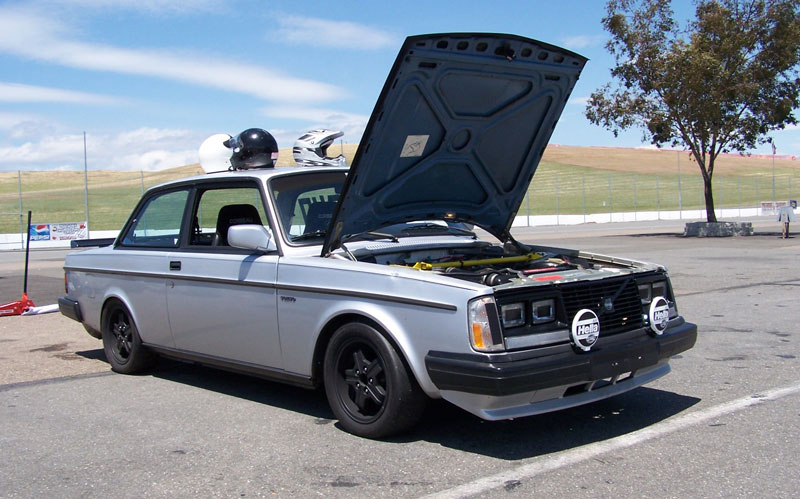
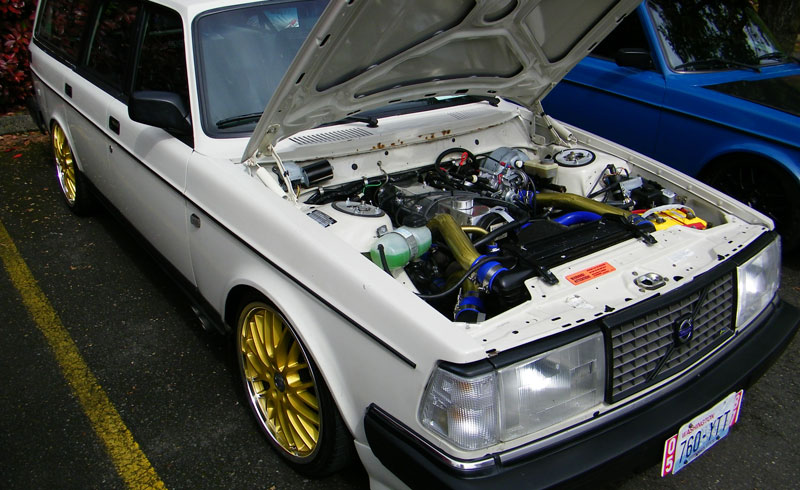
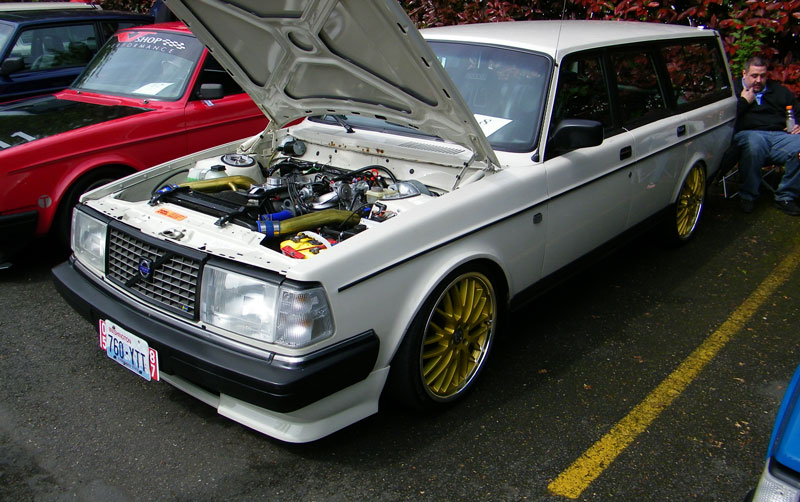
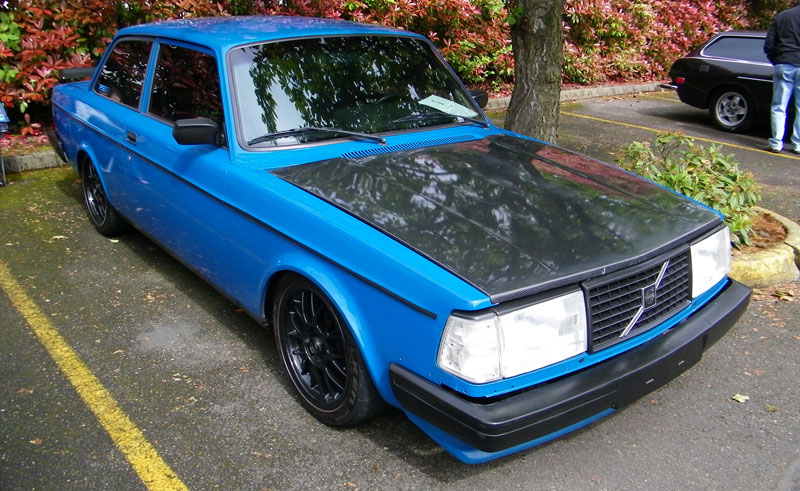
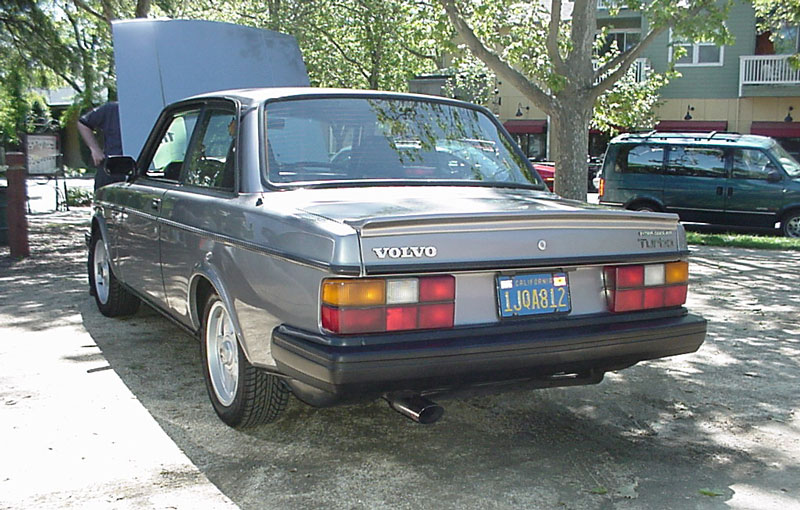
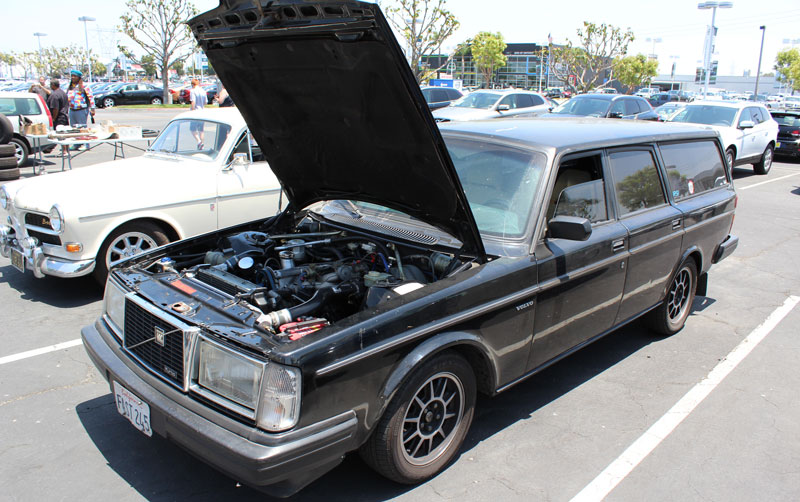
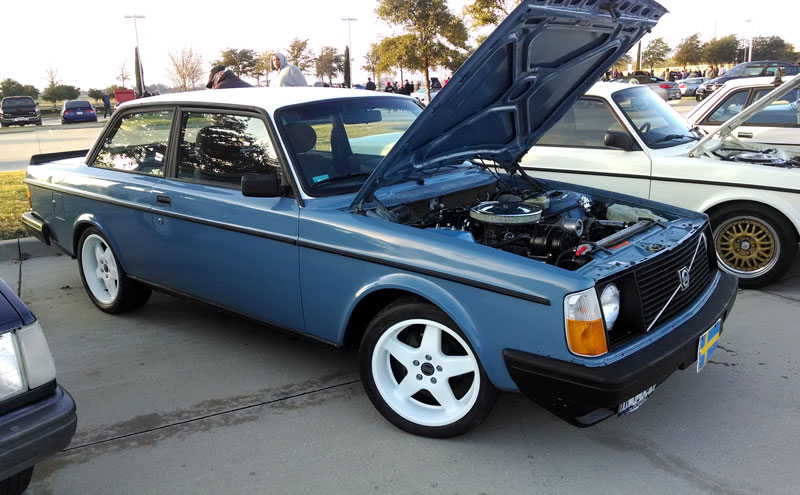
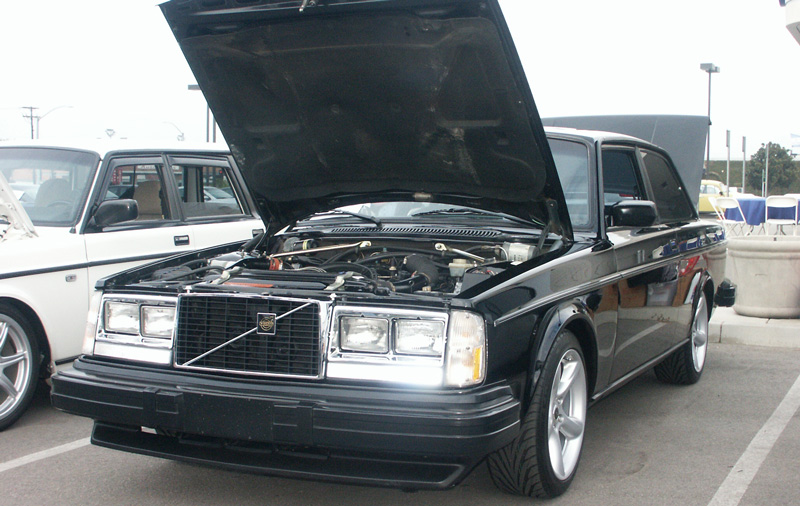
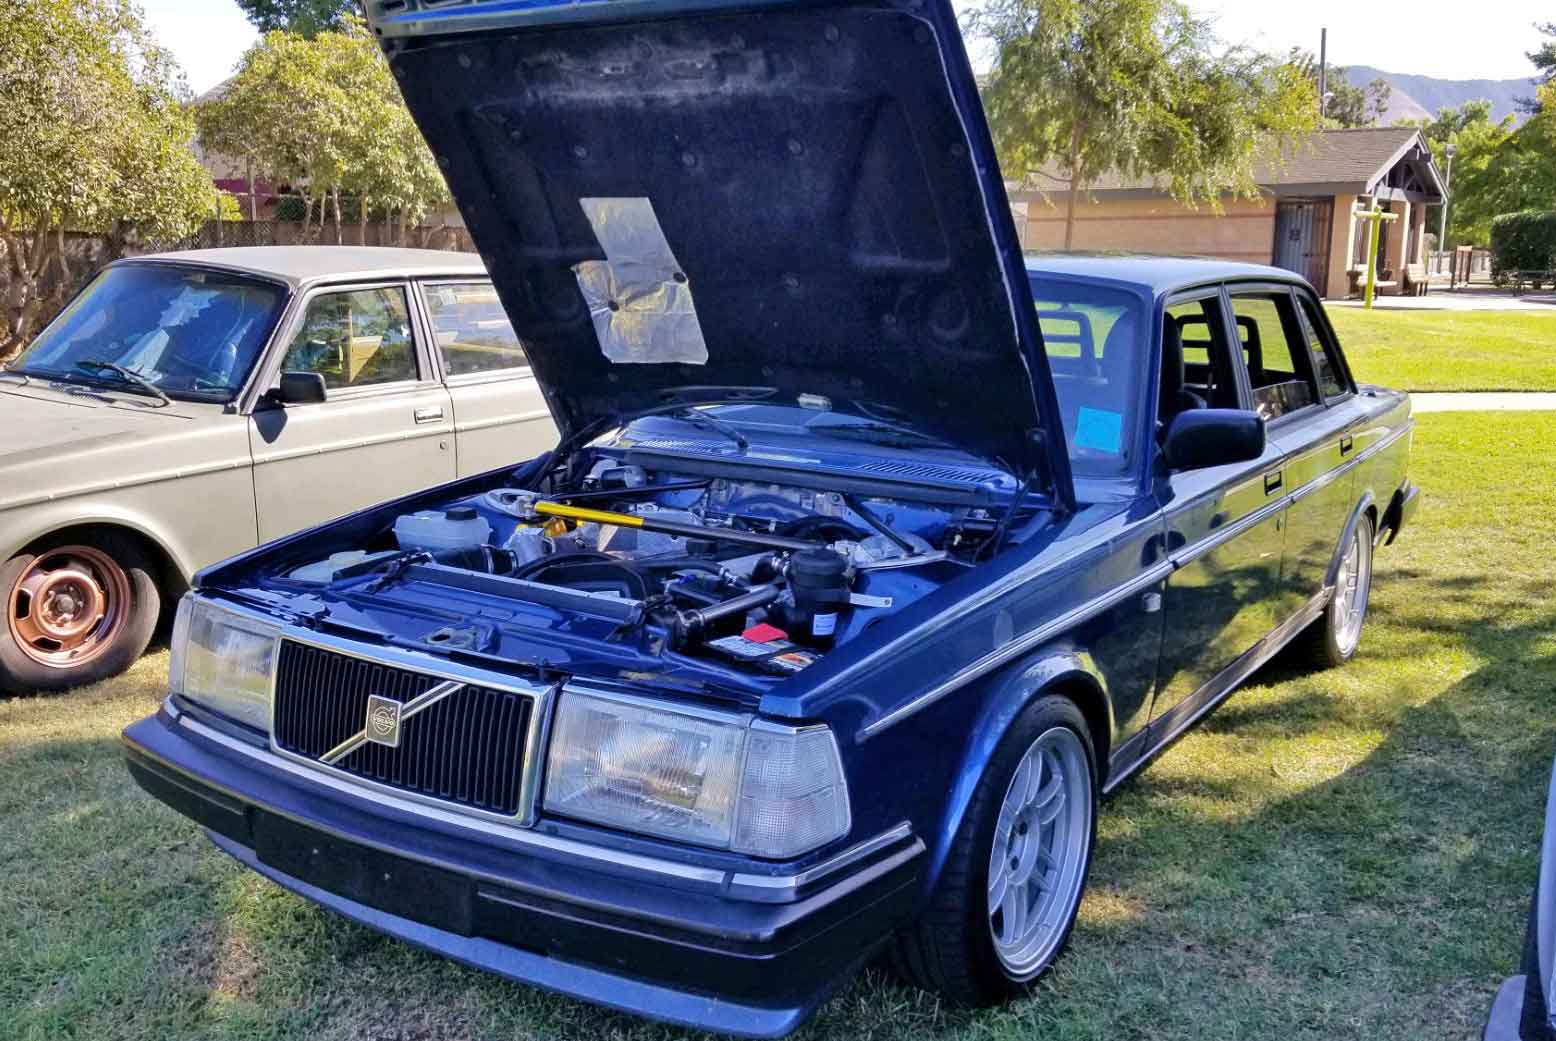
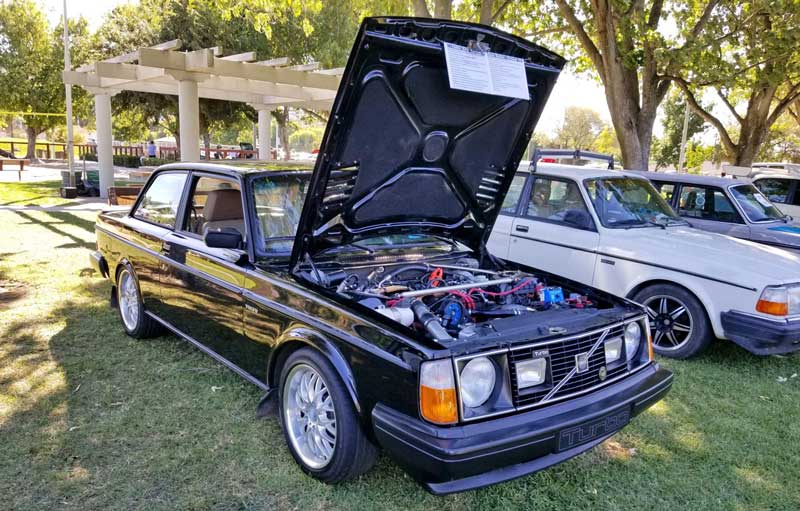
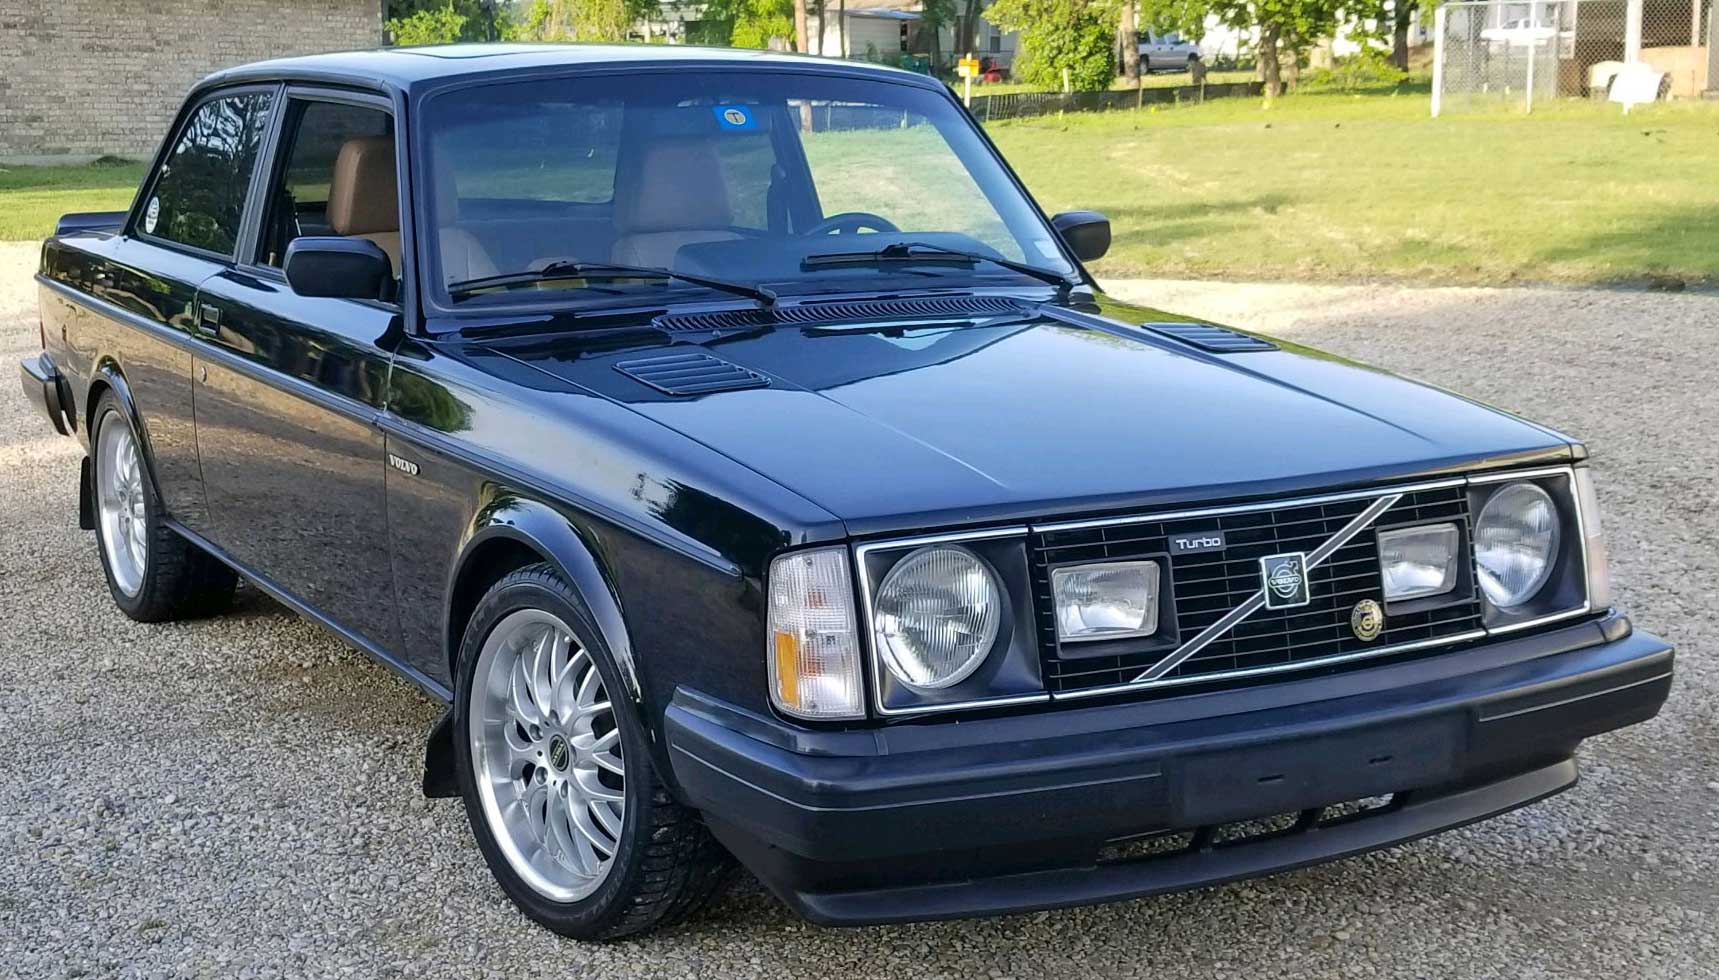
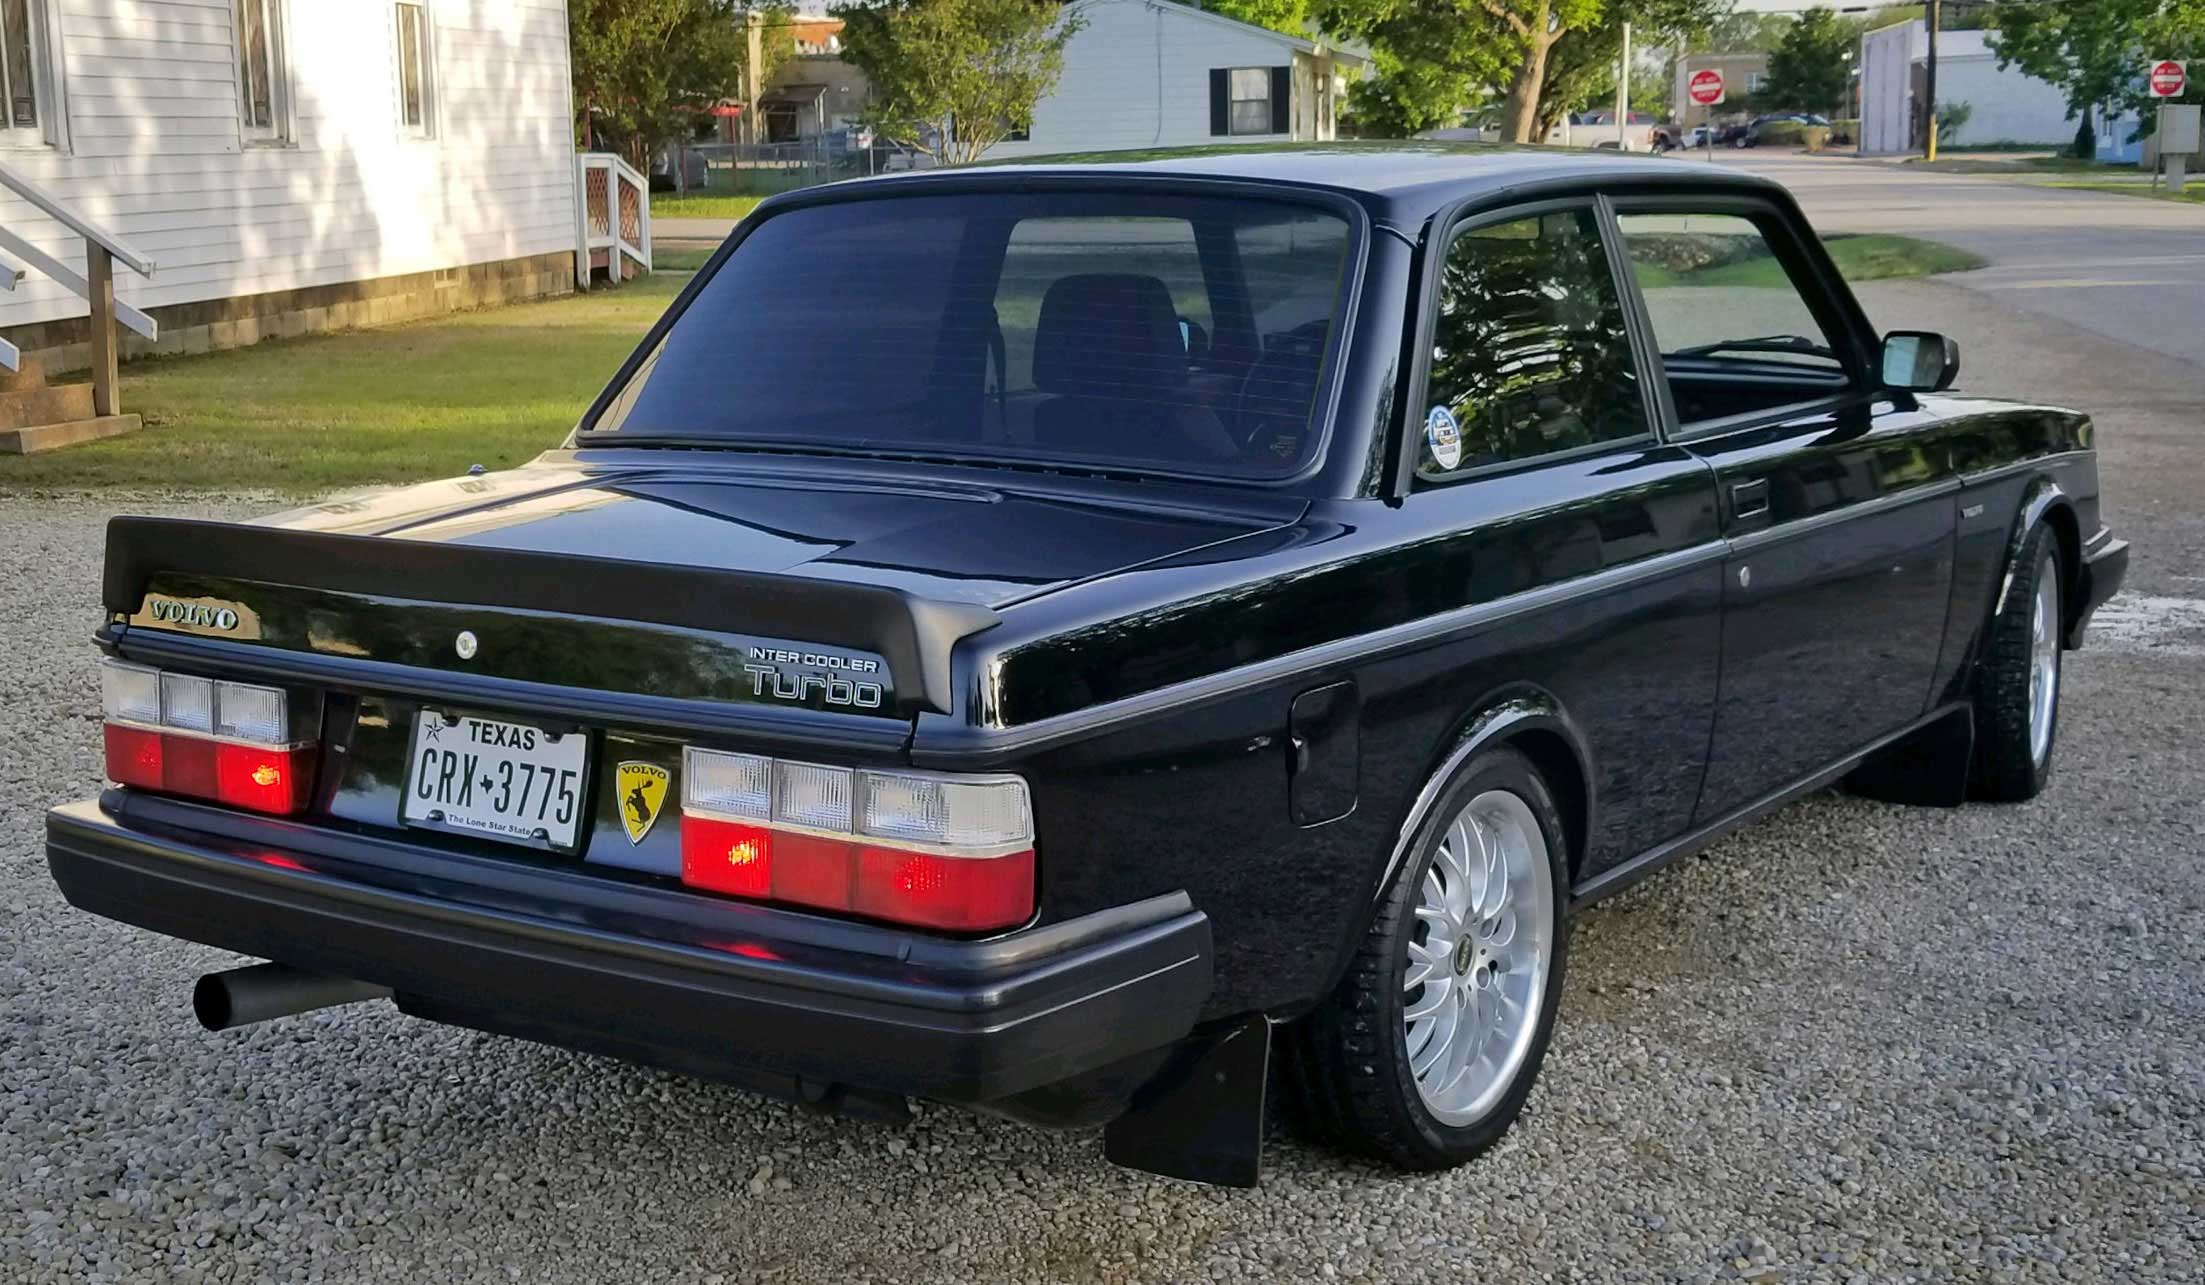
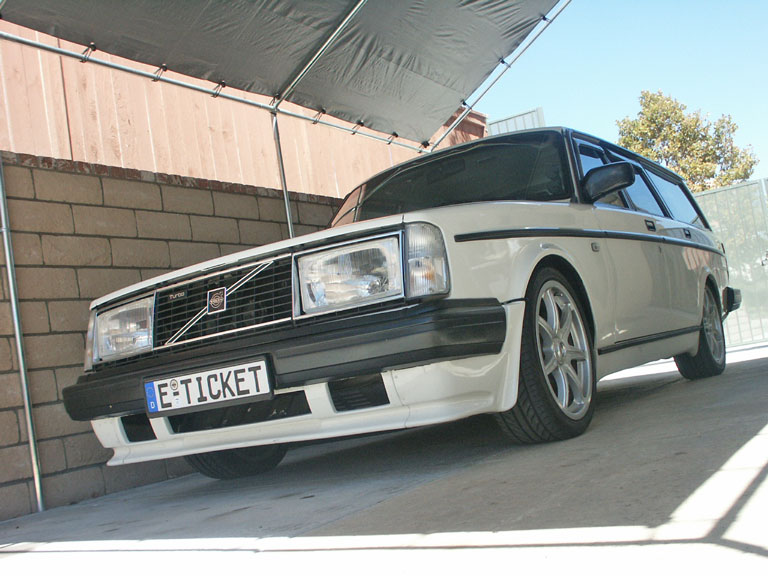
Here's my CURRENT 240.
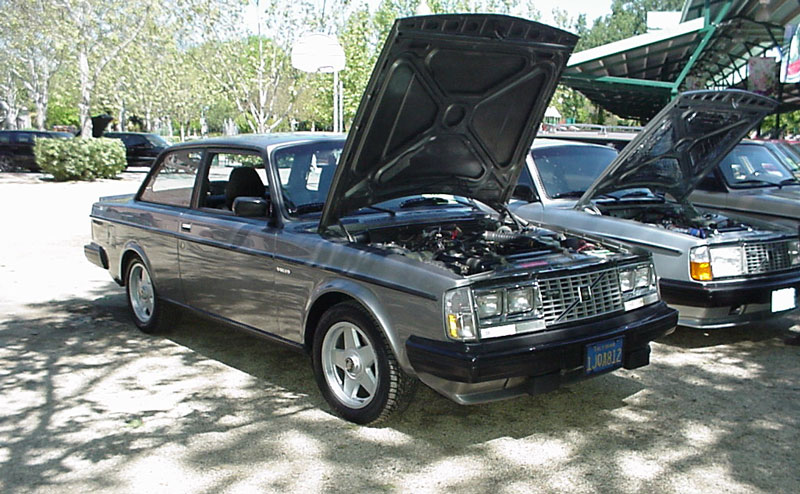
This is how it looked when I bought it back in 2003. 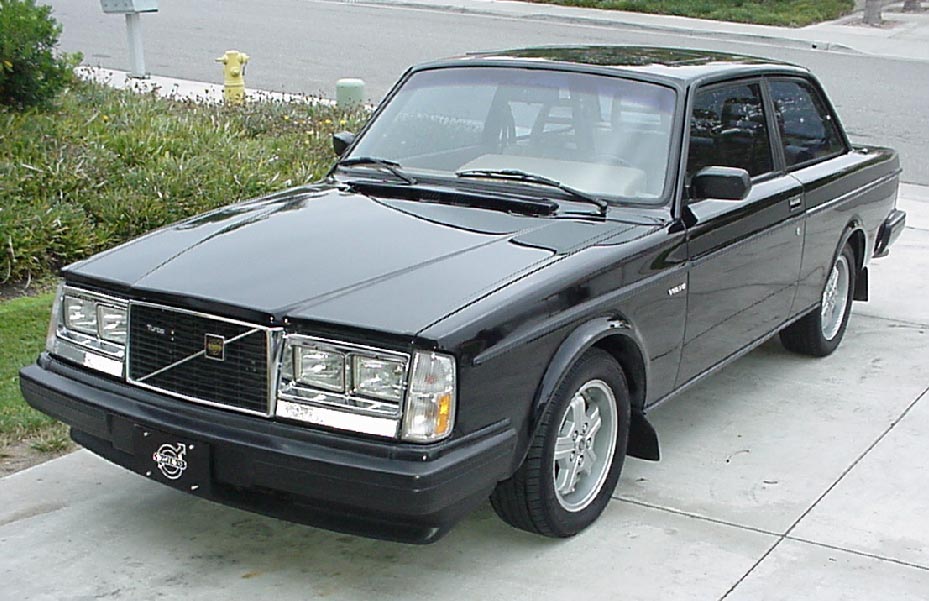 I bought this 1984 242 Turbo from the 3rd owner in 2003. He bought it only 6 months earlier in 2002 from Owner #2. The original paint and leather interior was in nice condition because the car had always been garaged. It's a big bonus for an old car like this to have lived indoors its whole life. It's why this car was so nice after years of use. This 242 was mostly stock, but it did come with iPd sport springs, iPd 25mm anti-sway bars and Bilstein HD shocks. I actually helped the previous owner install those things a few months before he sold the car to me. Otherwise nearly everything was original. |
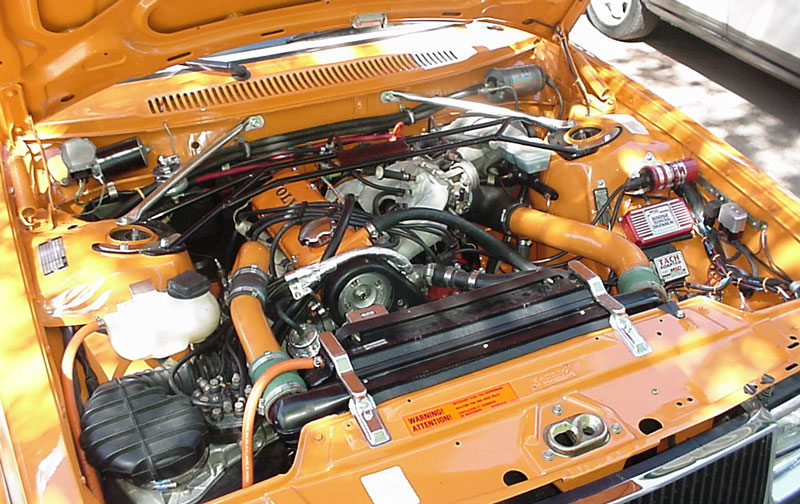
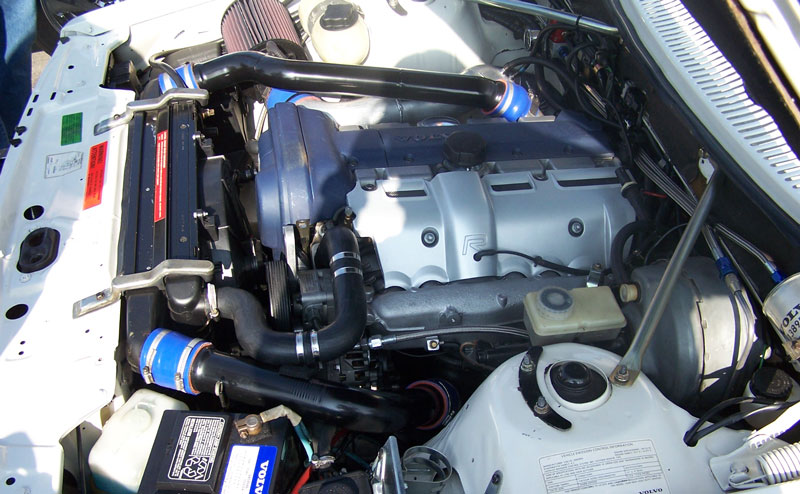
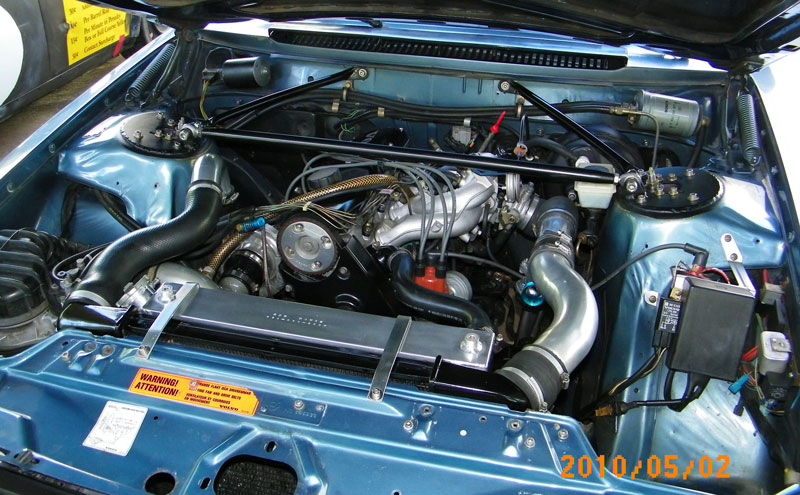
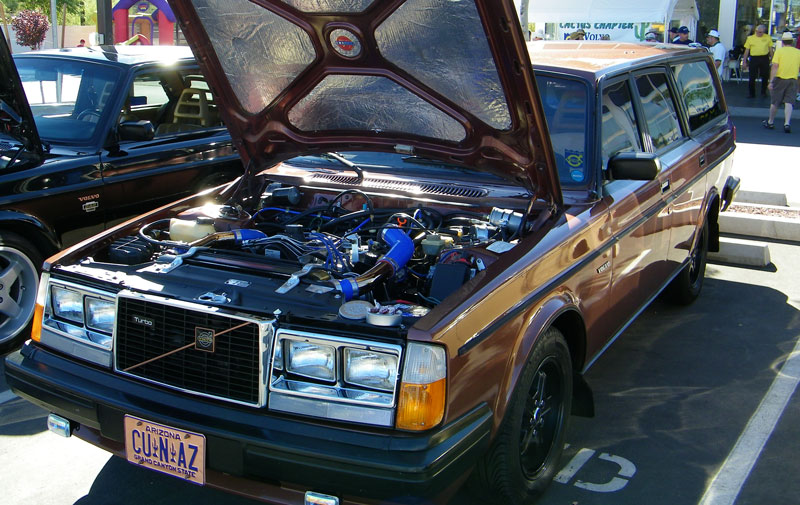
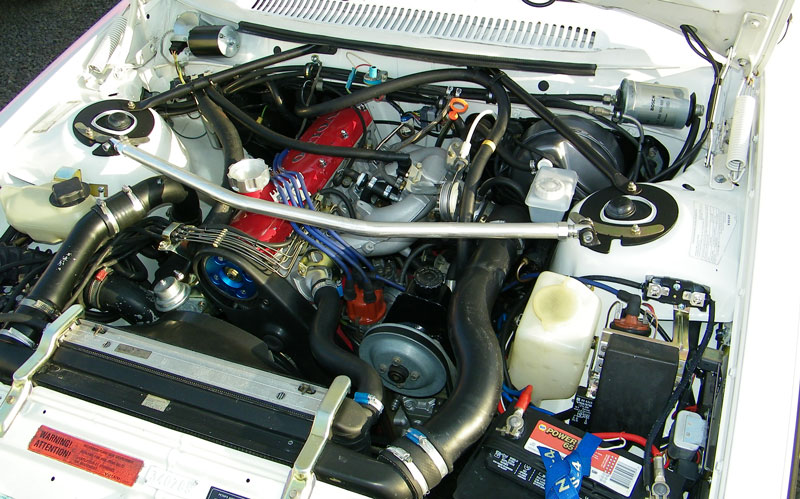
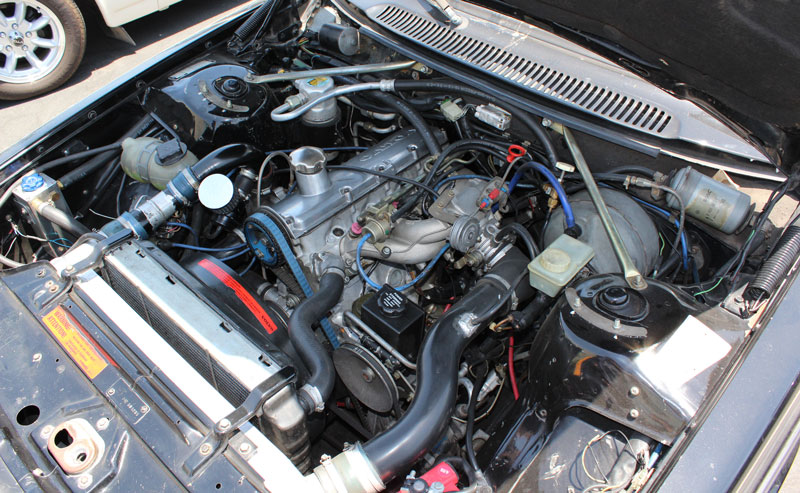
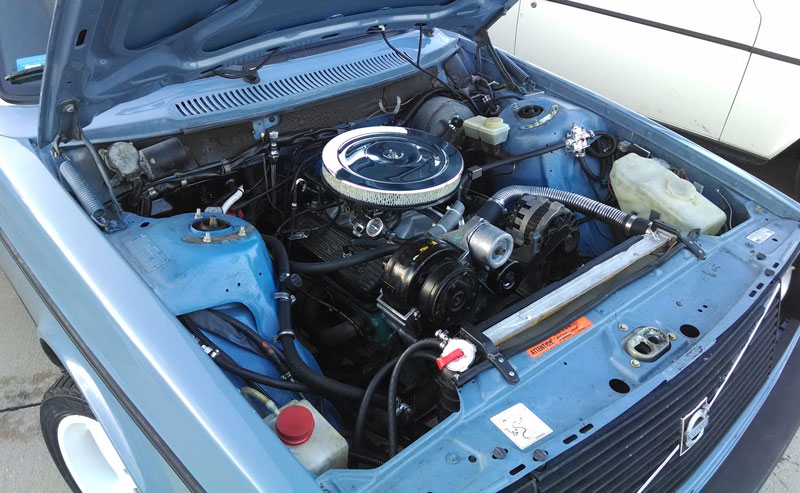
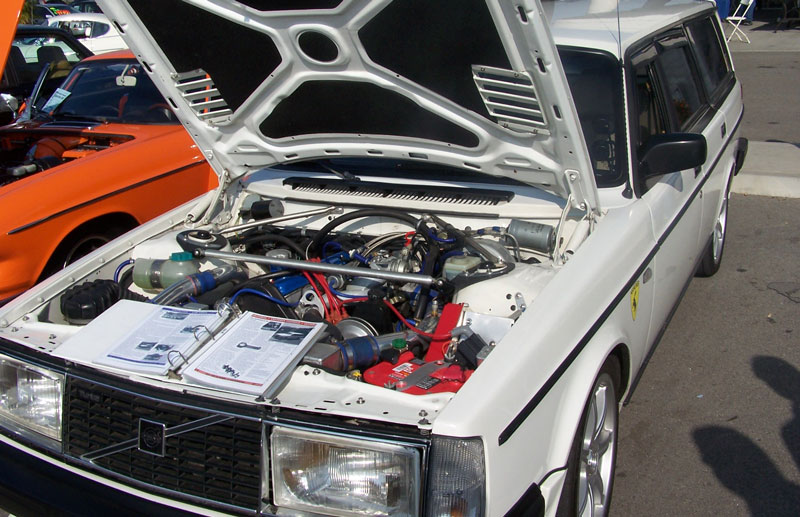
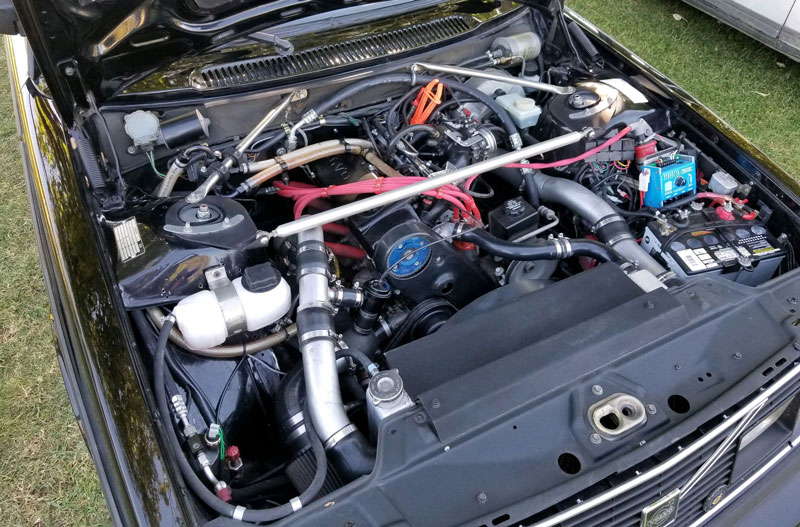
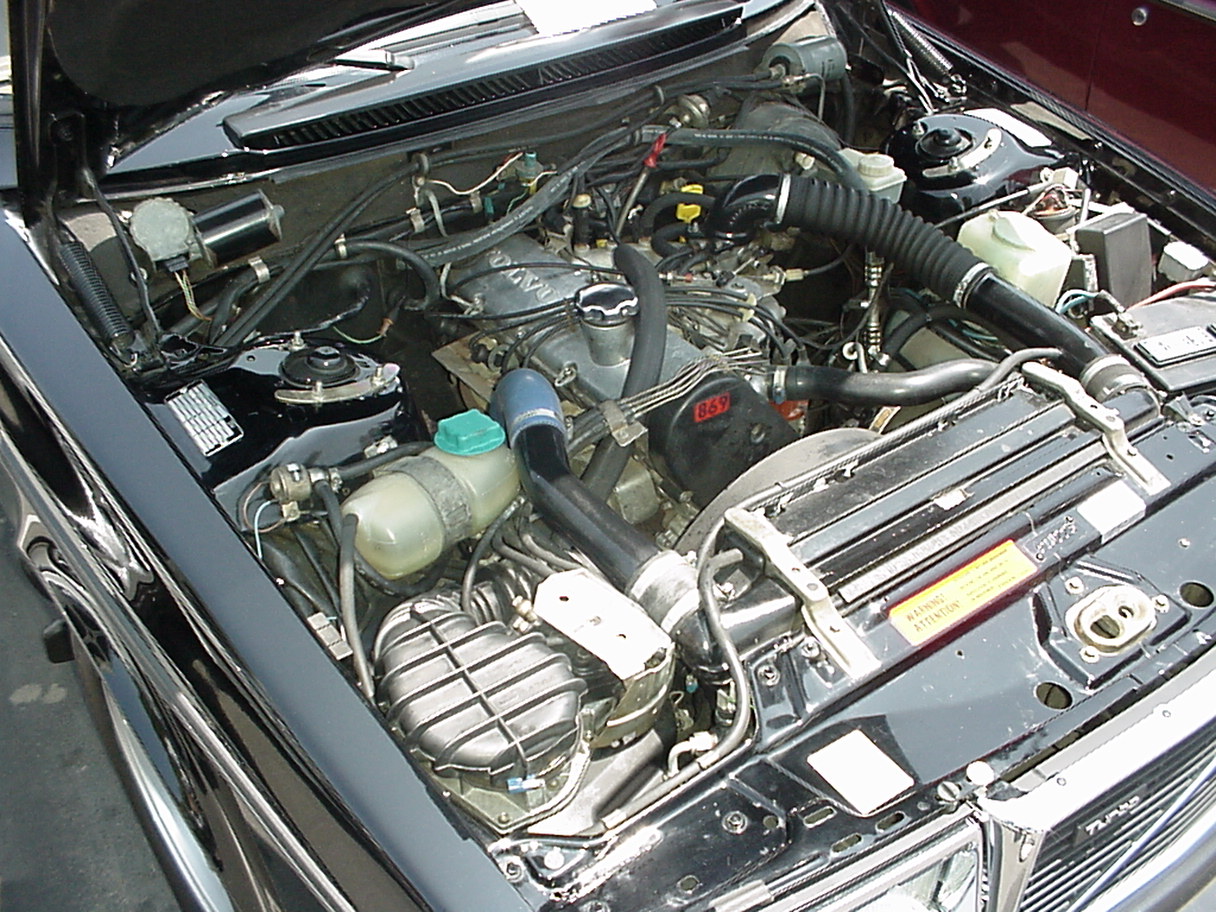
This car was
all very original and mostly stock. This is an
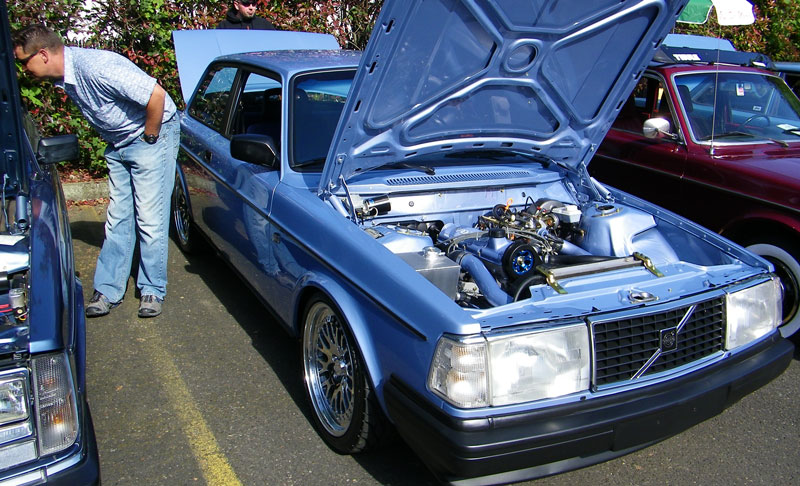
under-hood shot taken at the 2003 Annual Westside Volvo Show
at Westside Volvo in Culver City, California.
One item in this photo that is hard to see and not original is the power
steering pump and AC compressor. The previous owner had a shop
convert the AC to use a later rotary compressor (i.e.: Sanden type). This
required the installation of a later B230 mounting bracket
on the left side of the engine. The installer also changed the
power steering to the 1985-90 style, which used the pump with a remote
reservoir. I later tossed out that power steering pump and I
installed the 1991-93 style PS pump, which has the reservoir and pump together. A
view of that later engine bay is further down in this page.
 |
|
Installation of M46 TRANSMISSION I resisted the urge to modify this car for a few years, but slowly that urge began to win. So it has undergone a few changes over the years. After several years in my ownership, the original auto transmission failed. So I installed a manual transmission. Visit my MANUAL TRANS PAGE for more info on trans swaps: https://www.240turbo.com/T5.html 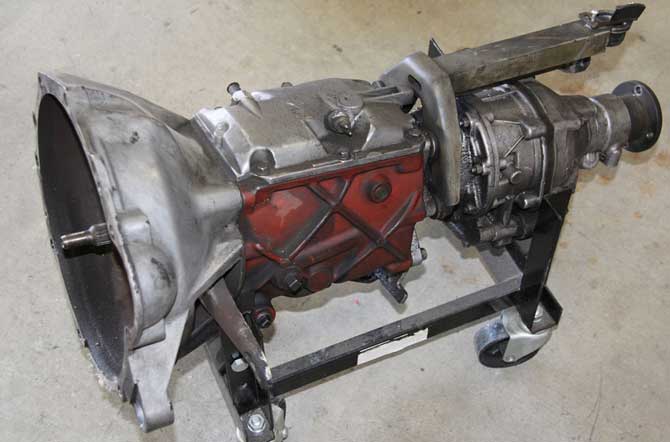 REAR END INFO  Considering my 1984 240 Turbo originally had an automatic transmission, the rear end came with a factory ratio of 3.91:1. An ORIGINAL manual transmission 1984 240 would have received a different rear end ratio of 3.73:1. A lot more 240 rear end info can be found in my REAR END PAGE. |
|
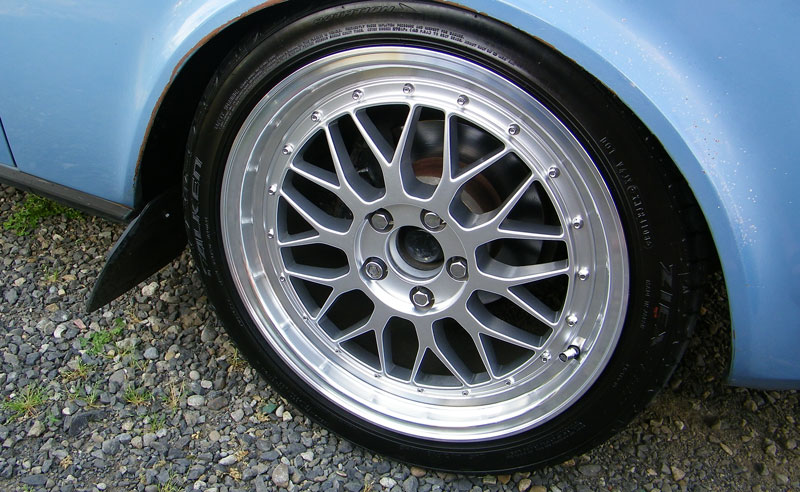
EIKER WHEELS (2004-2012)
The Eiker E1
wheels seen in some of my photos were
imported from Finland in 2004, because they were not yet available in the U.S. These are 17 x 7.5 inches (offset ET 20 mm positive) and were modeled after the Volvo Polaris wheel. I originally fitted 215/45-17 tires.
Back in 2004 the Eiker Wheel Company would not ship to U.S. customers, so a Finnish friend arranged for a relative of his to purchase and ship them from Finland. I loved these wheels and at that time this was the only way to get them in the U.S. A few cars had original Volvo Polaris wheels, but that was very rare. Almost no one else in the U.S. had these wheels yet. Years later these wheels became much more popular and some importers eventually managed to bring them to the U.S. in large quantities. The Eiker E1 started appearing on a number of other 240s at a faster rate. CENTER CAPS FOR EIKER WHEELS Back in 2004 I used the generic 62 mm "EIKER" plastic center caps that came with these wheels and I glued on round Volvo logos that I cut off of other Volvo caps. I get questions all the time now from people with Eikers who have trouble finding an existing and available VOLVO cap that will fit. When you search, keep in mind that some discussions will pertain to original Polaris wheels, which seem to have a 57 mm center bore, which is NOT the same size as an Eiker wheel, which reportedly has a 56 mm hole. An original Polaris wheel used center cap Volvo PN 3529610 (of course no longer available). There's some info on-line that suggests VOLVO center cap PN 30638643 (pictured HERE) from a first generation S40 (2001-2004) will supposedly fit an Eiker wheel. This does NOT appear to be correct according to some people I know who bought and tried them. The 30638643 is made for a 55 mm hole and is rather loose in an Eiker wheel. If anyone knows FOR CERTAIN of an existing AVAILABLE cap that actually fits well in an Eiker, please let me know and I'll add that here. I have some measurements of a few different common VOLVO center caps here: https://www.prancingmoose.com/centercaps.html#commoncaps Here are some discussions thread that will add to your confusion: https://turbobricks.com/index.php?threads/eiker-center-cap.244307/ https://turbobricks.com/index.php?threads/alternative-to-polaris-center-cap.280569/ |
|
T5 MANUAL TRANSMISSION UPGRADE
Fearing the old M46 would eventually break, I decided to install a Ford Motorsport World Class T5Z 5-speed transmission. 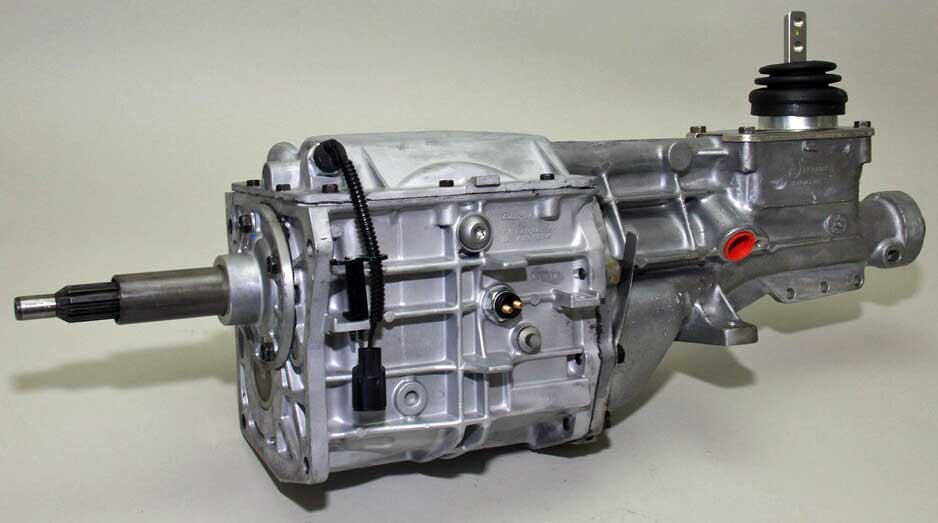 See more in my T5 Transmission Conversion Page: https://www.240turbo.com/T5.html I chose to keep the old school speedometer cable my car originally came with, however most 240's out there nowadays (all 1986 and later) will have an electric speedometer. Those later 240s are equipped with a Vehicle Speed Sensor (VSS) in the rear end. The T5 conveniently had a mechanical speedometer cable output port shown above (the red cap). 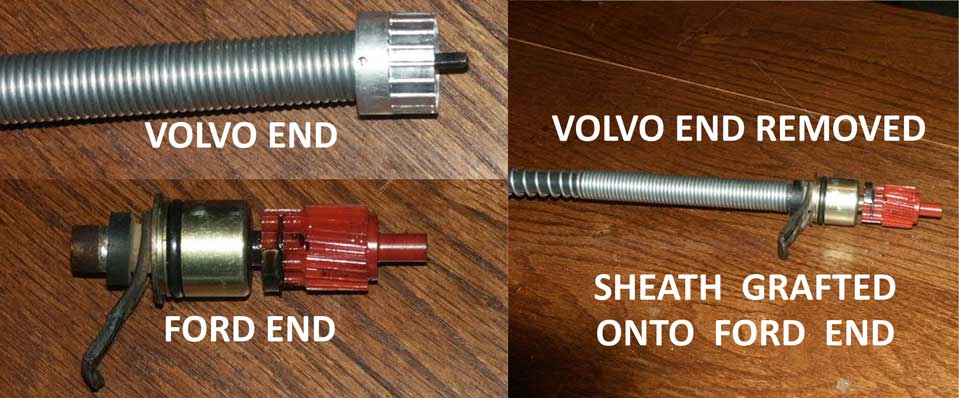 See more about the speedo cable in my T5 Transmission Conversion Page: https://www.240turbo.com/T5.html |
I added some new taillights in 2007. People have asked
where these taillights came from. They started
as ALL CLEAR taillights I found on eBay. I didn't like all clear lights. I
bought some
transparent red spray paint from the plastic model
section in a hobby store. 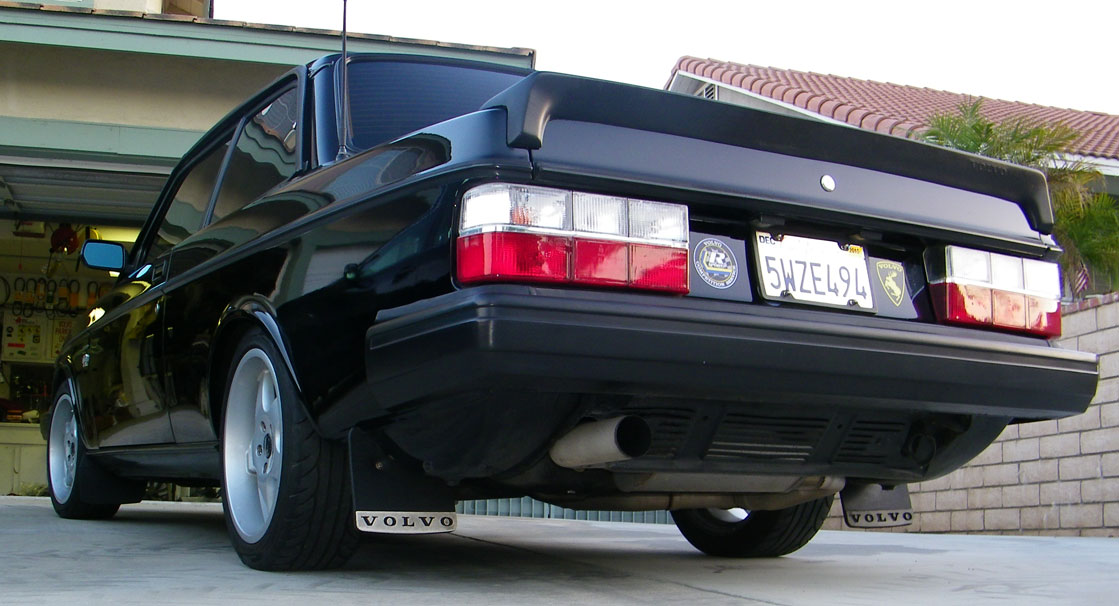 More detailed info on PAINTING TAIL LAMPS can be for HERE. That rear spoiler is a very rare Volvo 240 accessory made by Zender and available from Volvo dealers in the 1980's. |
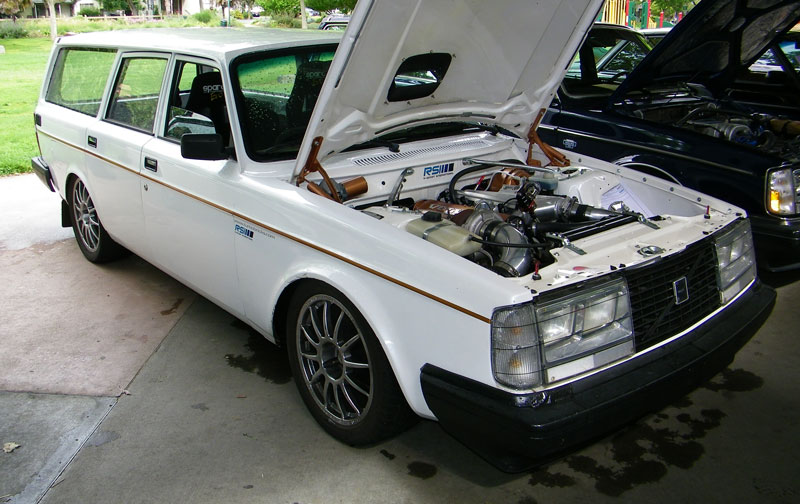
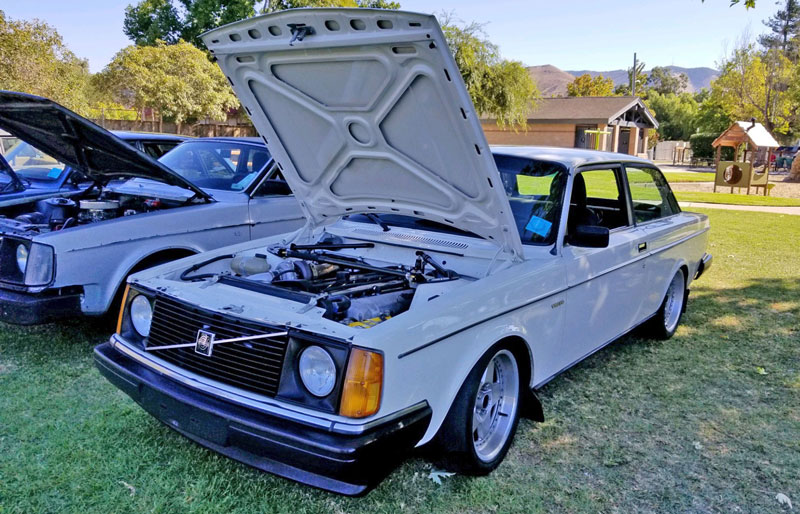
| This part may shock some 240 purists . . . . I don't prefer the traditional humped "coffin" hood that originally came on U.S. 240 models. Some people do. I don't.  So in 2010 my car received a flat hood and matching flat grill. Much more about 240 HOODS can be found in my 240 Hood Page. 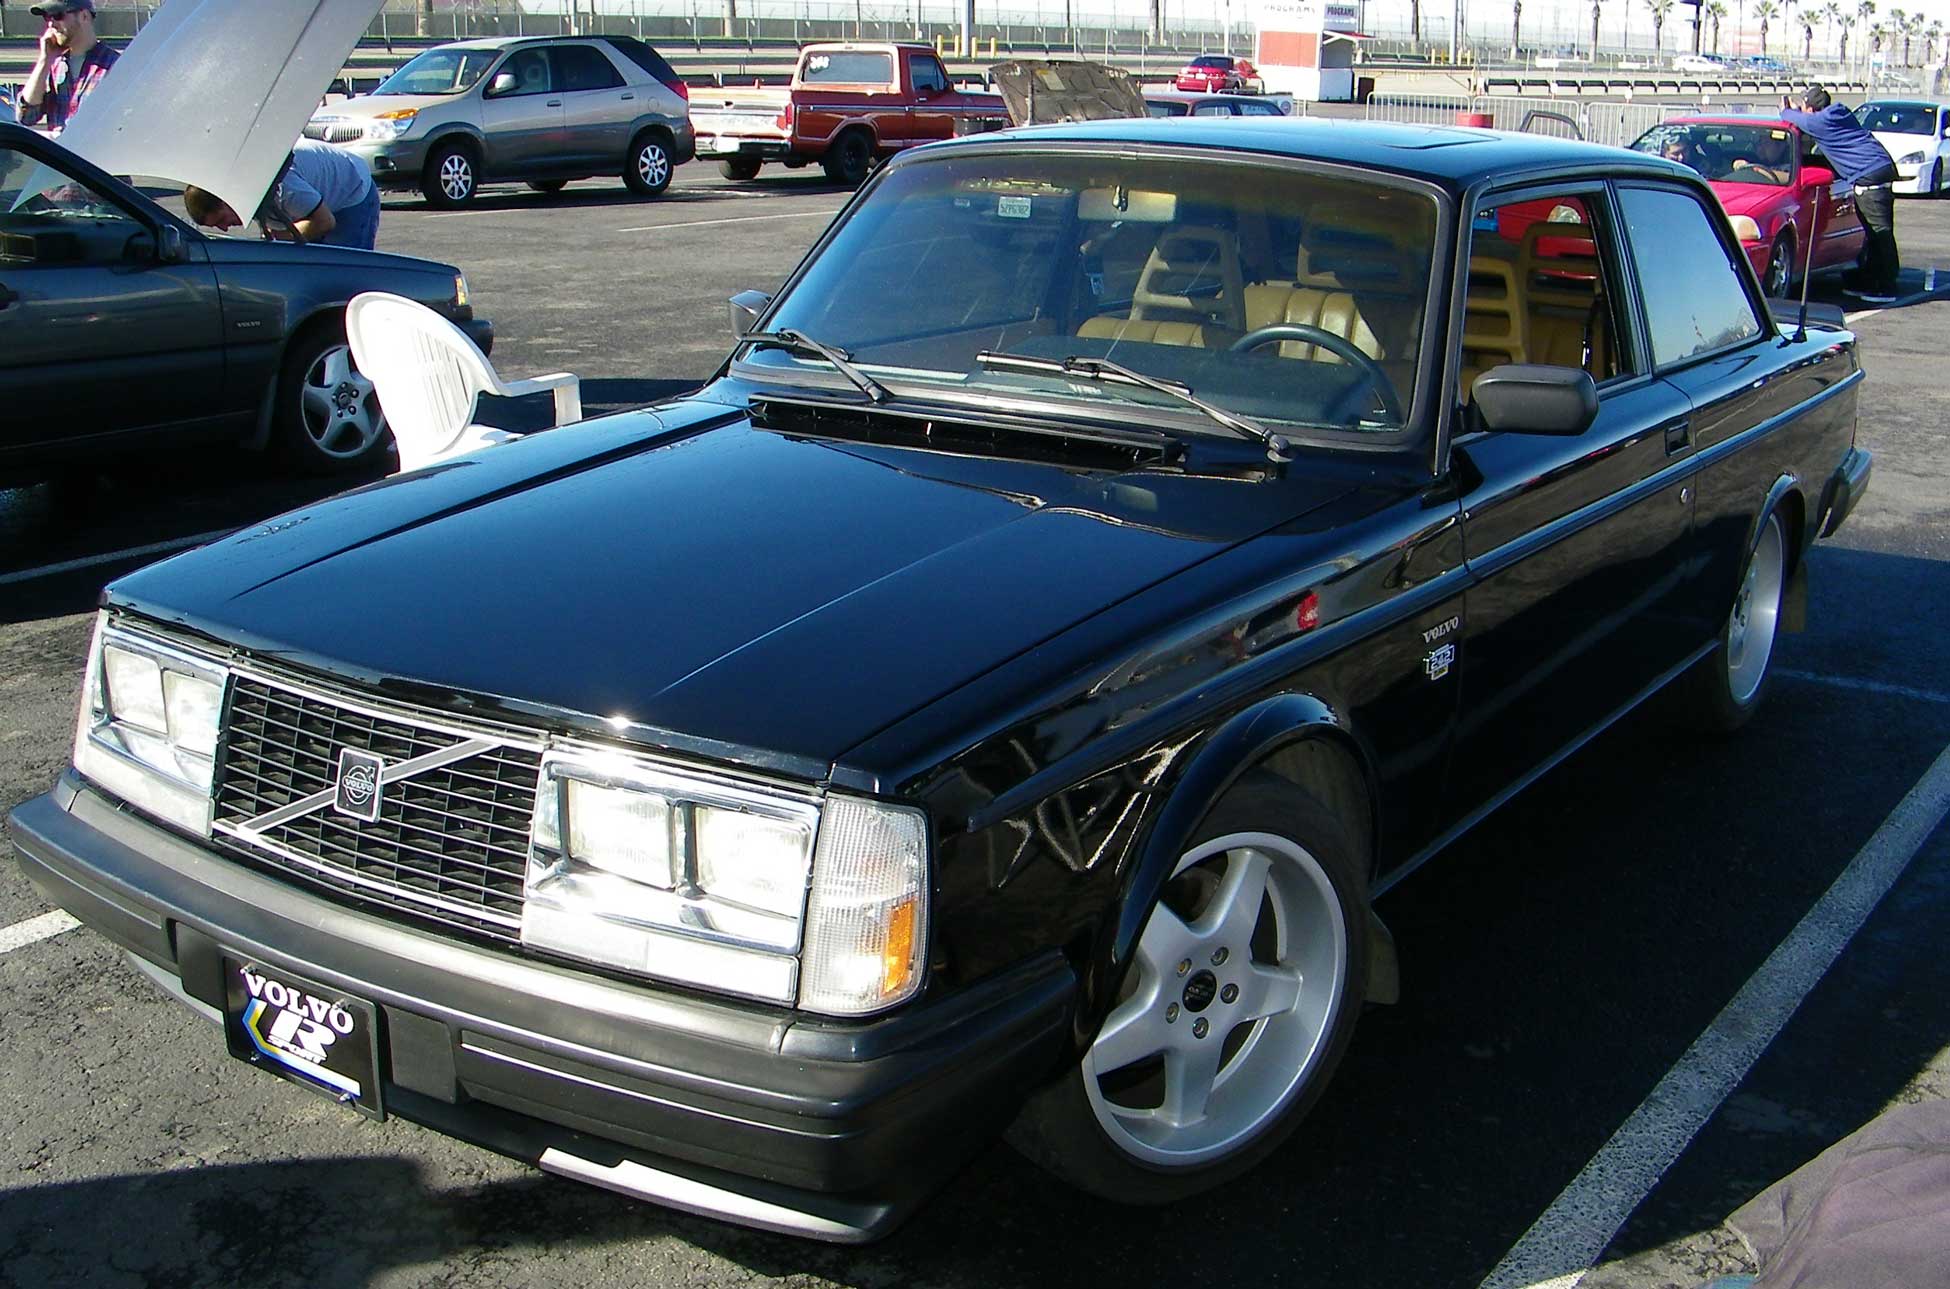 |
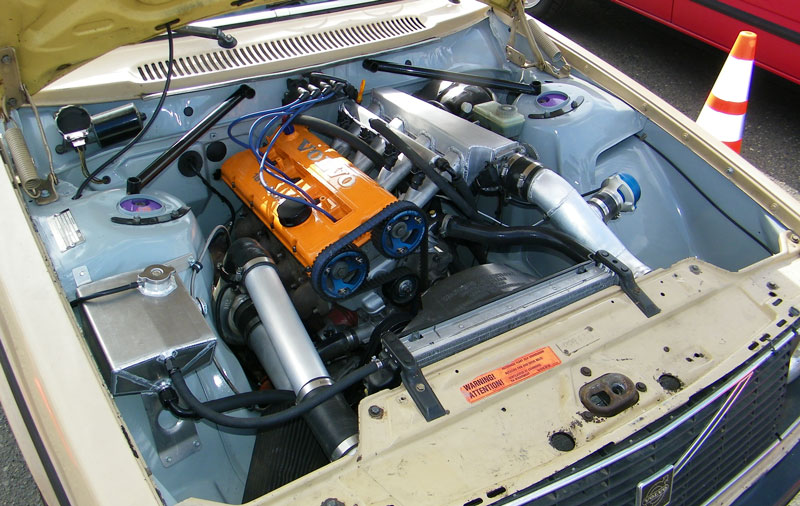
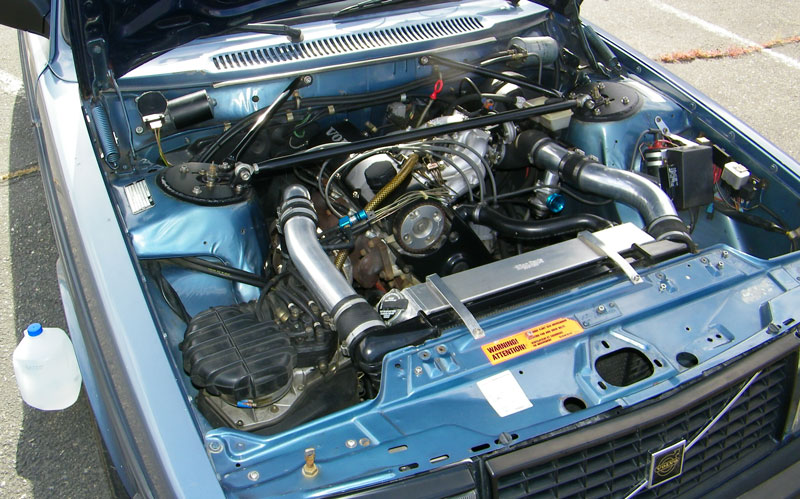
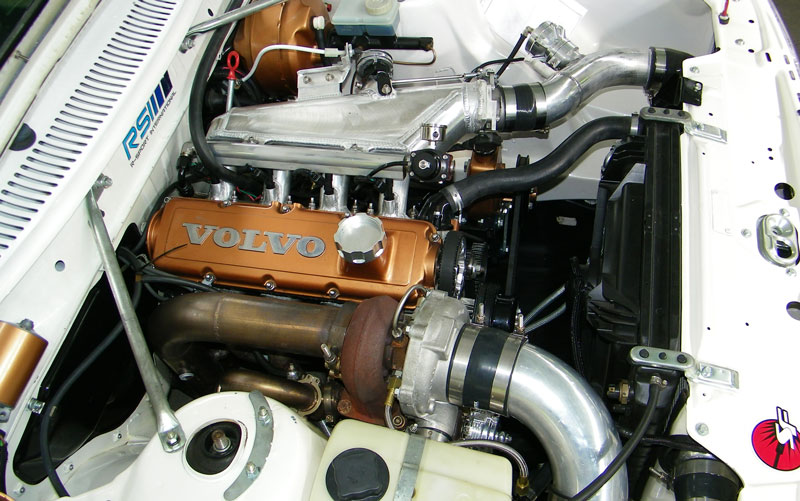
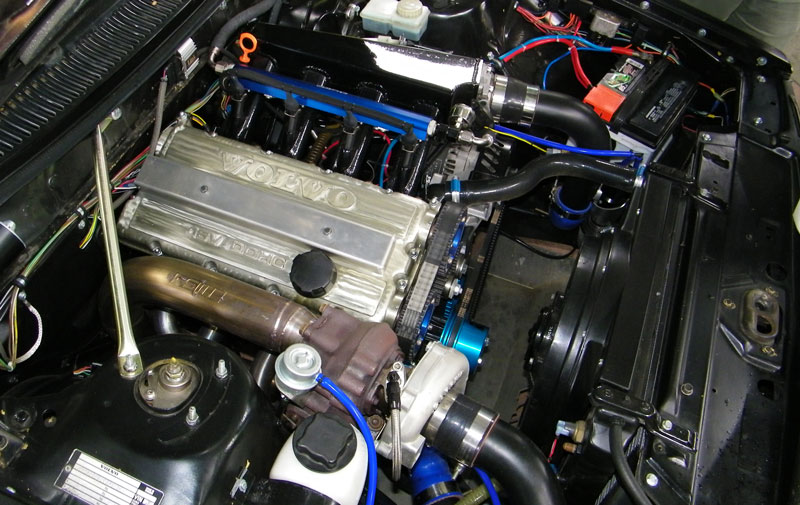
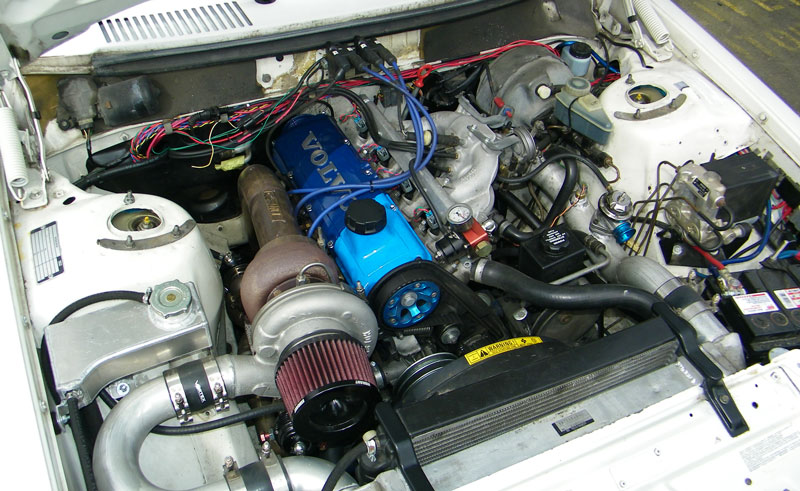
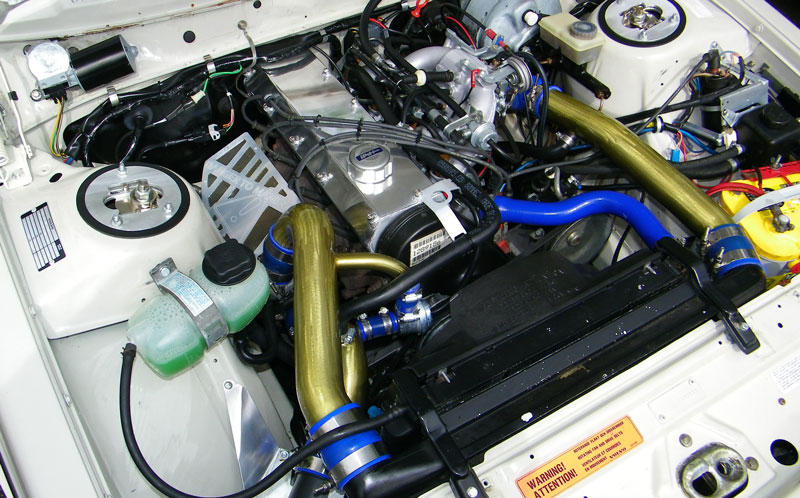
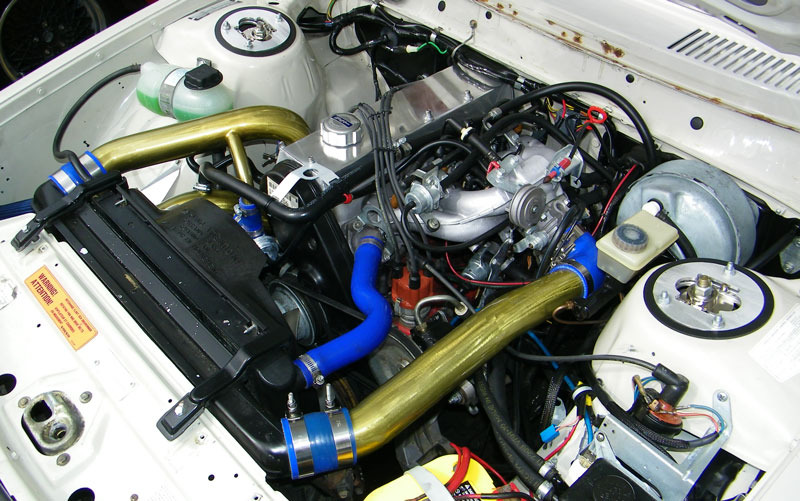
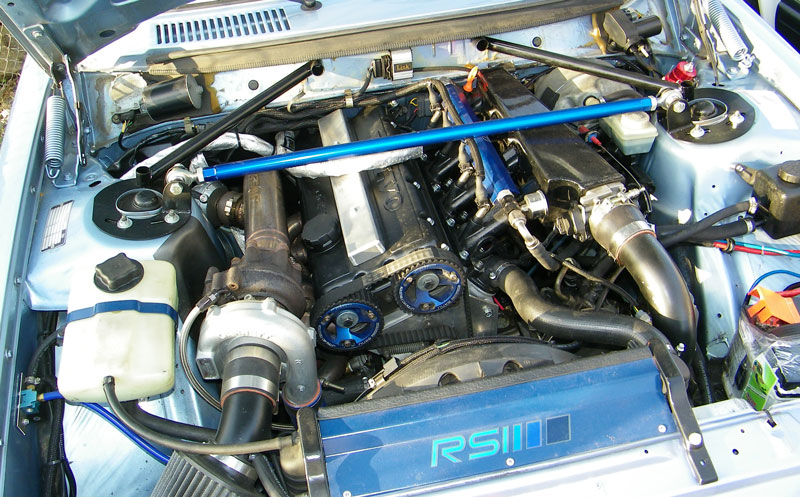
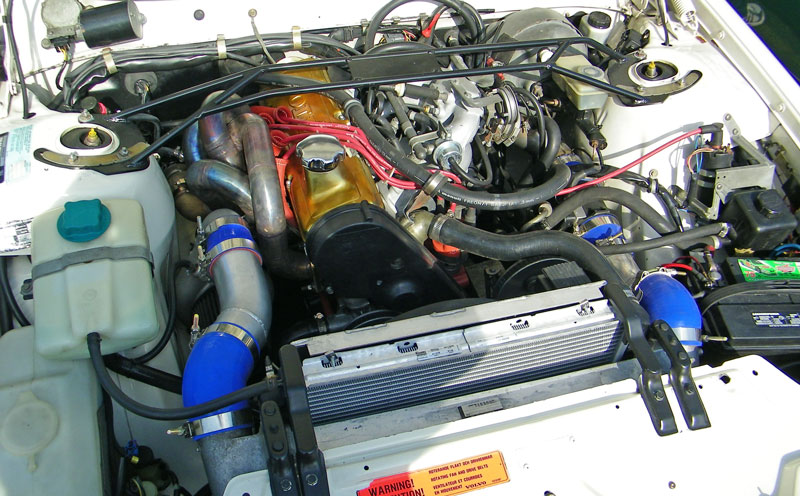
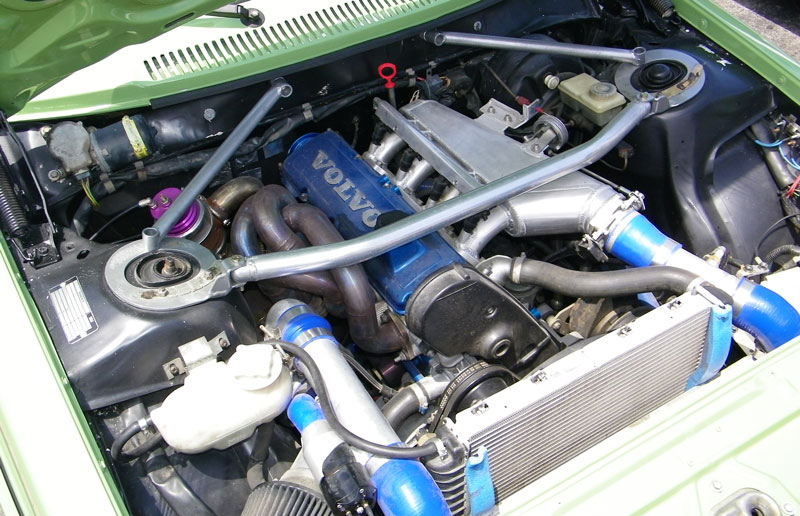
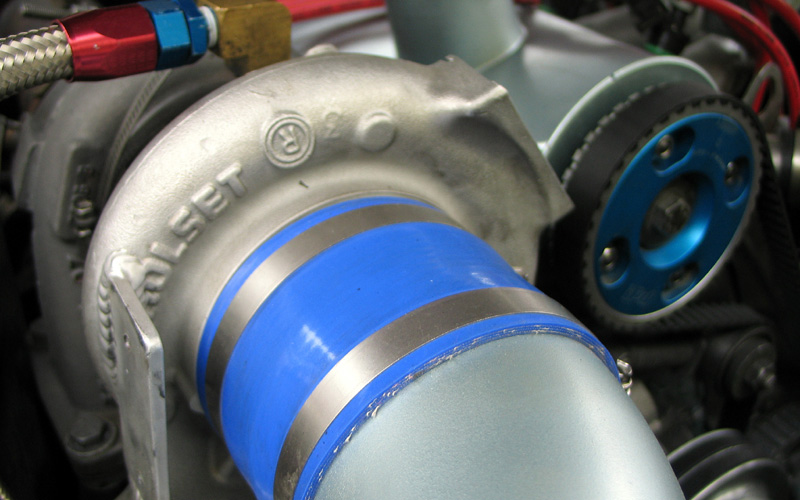
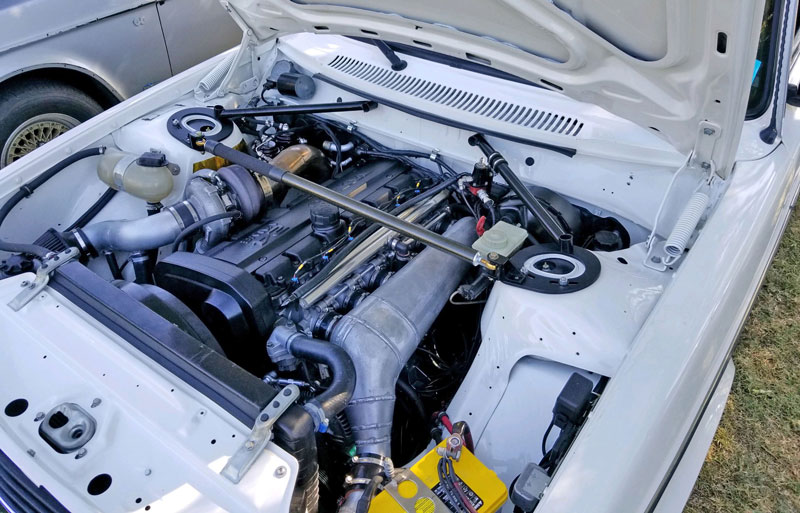
| ENGINE The engine in my 240 Turbo is still the original B21FT, but a few added features have crept in over the years. The original K-Jet fuel injection served me fairly well for years, but it has limits if you want better performance. I'm now using SDS EFI programmable fuel injection and programmable ignition. More info on my SDS EFI installation HERE. SDS EFI is in Canada and they may be found at: http://www.sdsefi.com.  I installed a Mitsubishi TD04HL 15G turbo (which I pulled from an 850R Turbo in a salvage yard). The 15G is mounted on a later (1990+) exhaust manifold. A turbo like this is much more responsive on a small engine with low compression like the B21FT (which has a compression ratio of only 7.5:1). The original Garrett T3 turbo was much slower to respond. Adapting a Mitsubishi turbo is not overly difficult and there's good basic info here: turbobricks.com/td04-turbo-guide.359871/ turbobricks.com/how-to-setup-a-15g-for-rwd.83929/ For comparison, here's an old pic of the original Garrett T3 turbo. 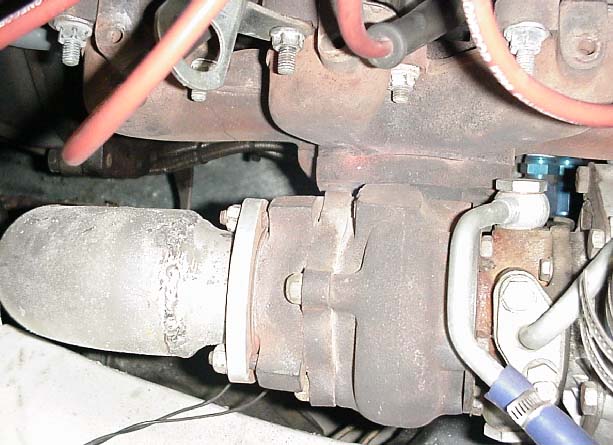 |
| 3 INCH EXHAUST If you're interested in how my 3 inch exhaust system was made, I've created a 240 Exhaust Page with those details. 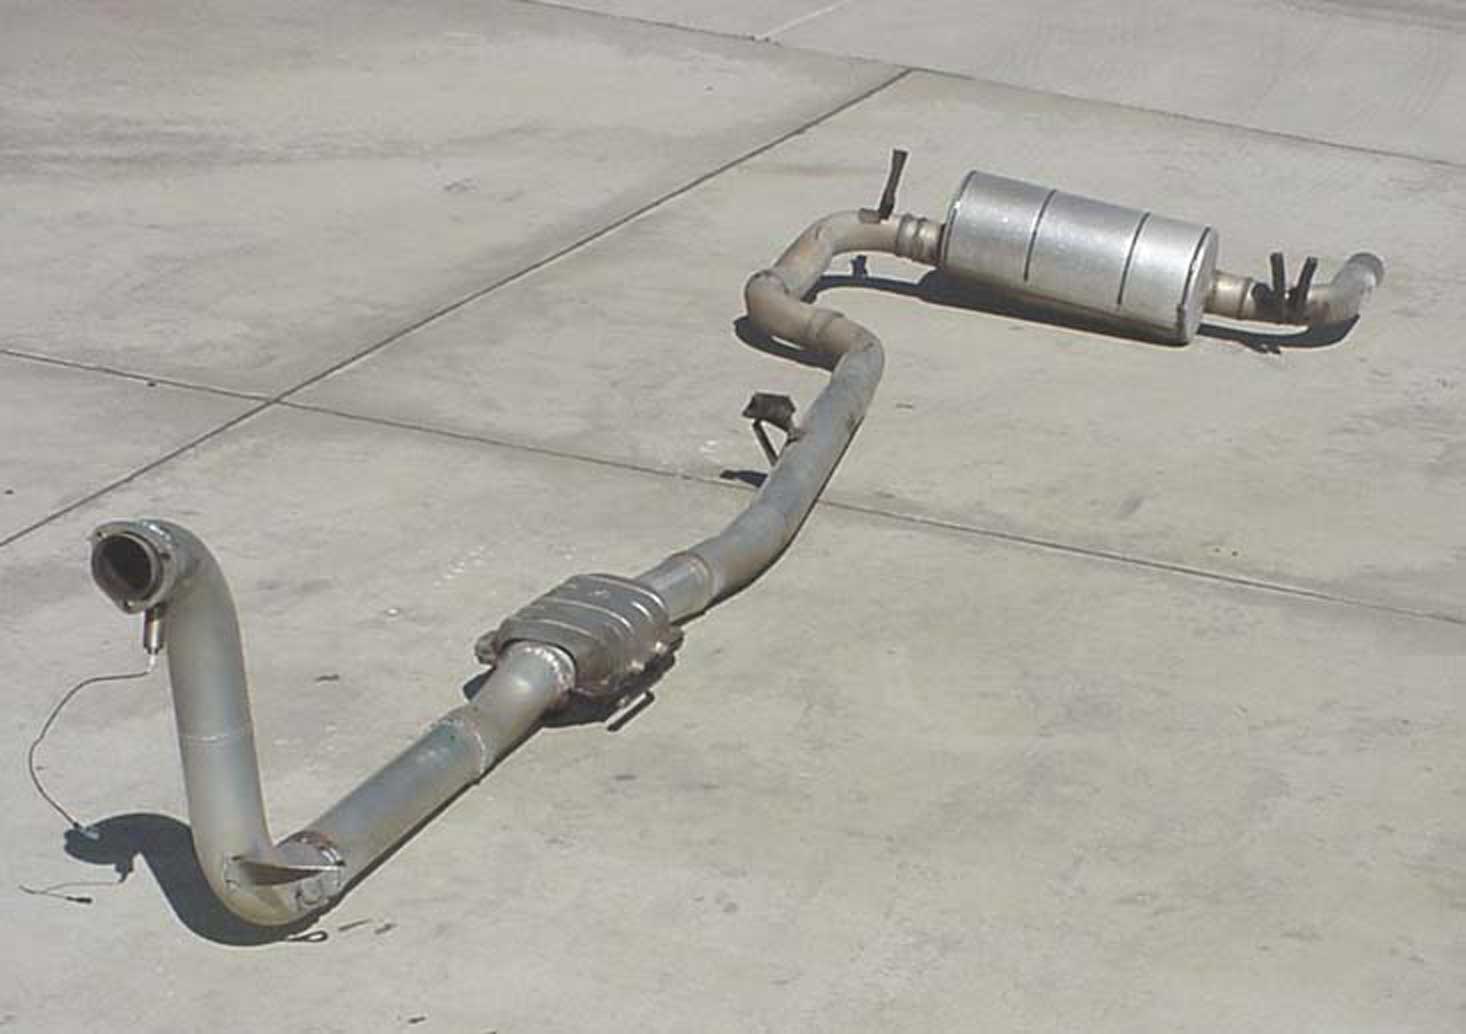 |
| Later I decided to go old-school on the front grill and
lights. I changed it to these round headlights, which came on a 1980 or earlier 242. If you want more info about different headlights used on the 240 over the years, I have lots of that info in my Headlight Page: https://www.240turbo.com/headlight.html.  |
I added these "GT style" driving lights in the grill in 2011. Those are NOT standard 242 GT fog lights. Those are actually larger off-road driving lights. They're larger top to bottom than 242 GT fog lights, so to make room, I carefully enlarged
the fog light buckets from a GT grill and fitted
the larger off-road lamps. They light up the night like the sun!
That's very useful on long, dark roads when on long road-trips. 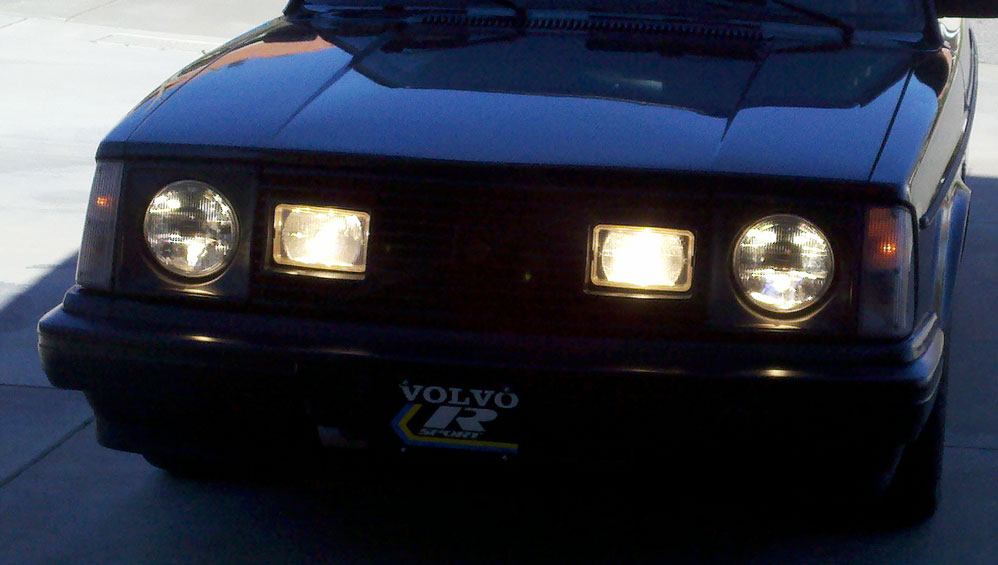 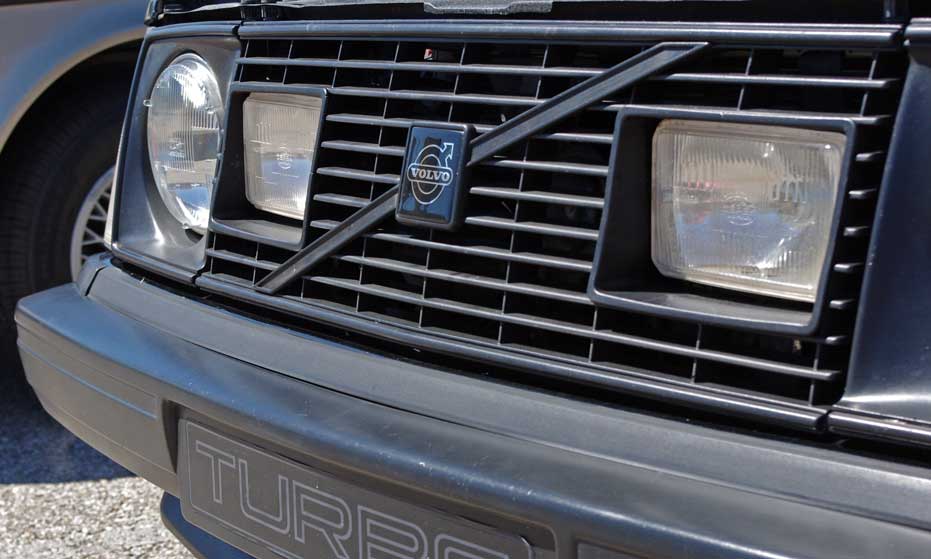 |
|
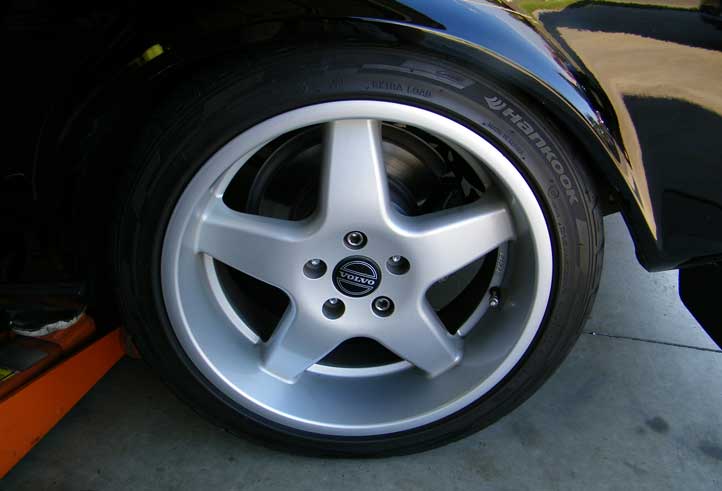
In
2012 I decided it was time for some different wheels.
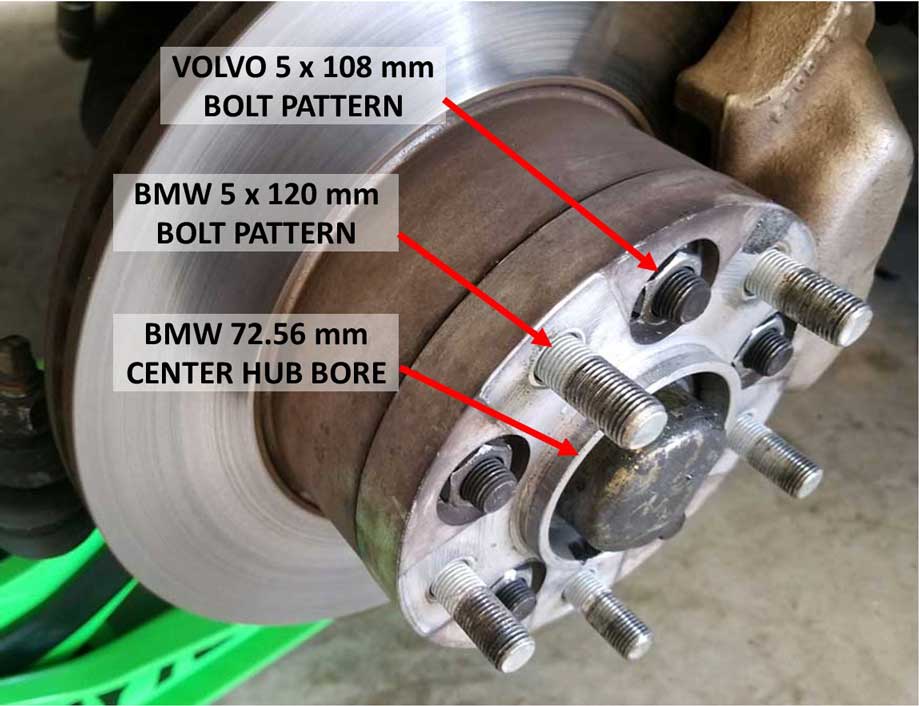
By 2012 the Eikers had been on my car for 8 years. They're very nice wheels and I still think they look good, but when I originally bought them there were almost no other Volvos with them. After a few years, they became very popular and a lot of 240s had them, so I wanted a change to something else I wouldn't see on so many other 240s at every Volvo meet I attended. 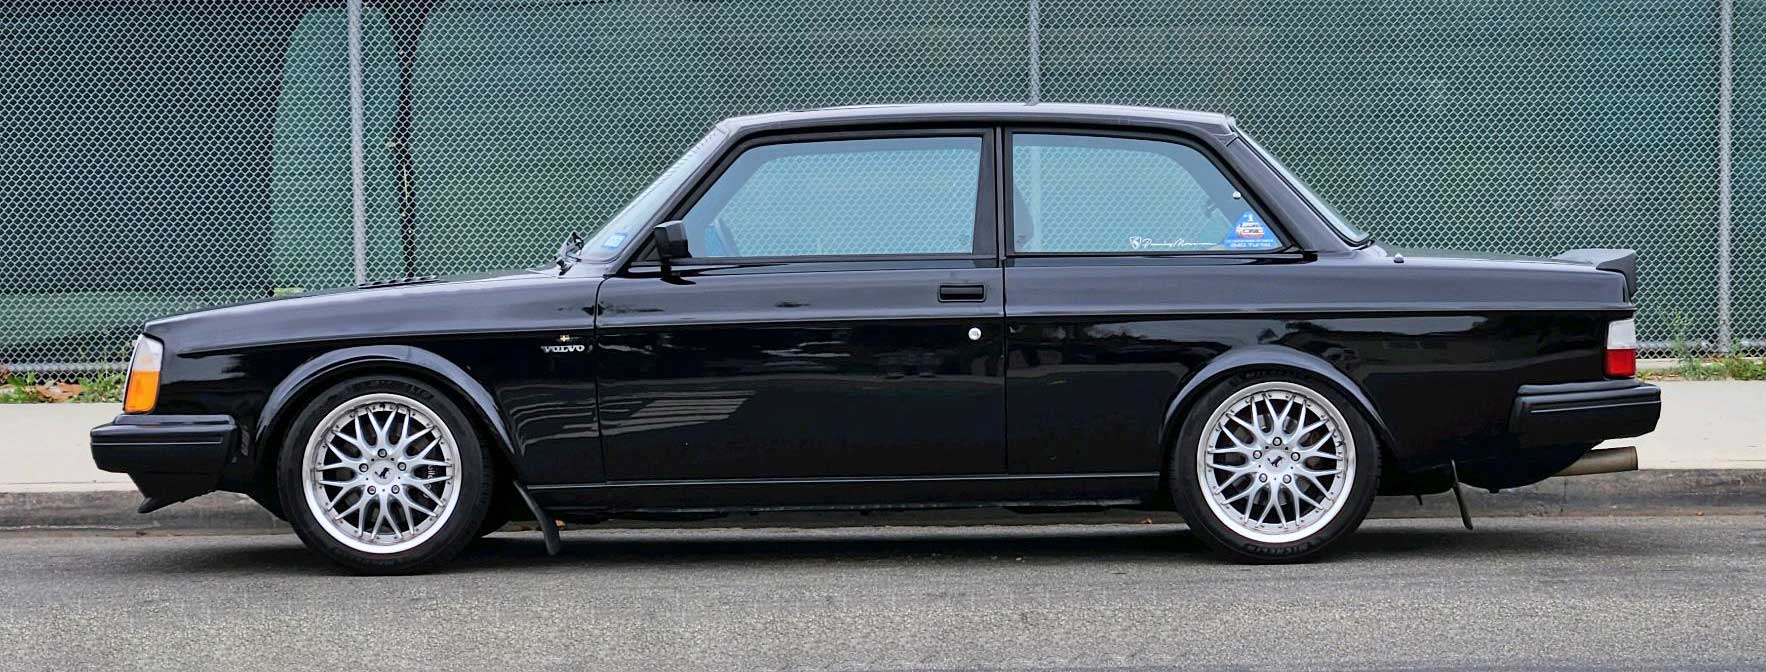 I have always loved the look of BBS style mesh wheels, so I thought about looking for a mesh style wheel instead.  These wheels are NOT BBS, but they look nice on my car. I found them on eBay. The size is 17 x 7.5, same size as the Eikers, but these wheels have a BMW bolt pattern. BMW bolt pattern: 5 x 120 mm, with 72.56 mm hub center bore. These wheels have a 35 mm positive offset. Standard Volvo bolt pattern for 240, 700, 800, and 900: 5 x 108 mm, with 65.1 mm hub center bore. I had some hub-centric billet adapters custom made by http://www.motorsport-tech.com. More on the adapters below. The tires shown above are 235/40-17 Goodyear Eagle F1. If you fit a tire this wide on the rear of a lowered 240, you WILL absolutely be trimming or pounding some of the inner rear fender metal to make more room. The back half of the INNER rear arch will rub on a wide tire on bumps. If the car is lowered, it'll rub even more on bumps. I have created an article in my 240 Mods Page on how I made clearance for these tires on my 240: HERE: https://www.240turbo.com/volvo240mods.html#rearwheelclearance. |
| WHY DID I CHOOSE A BMW BOLT PATTERN WHEEL? The reason I decided on a BMW bolt pattern with custom adapters is because there are MANY more wheel styles to choose from for a BMW bolt pattern than for a Volvo 240. So shopping for something I liked was so much easier. Nowadays adapting non-Volvo wheels can sometimes also be done by using custom re-drilled front 240 hubs instead of adapters. This option is offered in a limited way at https://www.bneshop.com/. Re-drilling a 240 hub from original 5 x 108 mm is limited to certain bolt patterns only due to the small outside diameter of the Volvo hub. Unfortunately, a BMW bolt pattern of 5 x 120 mm is too large to be drilled into a 240 front hub. These 17 x 7.5 wheels have a 35 mm positive offset. I chose 20 mm thick FRONT adapters. The 20 mm adapter in front put the wheels in a good position between the strut housing and fender. Since these wheels have a 35 mm positive offset, adding a 20 mm spacer changes the final FRONT wheel offset to 15 mm positive. The REAR adapters are 40 mm thick. Since these wheels have a 35 mm positive offset, adding a 40 mm spacer changes the final REAR wheel offset to 5 mm NEGATIVE. Adding these 40 mm adapters in the back pushed the wheels OUT about 20 mm toward the outer rear fender than a stock looking 240. These specs worked nicely for me, considering the rear inner fender sheet metal work I had already done years earlier, seen here: https://www.240turbo.com/volvo240mods.html#rearwheelclearance. SELECTING WHEEL ADAPTERS I've been told that most custom wheel adapter makers will tell you their minimum recommended adapter thickness is somewhere between 20 and 30 mm. Motorsport-tech.com told me their minimum thickness is usually 19-20 mm. The wheels you choose will need the right offset to compensate for your adapter thickness and wheel offset. Also keep in mind that a wider front wheel or tire may also move inside of the wheel/tire to the front strut tube, so make sure you have a look at that clearance too. The best place to begin is carefully measuring all these clearances with your existing wheels first. Then plan carefully for things moving outward, etc. 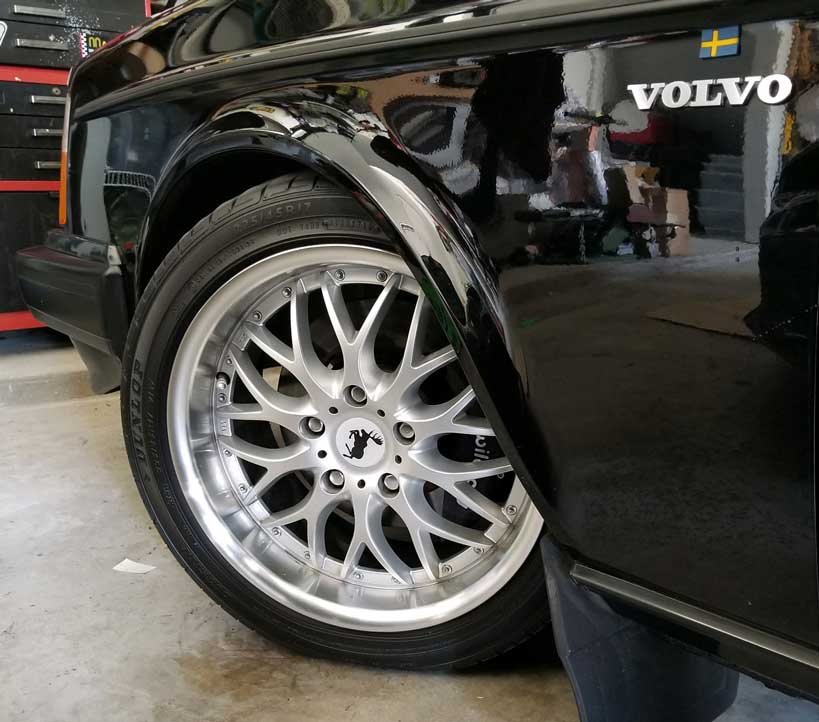  I put some more info together on calculating wheel offset for a Volvo 240 here: https://www.240turbo.com/volvo240mods.html#wheeloffset 
|
FRONT ADAPTER DETAIL
 Here's a pic of the front 20 mm thick adapter/spacer bolted in place. |
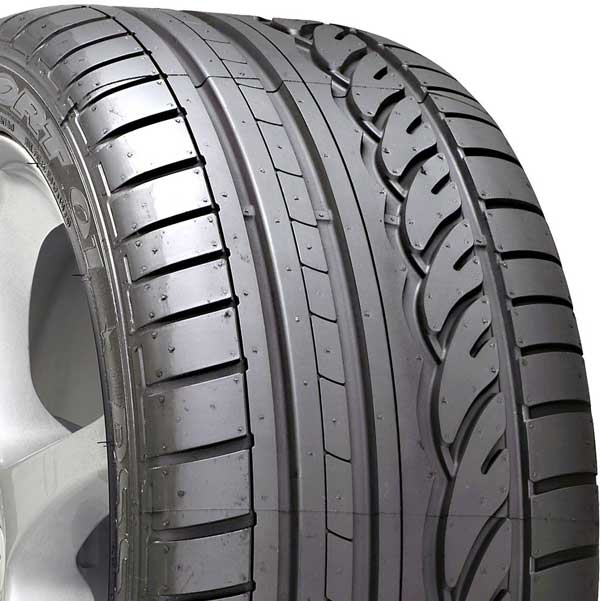 <<< In 2019 I changed the tire size to 225/45-17, since I could no longer find the previous 235/40-17 size in a tire I liked. These new ones were Dunlop SP Sport 01,
an aggressive Ultra-High Performance Summer tire with a softer rubber compound. They had great
reviews and I have always been very happy with Dunlop performance tires
in past years.These tires gripped exceptionally well on dry pavement, however these tires are NOT WELL RATED IN THE RAIN. <<< In 2019 I changed the tire size to 225/45-17, since I could no longer find the previous 235/40-17 size in a tire I liked. These new ones were Dunlop SP Sport 01,
an aggressive Ultra-High Performance Summer tire with a softer rubber compound. They had great
reviews and I have always been very happy with Dunlop performance tires
in past years.These tires gripped exceptionally well on dry pavement, however these tires are NOT WELL RATED IN THE RAIN. In my experience, HEAVY RAIN at highway speed was definitely SCARY. So I got something else in 2023. |
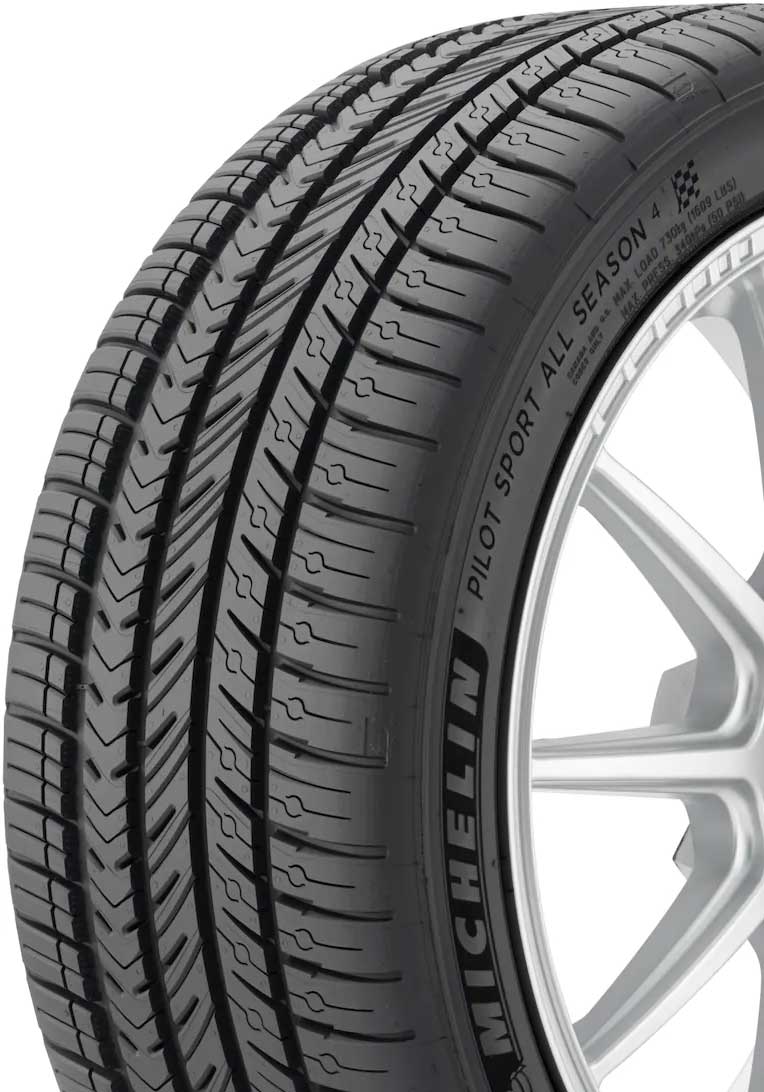 <<< In 2023 I changed to Michelin Pilot Sport All Season 4. These are classified as Ultra-High Performance All Season tires. I chose the same size as the last tires: 225/45-17. I picked these because I wanted something that could do better in a heavy rain storm. These are rated
extremely high in the rain and soon after I bought them I found myself
in a heavy downpour at freeway speeds. They were great! <<< In 2023 I changed to Michelin Pilot Sport All Season 4. These are classified as Ultra-High Performance All Season tires. I chose the same size as the last tires: 225/45-17. I picked these because I wanted something that could do better in a heavy rain storm. These are rated
extremely high in the rain and soon after I bought them I found myself
in a heavy downpour at freeway speeds. They were great! These were a much better choice. |
|
|
|
WHAT DID I DO FOR A SPARE TIRE?
I kept the original Volvo spare in the trunk for a number of years after installing the BMW bolt pattern wheels. I
began thinking that if I actually had to USE that Volvo spare, I would have
to remove a wheel adapter first. So I decided to look for a spare wheel with
a BMW bolt pattern.
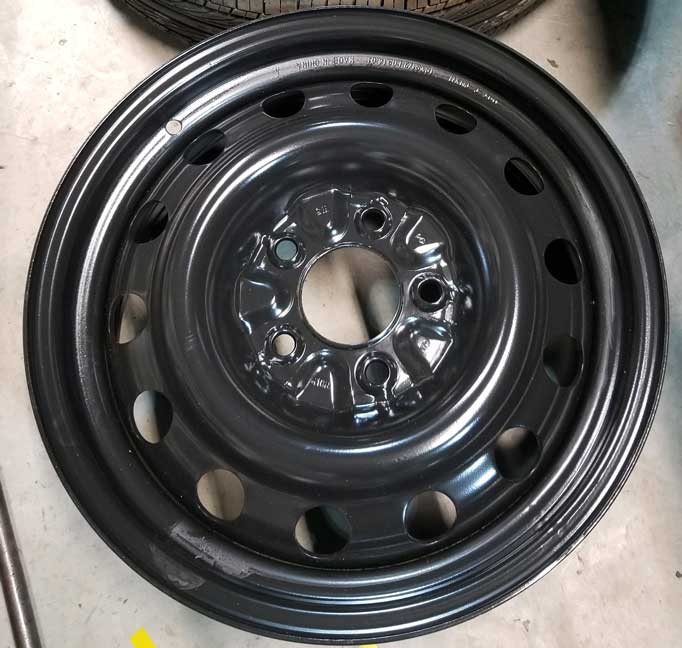
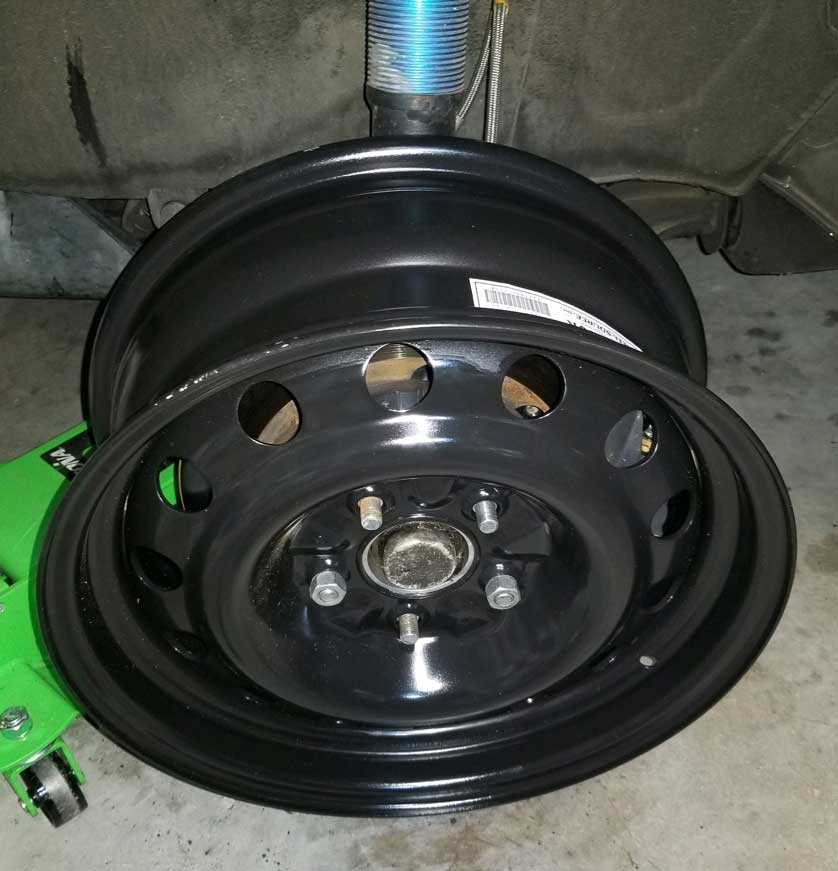
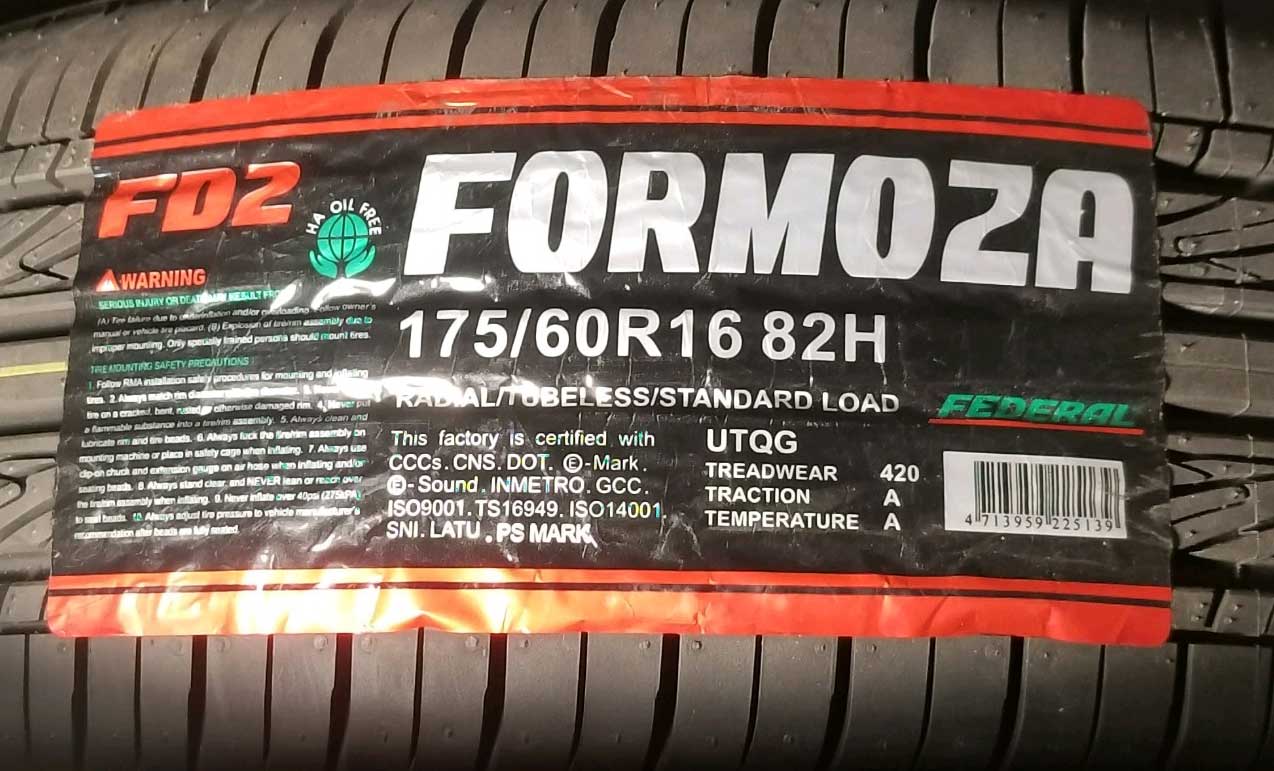
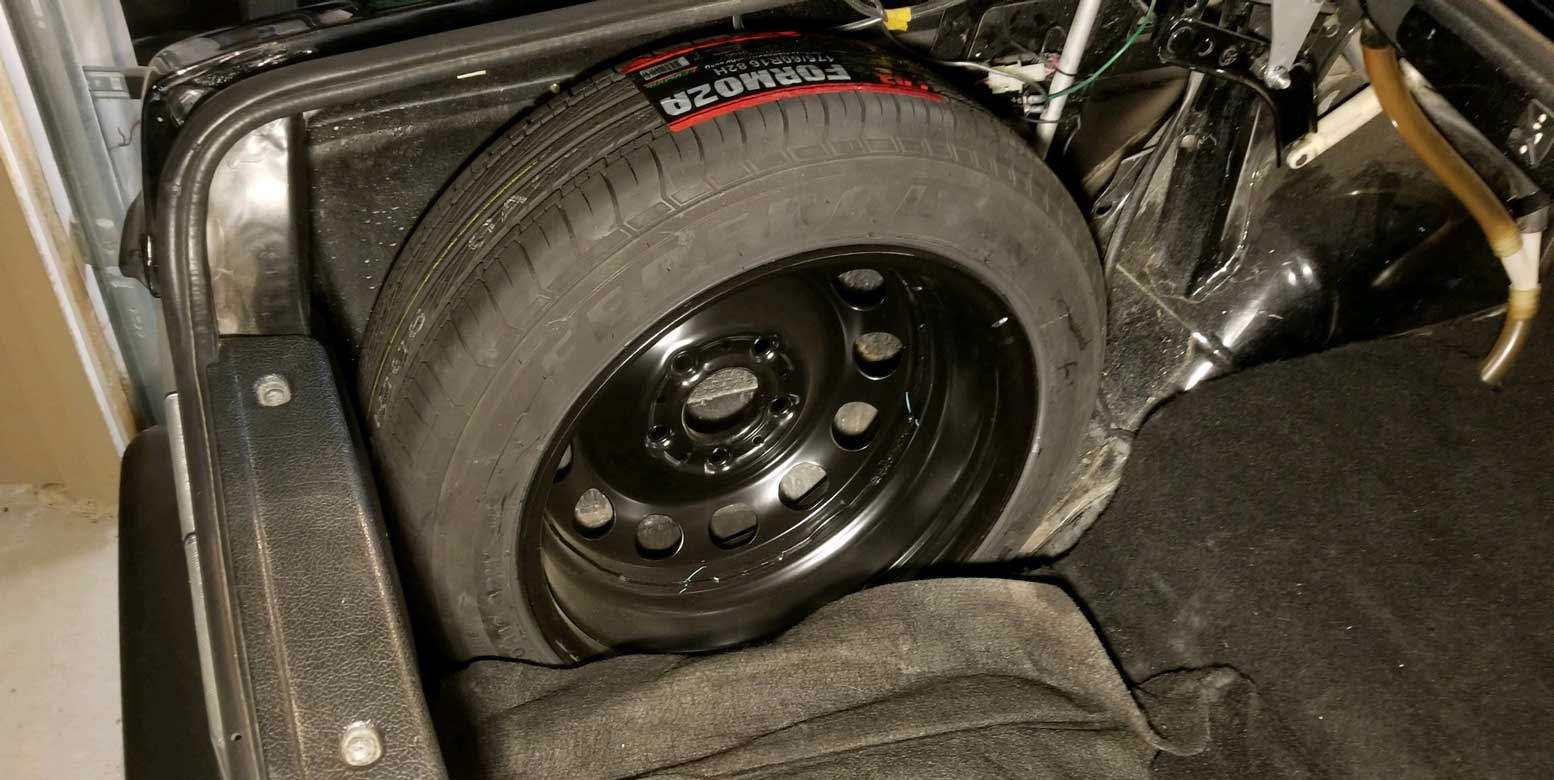
I wanted a wheel larger than 15 inches, closer to 17 inches if possible (like my current wheels), because I wanted it to clear my larger front brakes (and IT DOES). I wanted the spare tire diameter to be fairly close to the same diameter as the 225/45-17 tires I have (24.9 inches tall). And the spare tire would ultimately need to be narrow enough to fit inside the spare tire well in the trunk. Plus I really wanted a NORMAL tire, not a stupid space-saver temporary spare. And it needed to be inexpensive. It wasn't easy finding a wheel I liked, since many BMW wheels are much wider than I wanted (many are 8 to 10 inches wide). I would have preferred a 17 inch wheel with a 6 or 6.5 inch width. I found a couple like that, but then I searched for an appropriate 17 inch tire. I was disappointed to discover I could NOT find an appropriate 17 inch tire. I found that no one made a 17 inch tire narrow enough to fit a 6.5 inch wheel, yet tall enough to be close to 24.9 inches. Try searching yourself. 17 inch sizes seem to begin at 195/50 and it stays in low profiles, unless you want a really, really TALL SUV space saver tire. A 195 width tire would be too wide for a 240 spare tire well. So a 17 inch spare was OUT OF THE PICTURE. While searching for wheels, I found lots of USED space-saver spares on eBay. Those all seemed to have a 3.5 or 4 inch width. That's too narrow for me. Plus have you seen how damned expensive used BMW space-savers are on eBay??? They think they're gold plated. Finally I found this new steel wheel on eBay (pictured below). It was $80. Sold by https://www.motorcitycustoms.com. It's a steel wheel, SIZE: 16 x 6.5 inches (BMW 5x120, 72.56 mm center) with an ET (offset) of +32 mm positive. Listed as Part Number X-50610R. Then I found the below Federal tire in size 175/60-16. It was just barely narrow enough to fit nicely in the spare tire well. |
| If you need a 16 inch BMW wheel for a spare like this, I have one extra available CHEAP in my Used Parts Page: https://www.prancingmoose.com/usedvolvoparts.html |
Here are some photos of the wheel and tire I used for my spare. |
       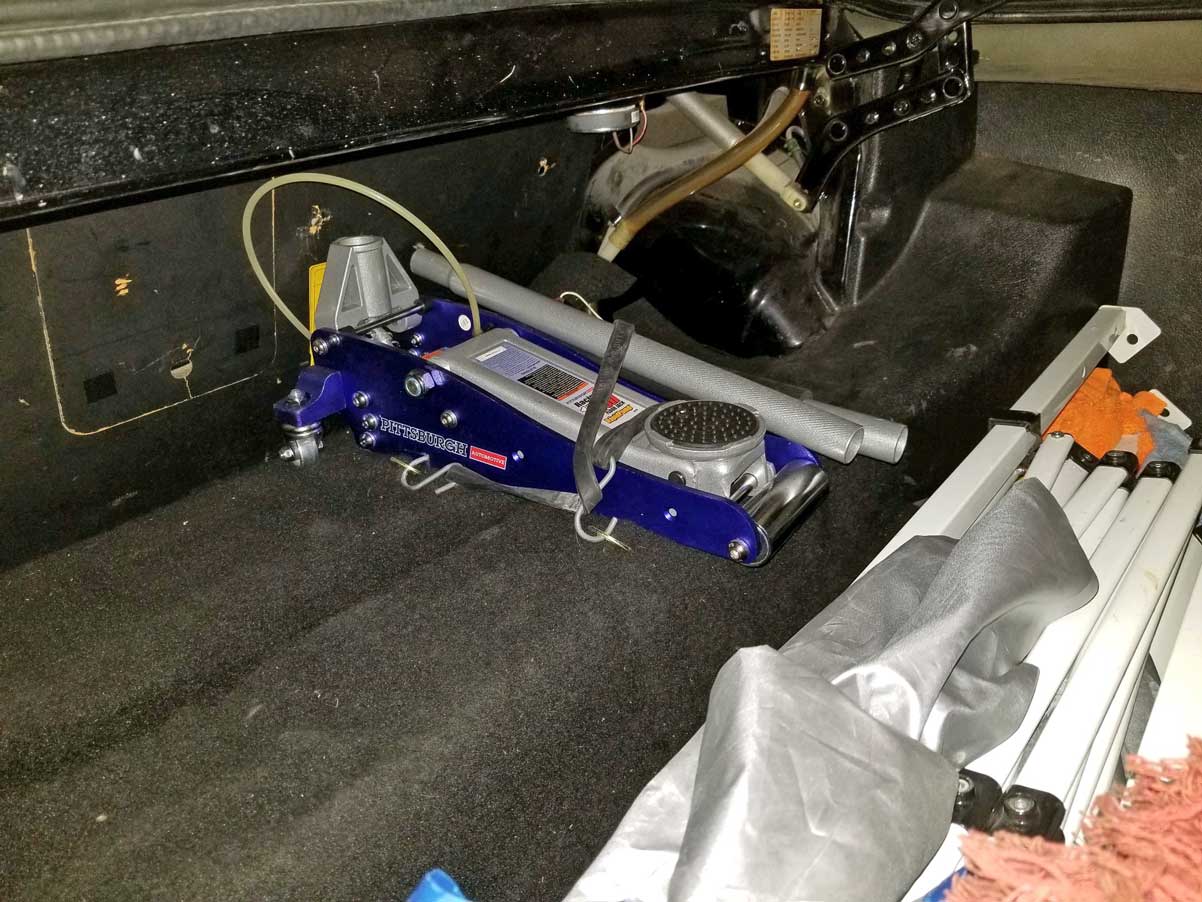 What else is in the trunk? For those long cross-country trips, in addition to a pretty heavy tool bag, I keep a small, lightweight aluminum jack from Harbor Freight in my trunk. It's strapped down using eye-brackets bolted to the floor just behind the rear seat. Lightweight 33 lb. Harbor Freight Jack: https://www.harborfreight.com/15-ton...ack-64545.html |
|
In 2017 I completed a conversion of the AC, using a complete new in-dash system
from Classic Auto
Air.
Sounds pretty
drastic. It was, but it's working so much better than
my old AC ever did before.
32° Fahrenheit vent temps! https://www.youtube.com/watch?v=Mh6E2dmDZfw |
| HOOD VENTS If you're curious about these hood vents, they were originally from a 1986-87 Ford Sierra RS 500 Cosworth from the United Kingdom. These vents were rare and expensive 20 years ago. Even more rare and expensive now. They function very well getting hot air out of the engine bay and they look nice on the Volvo hood. 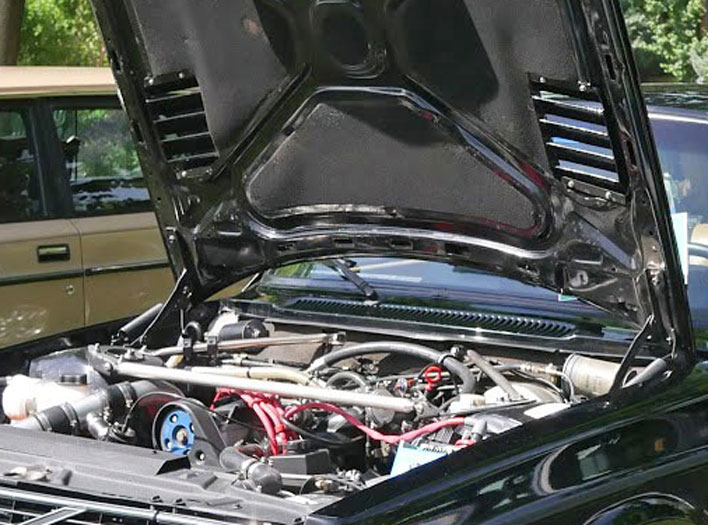  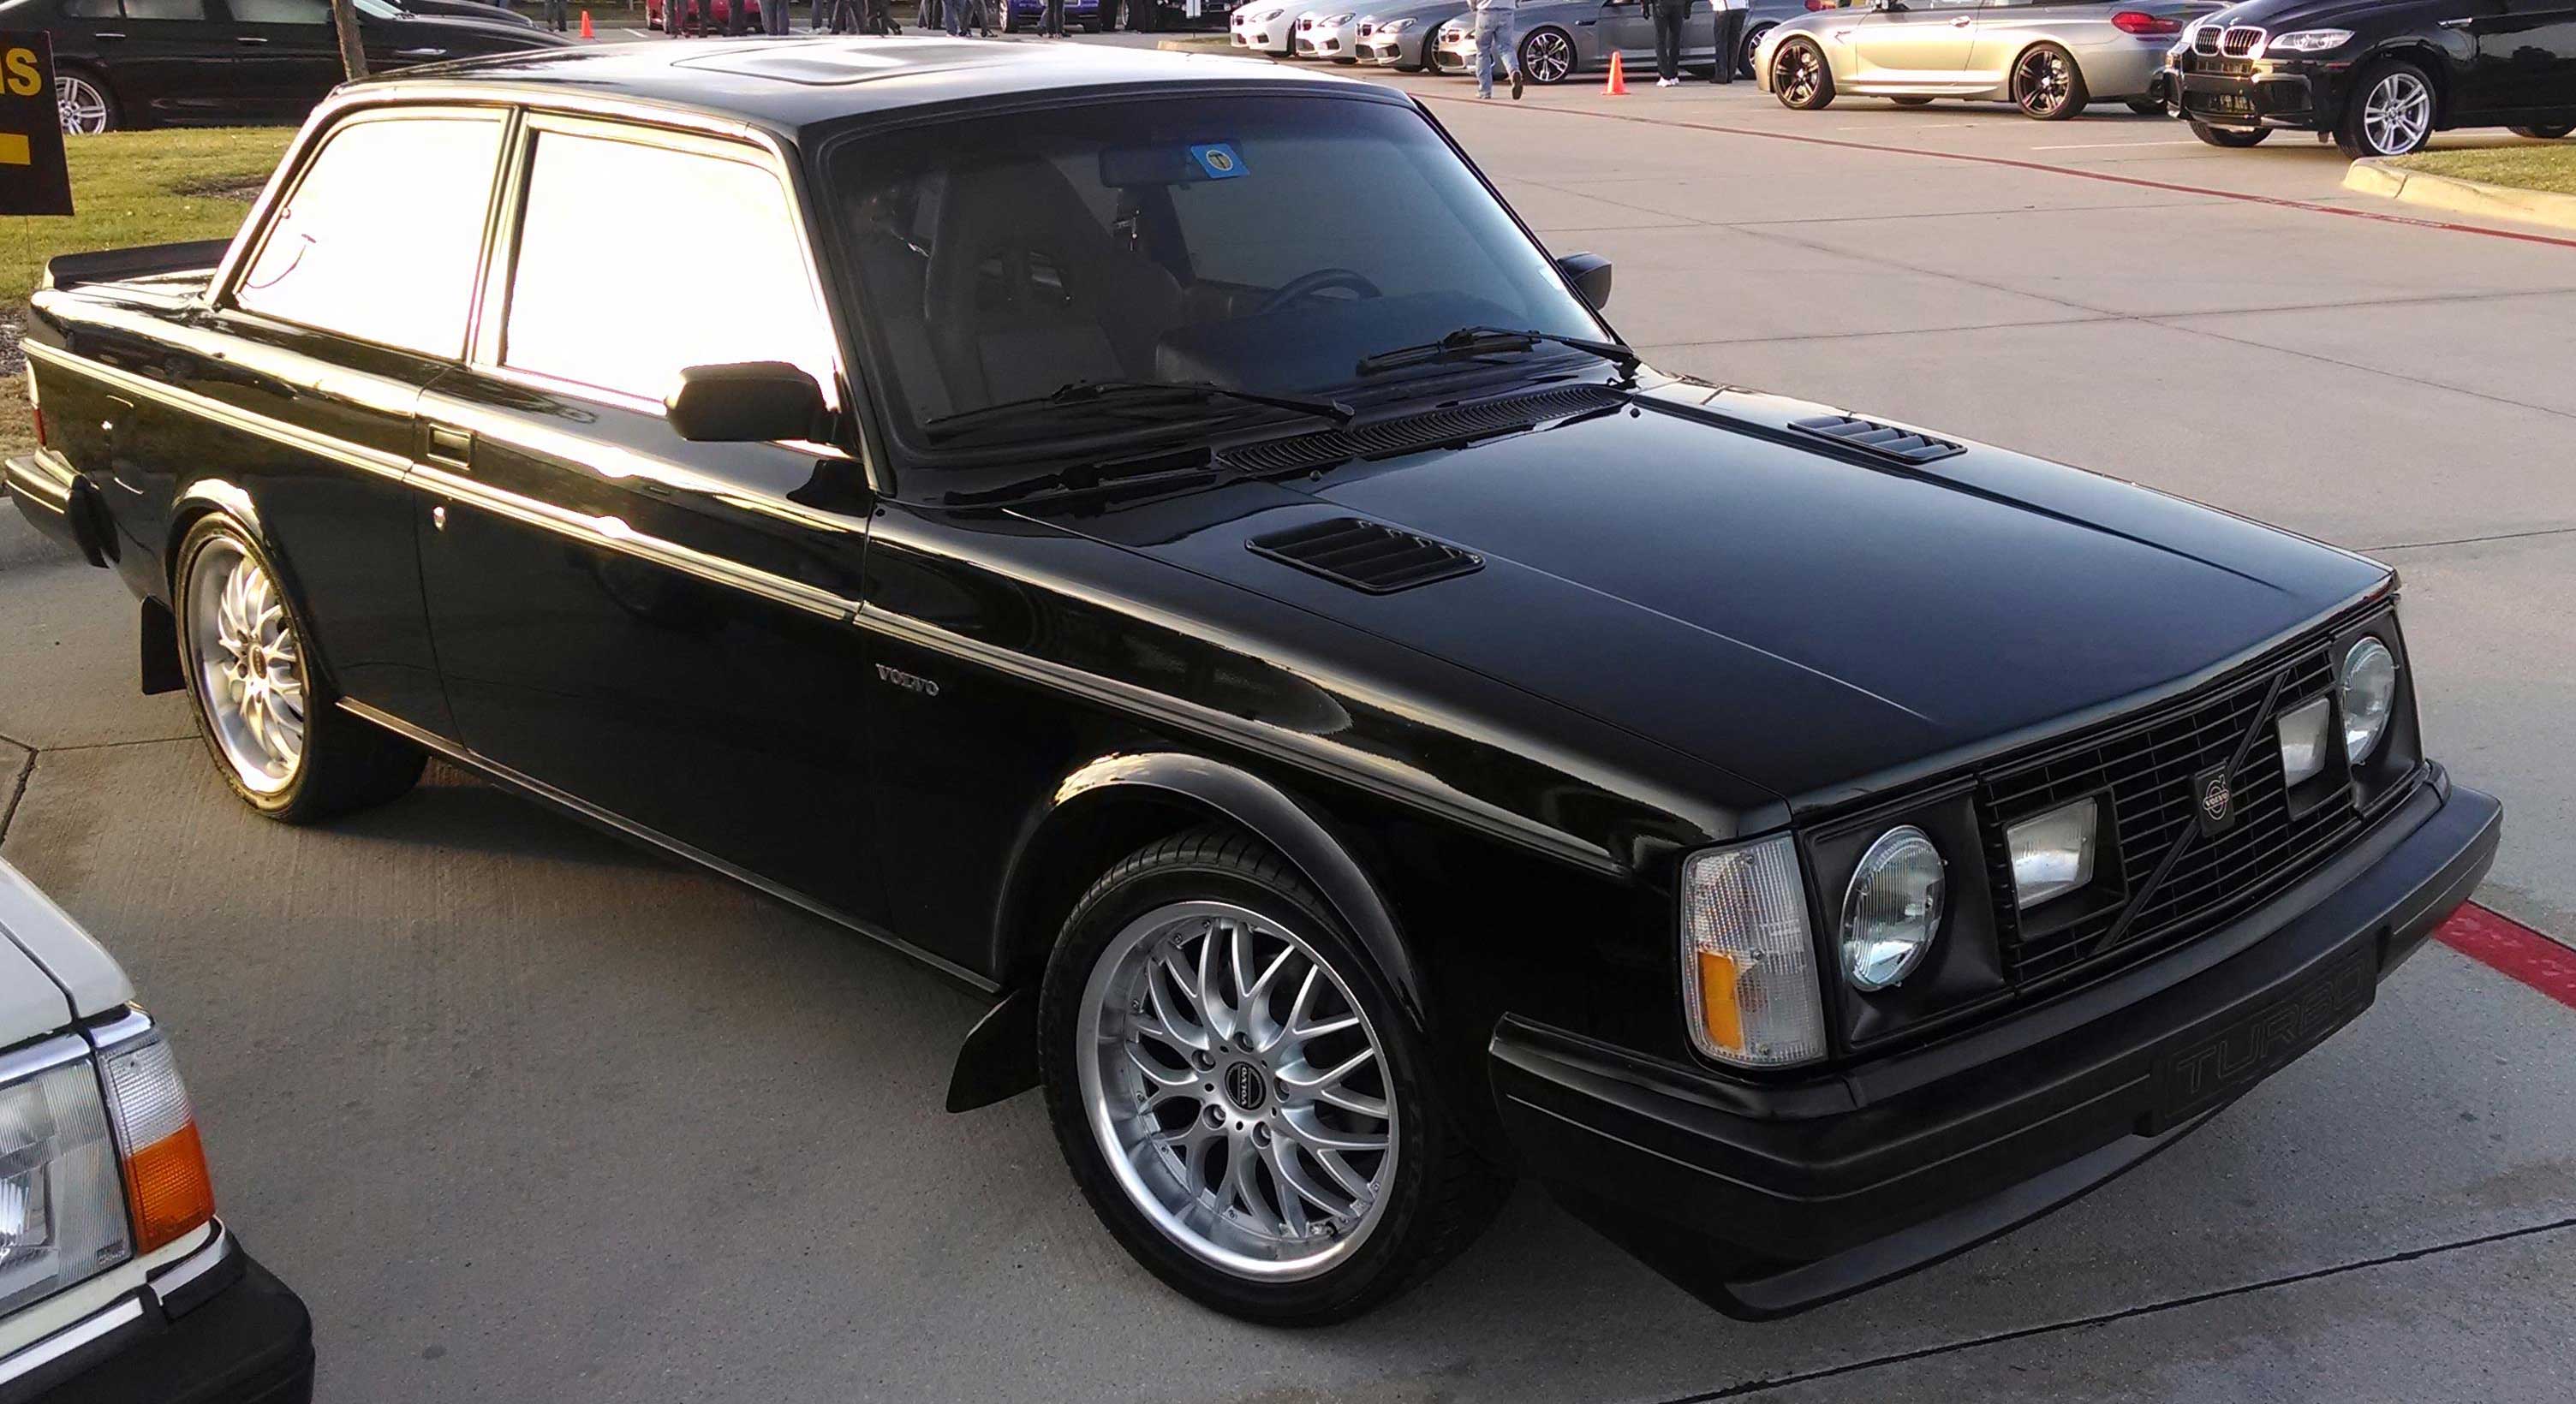 The Sierra Cosworth used these same vents (below), although a bit further forward on the hood. \ 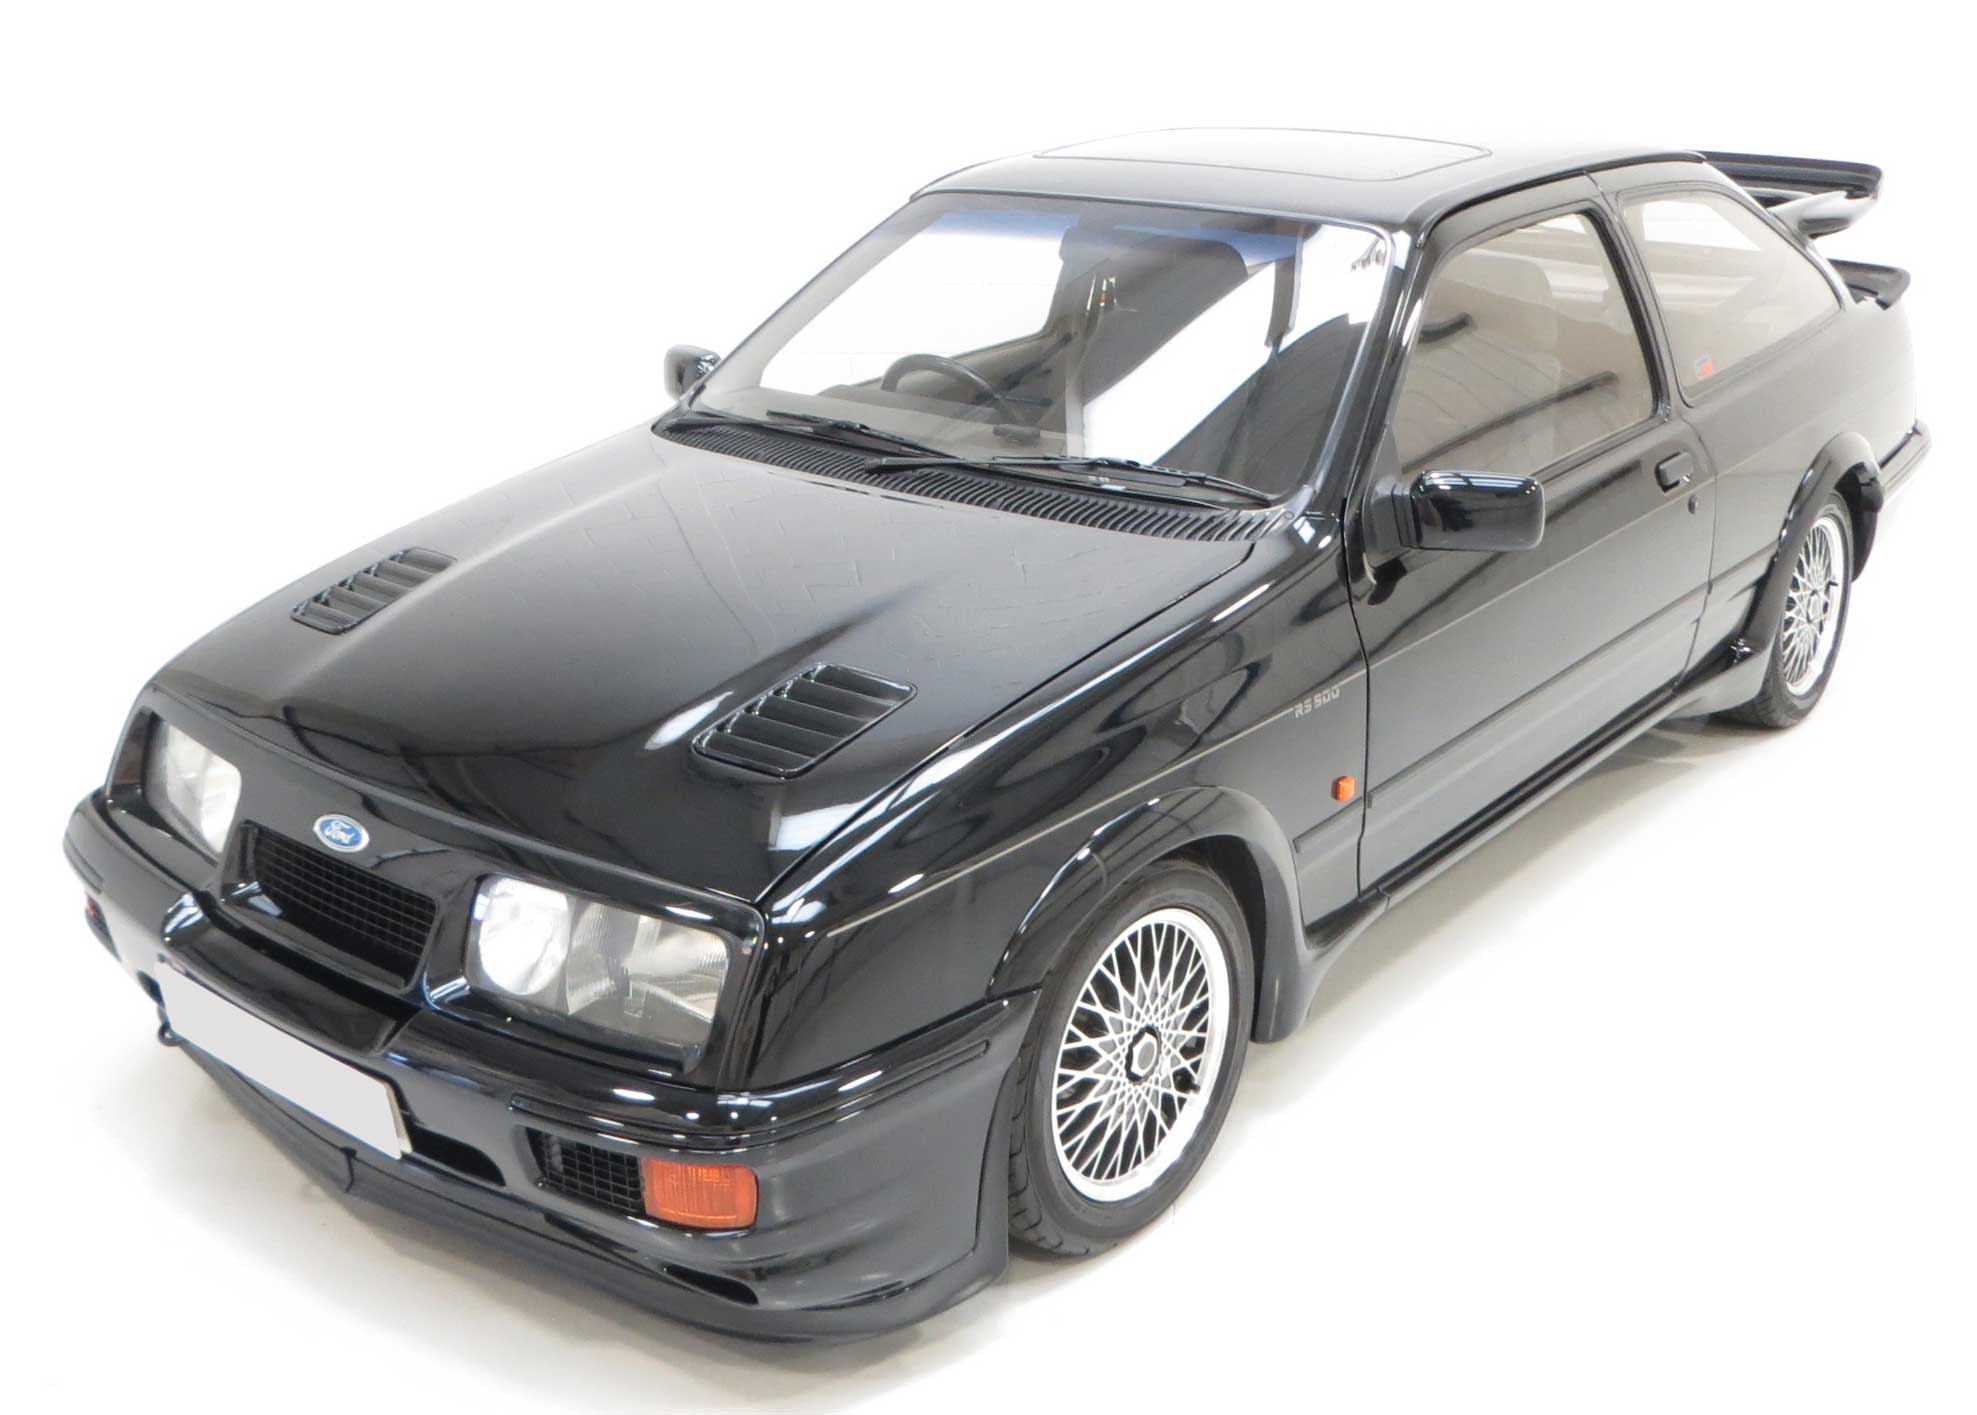 
|
"KOMFORT BLINKER" UPGRADE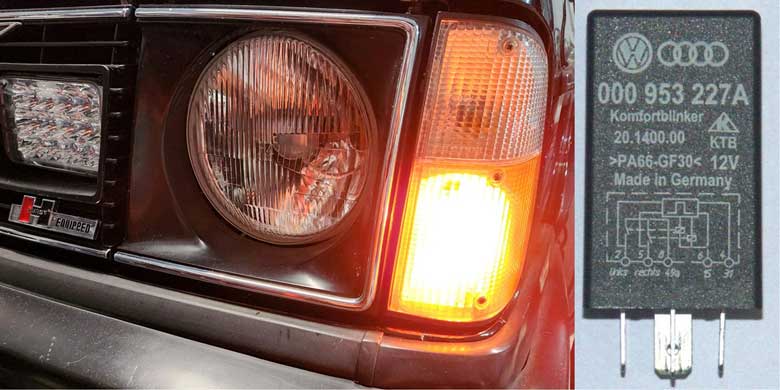 Back in 2010 I drove a late model BMW E60 M5 on cross-country road-trip and I fell in love with the "Komfort Blinker" feature that was then fairly new for luxury German cars. This feature allows you to momentarily tap the turn signal lever left or right and you get three successive blinks or flashes. If you actually use your turn signals when changing lanes, you may appreciate this convenience. I liked this feature enough that I decided to figure out how I could make this relay work for my 240. CLICK HERE for my "Komfort Blinker Page: https://www.240turbo.com/blinker.html |
| GENTEX REAR VIEW MIRROR with compass and outside temperature. 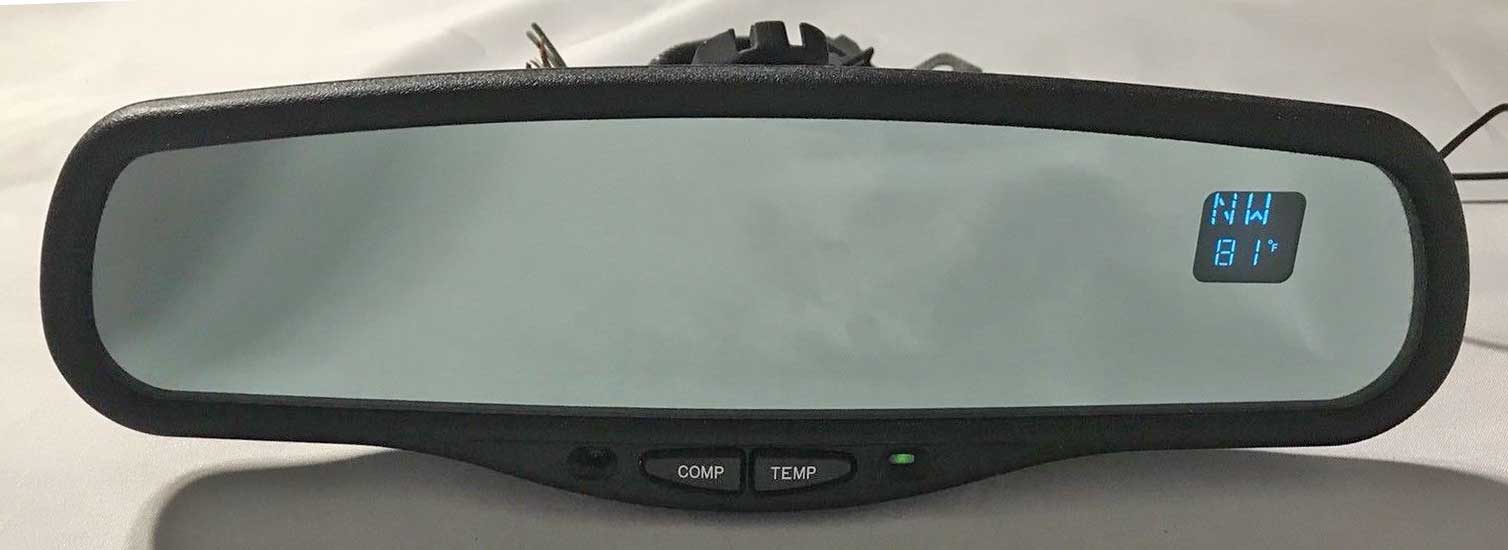 After seeing someone I know fit one of these more modern mirrors in their non-Volvo with so much simplicity, I decided it was an upgrade worth checking out for my Volvo 242. It turned out nice and a used mirror was not expensive. CLICK HERE for my GENTEX MIRROR PAGE: https://www.240turbo.com/gentexmirror.html |
|
DASH TOP GAUGE POD PROJECT
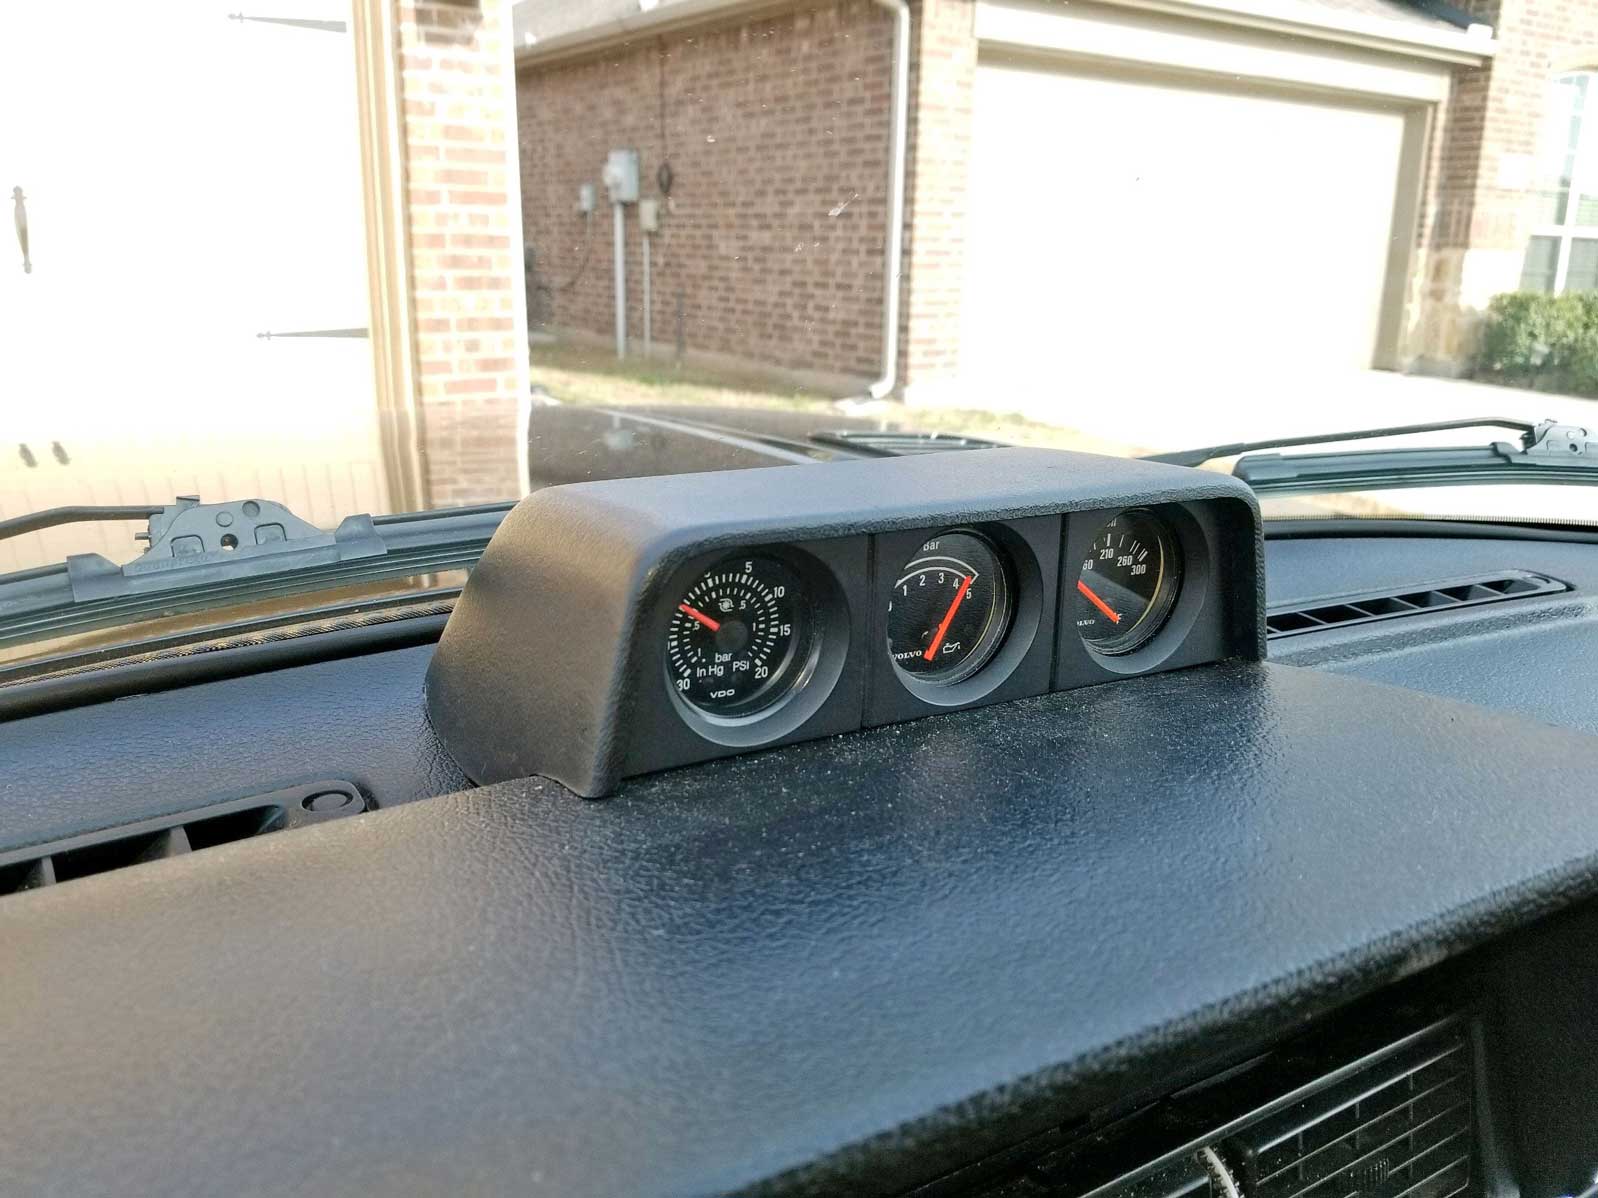 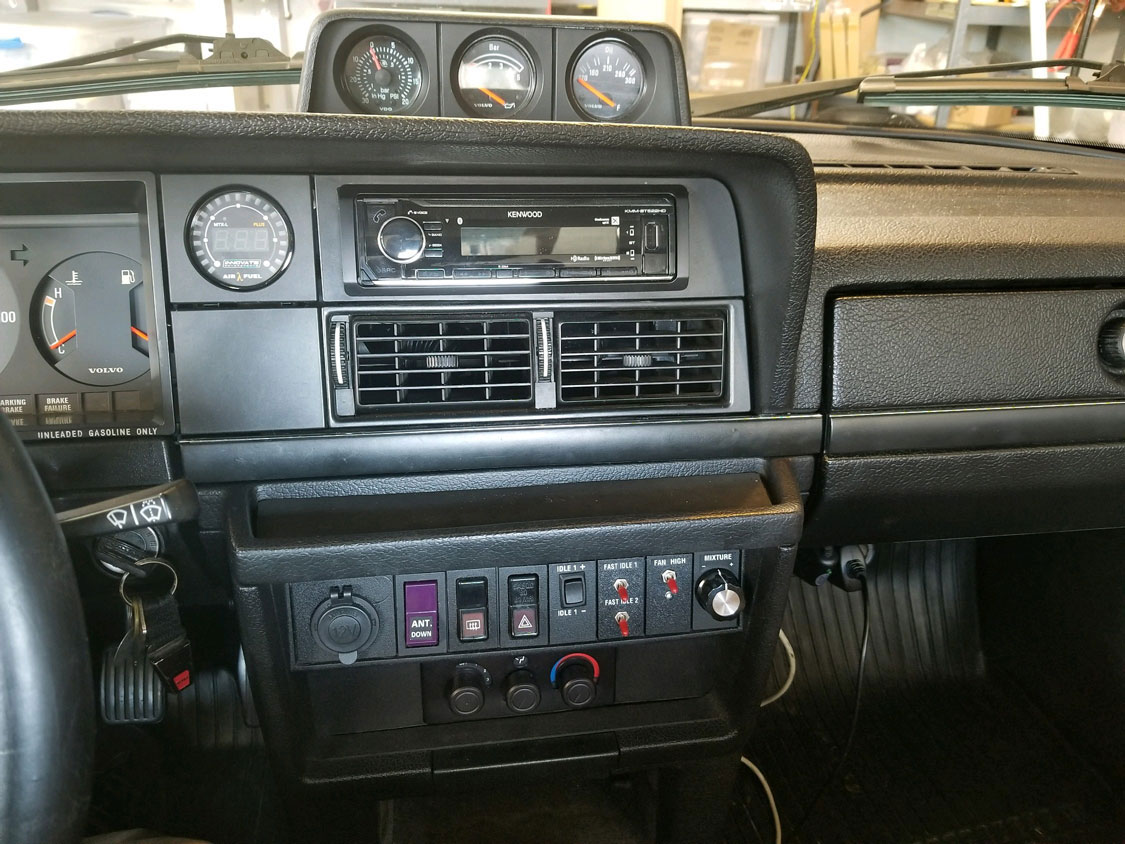 In 2018 I got out my tools and completed a detailed build project to make this DASH TOP GAUGE POD similar to the ultra-rare and unobtainable accessory gauge pod offered by Volvo in the 1980s.
This project was a lot of fun and it has it's own project page. CLICK HERE FOR THIS PAGE: https://www.240turbo.com/dashgaugepod.html |
| 4-NOTE CADILLAC HORNS Because your horns should not embarrass your car. 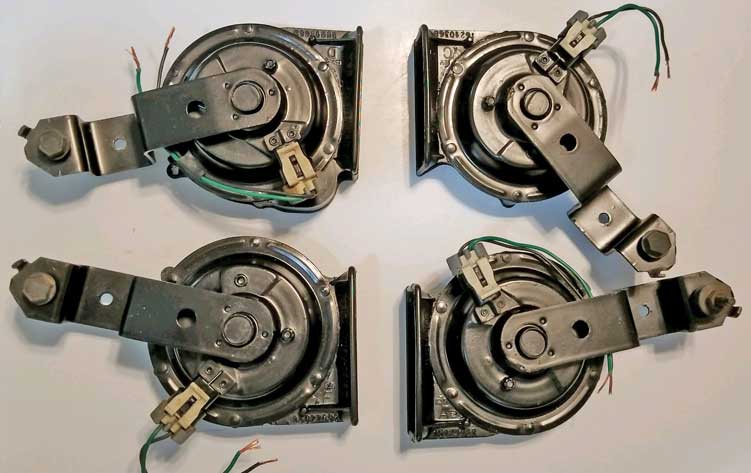 Are these loud? You bet they are. CLICK HERE FOR MY INSTALLATION PAGE: https://www.240turbo.com/horns.html |
| 242 POWER VENT WINDOWS BEFORE and AFTER 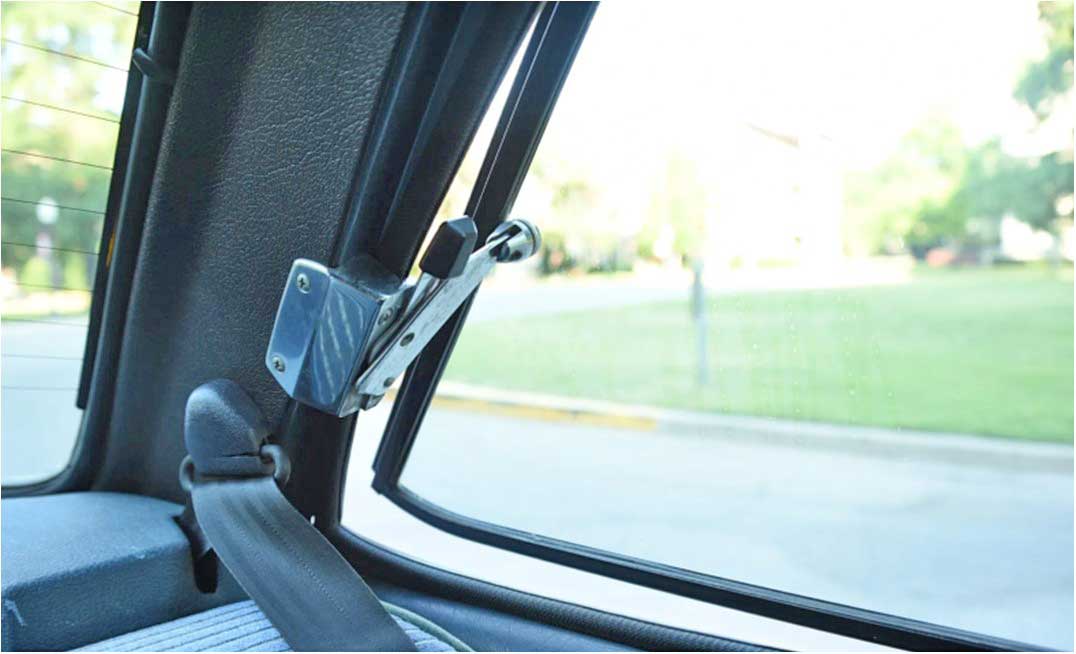  In 2022 I added power actuators for my rear pop-out vent windows. Something I had been obsessing about for a long time. It turned out really nice. See my Vent Window page HERE: https://www.240turbo.com/ventwindow.html |
| SUSPENSION My car has front coil-overs with 2.5 inch springs and rear adjustable coils with 5 inch springs. The front strut setup was made many years ago my a company that no longer exists, but if this interests you, you can find them and lots of other 240 performance suspension parts at BNE Dynamics. More detailed info about coil-overs and performance 240 suspensions can be found in my 240 Suspension Page. See my 240 SUSPENSION PAGE.  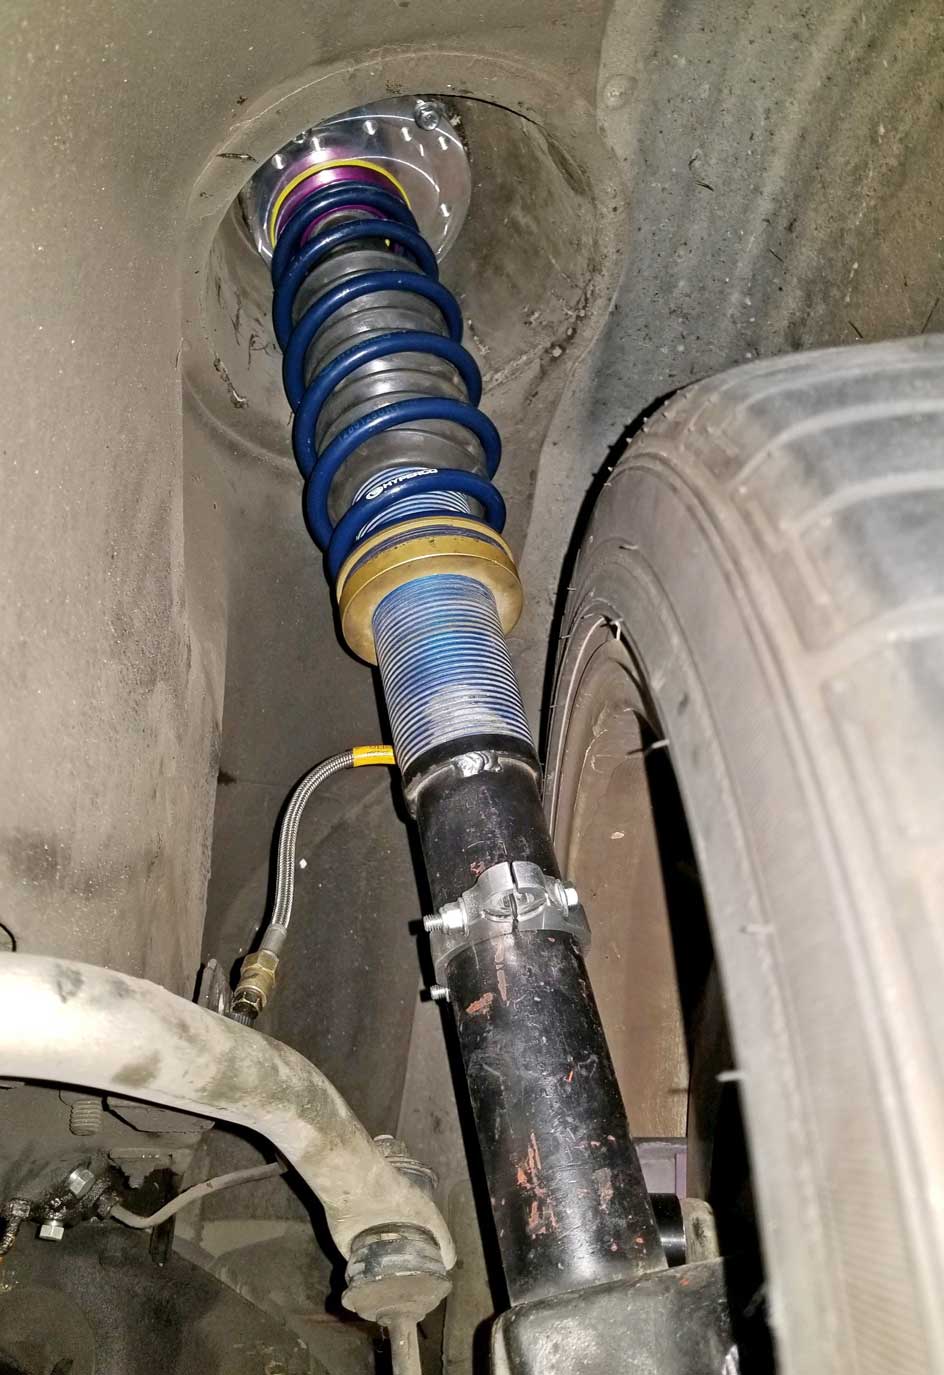 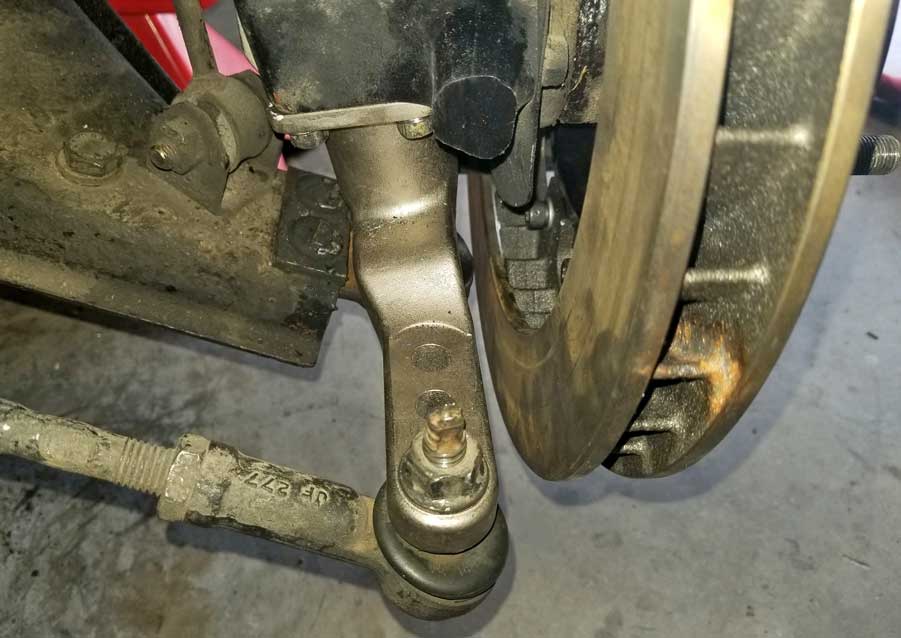 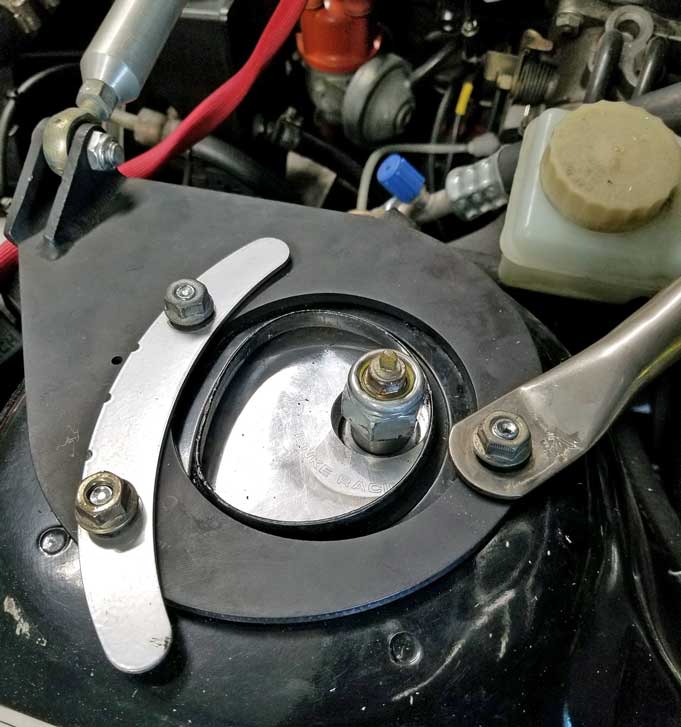 - 240 SUSPENSION PAGE Click Here - |
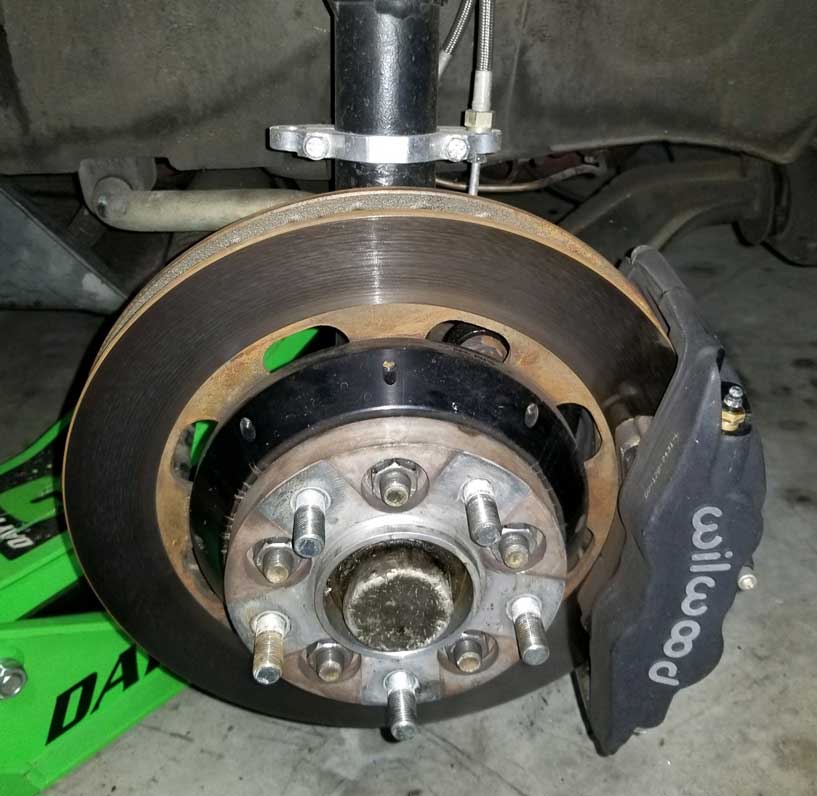
| BRAKES 240 factory disc brakes were considered better than many other cars when they were developed in the 1970's, but improving on that performance was a VERY necessary thing in my opinion. My 240 BIG BRAKE PAGE will illustrate things than can be done to any 240 to make your brakes better. The front brake upgrade I chose BELOW for my 242 was Wilwood 4-piston calipers and Wilwood 12.2 inch rotors. These are NOT considered "huge" brakes at all, and they do fit very easily behind my 17 inch wheels (and they even fit behind my 16 inch spare wheel). And the difference in repeatable stopping power from high speeds is like night and day compared to the factory front Girling 4-piston calipers and 10.3 inch rotors. 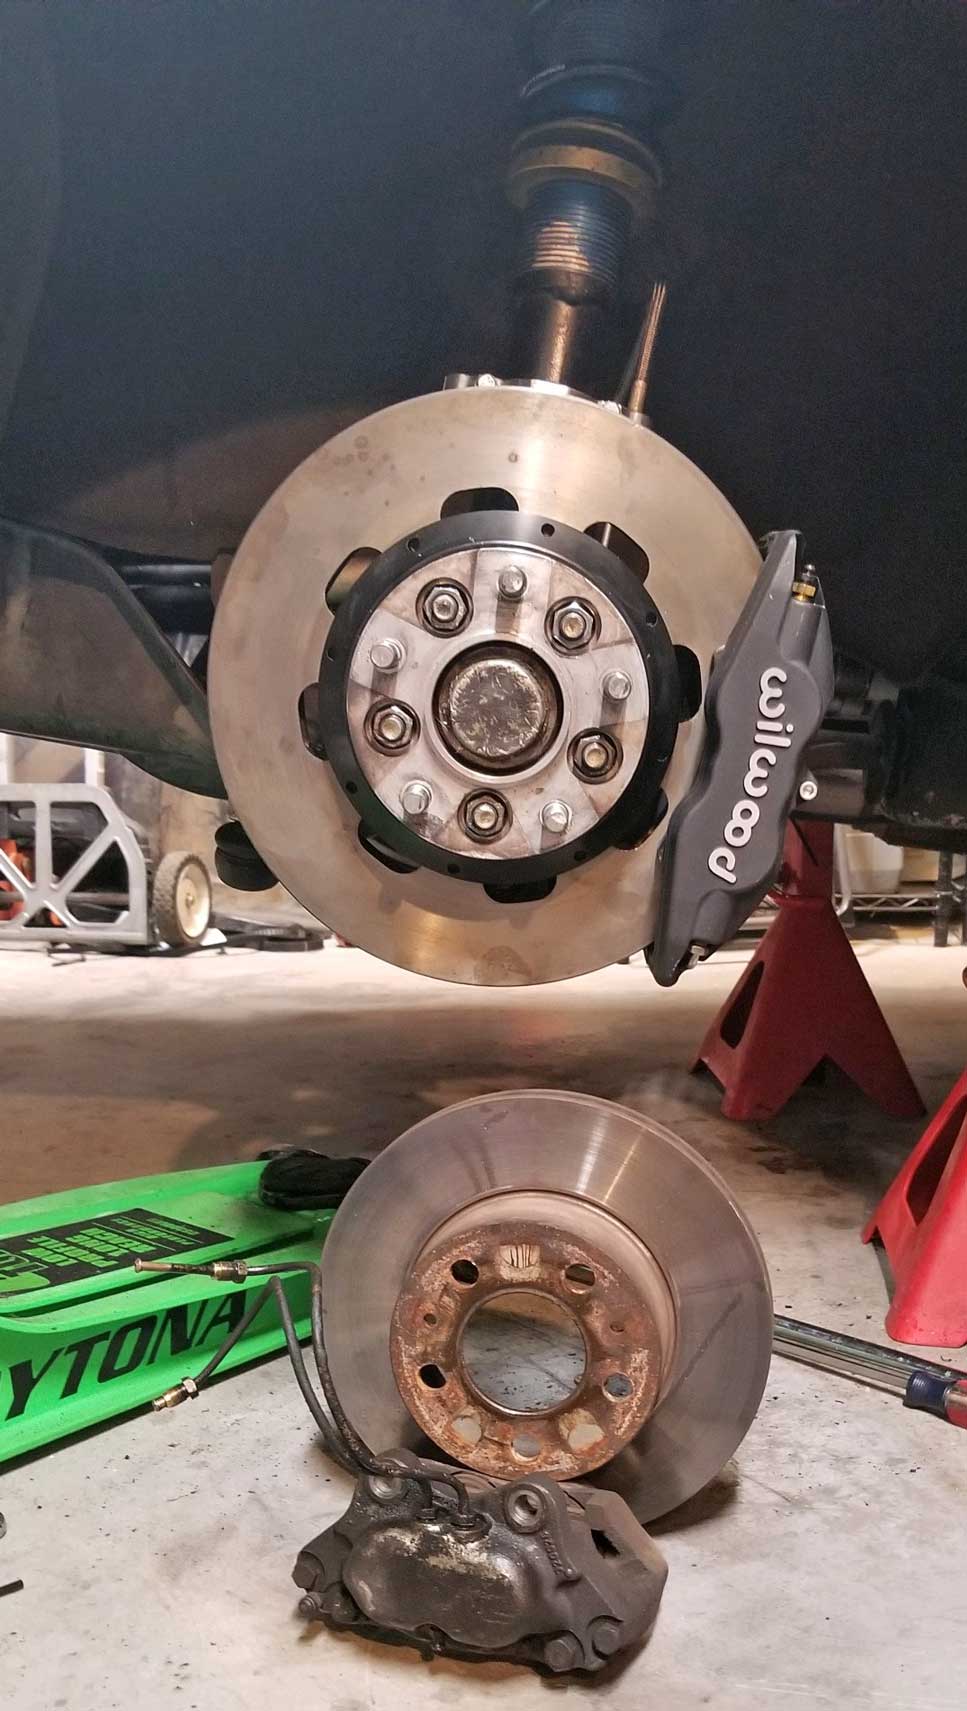
|
More recent
pics.
  |
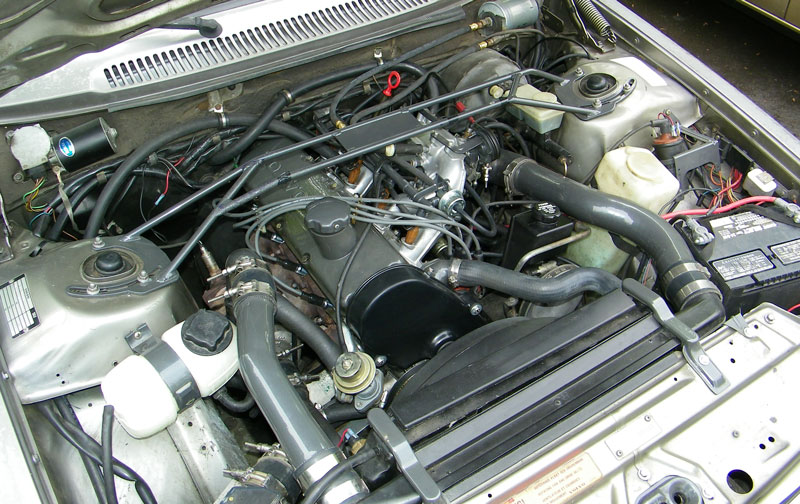
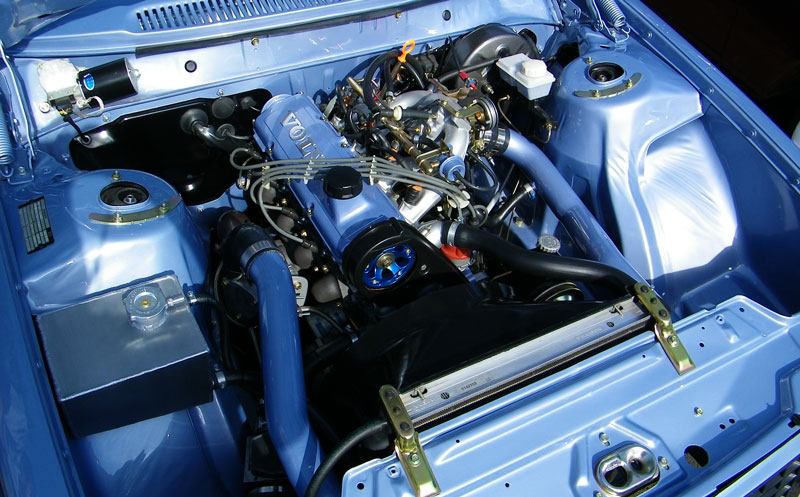
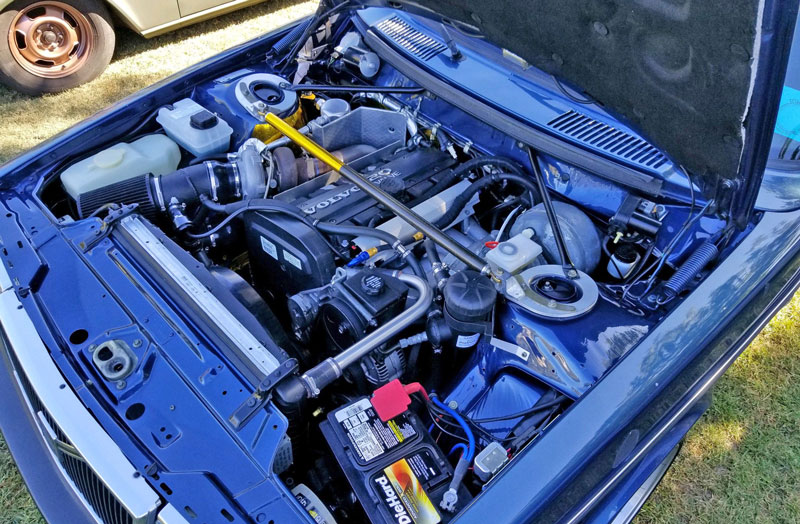
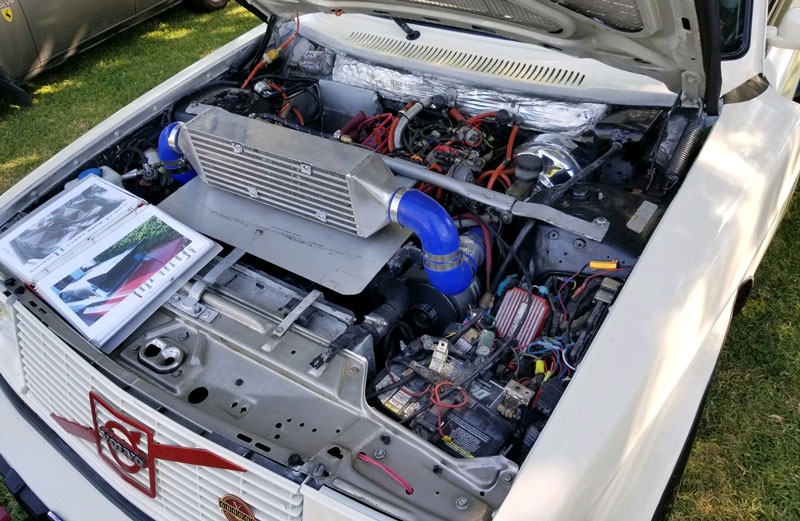
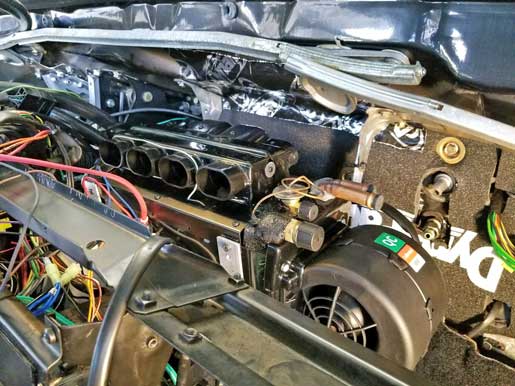
Here's an under hood shot.
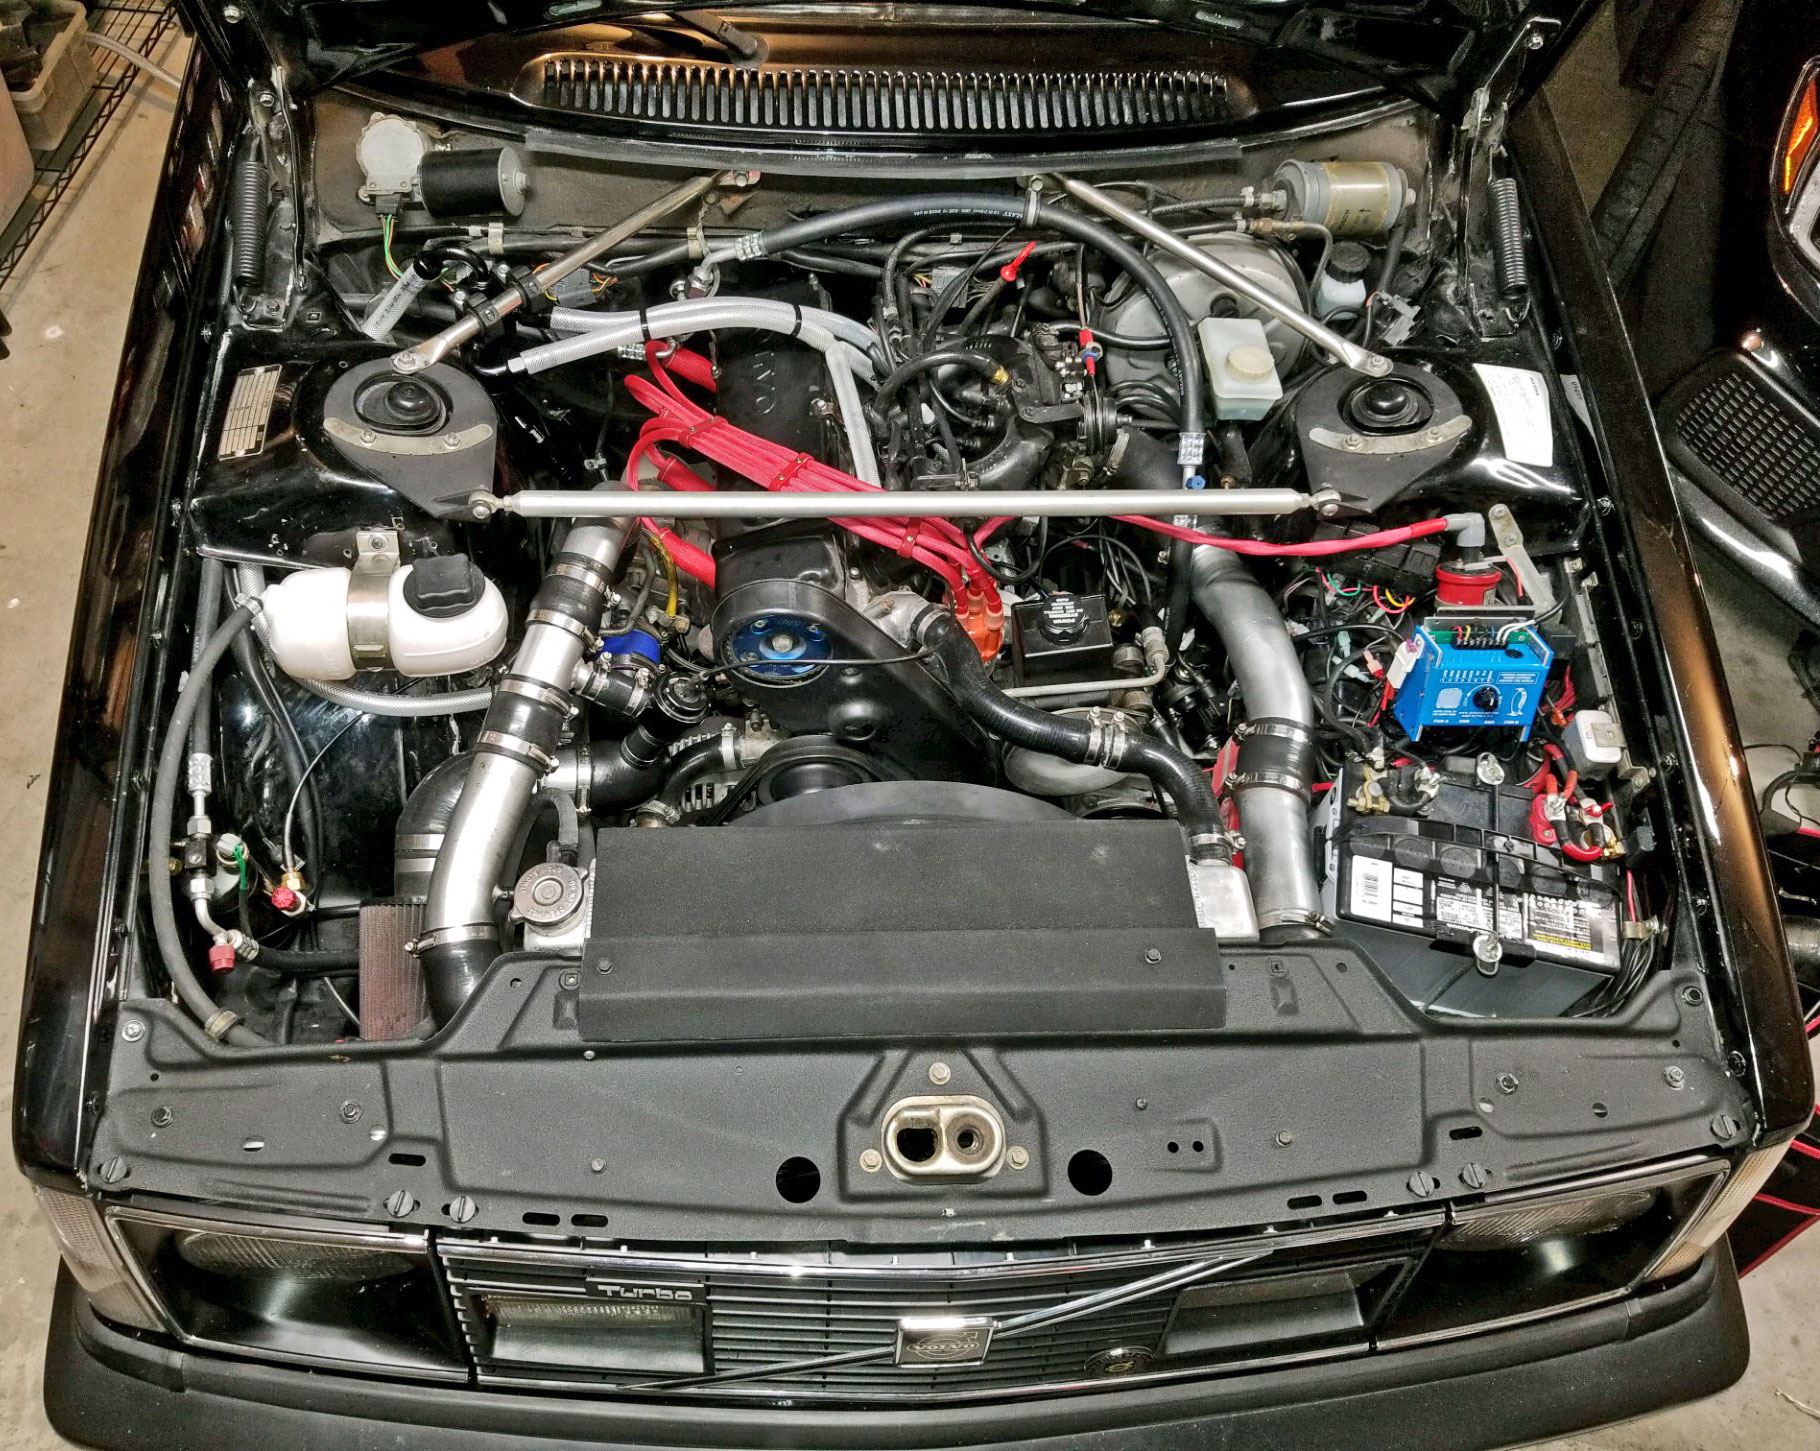 There's
a
lot going on under my hood, but it's all pretty reliable
on long cross-country trips. I previously mentioned at
the top of this page that I changed to a 1991-93 power steering pump.
That can be seen here. The later style B230 mounting bracket on the
engine was already in place because the previous owner had someone install a
rotary AC compressor and a 1985-90 style P.S. pump (with the remote
reservoir). I never cared for that remote reservoir. So I tossed
that pump and installed a used from a 1991-93 240. In 2023 I began studying up on BRUSHLESS FANS after I saw some videos and test data which suggested some BRUSHLESS fans can significantly out-perform old-school BRUSHED fans, offering higher speeds, more airflow, and all while using LESS AMPERAGE. My 240 has a high-performance alternator powering very cold 32ºF AC that works awesome even in 100ºF plus temps. And it has a big custom radiator, which can handle all that in any climate, even going up endless grades. My previous fan was a monster Lincoln Mark VIII. It was fine with all this, but I discovered that BRUSHLESS fans can be even BETTER. I have more info on my cooling system installation and past cooling system projects here: 240turbo.com/ElectricCoolingFans.html and a BRAND NEW PAGE with everything I've learned so far on upgrading to a BRUSHLESS FAN here: 240turbo.com/BrushlessFans.html. 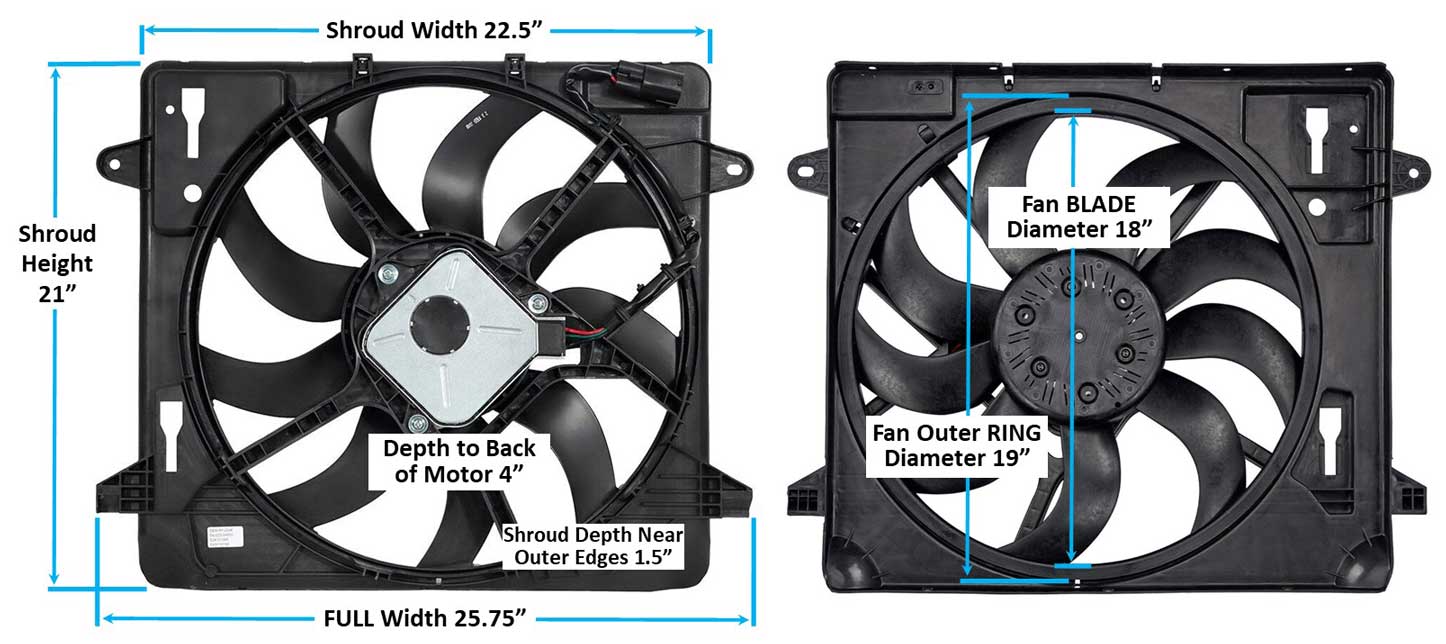
MECHMAN Alternator and Custom Belt Idler Pulley To handle the extra voltage needed for all my modern stuff I installed a high performance alternator from Mechman. And to keep the dual V-belts gripping all that extra amperage, I designed and installed a custom idler pulley system. ALTERNATOR PAGE IDLER PULLEY PAGE     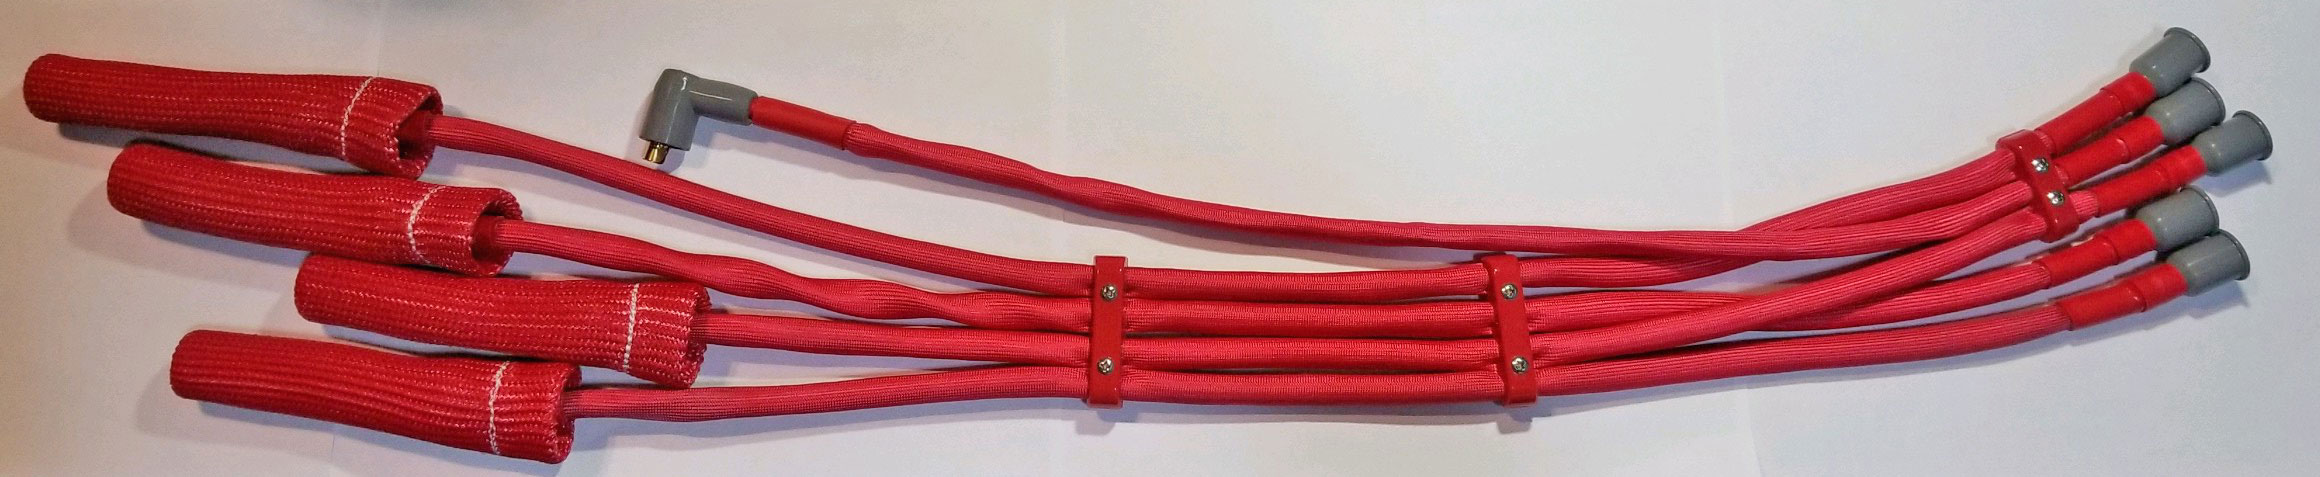 If you're curious about these CUSTOM spark plug wires, I built them myself. I made a page on HOW TO DIY Custom Ignition Cables: https://www.240turbo.com/ignition.html#sparkcables Large (Mazda) Oil Cooler and Remote Oil Filter 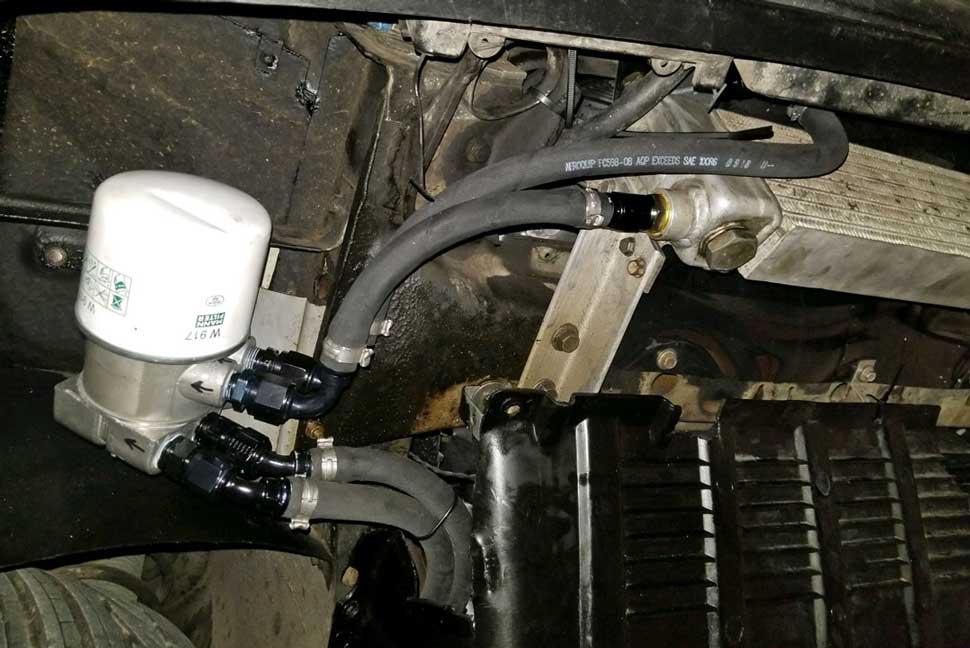 I made a page detailing my large Mazda oil cooler and remote oil filter installation using Aeroquip Socketless fittings and hose. Click here for my 240 Oil Cooler Page. Engine Mount Options Engine mounts are kind of important. I think there should be more discussion about better options, don't YOU? I made a new page showing some of my ideas about better options for high-performance engine mounts. 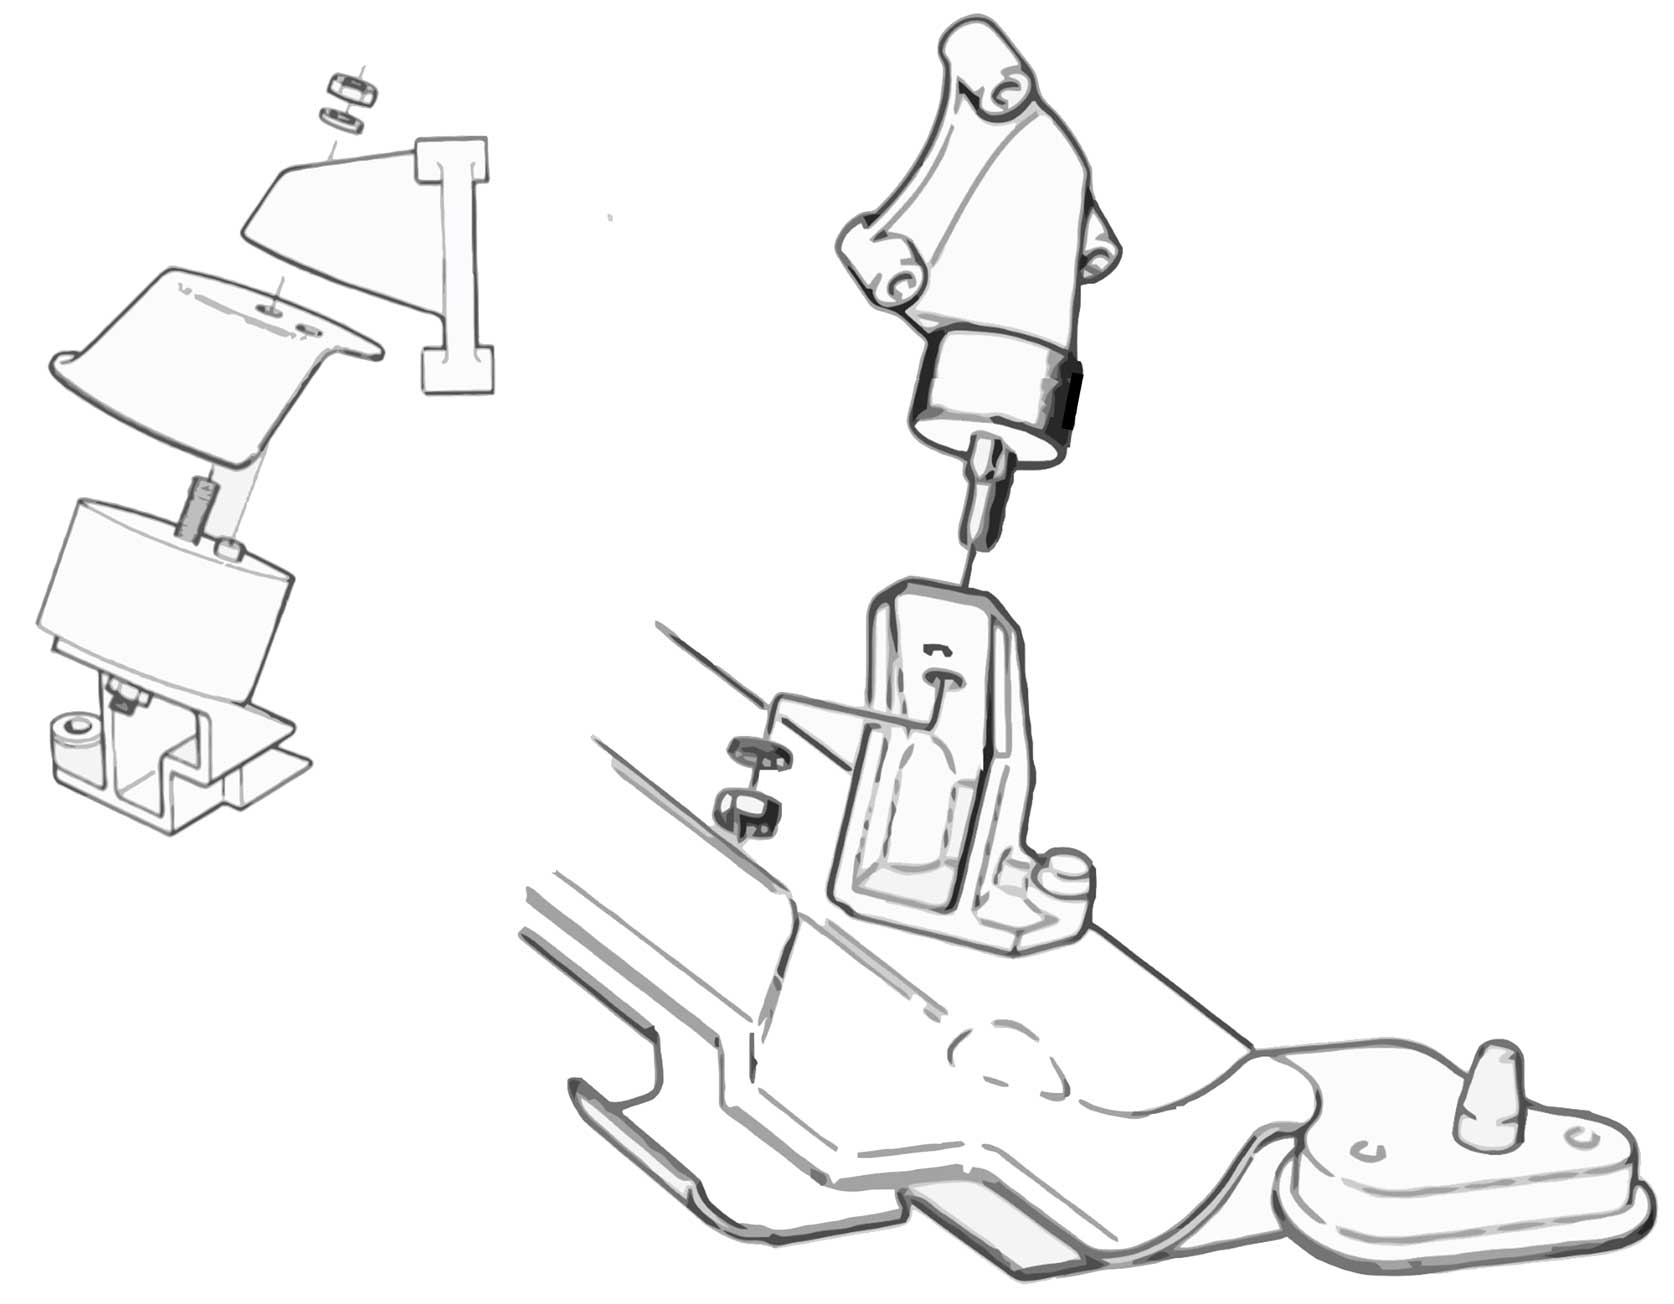 https://www.240turbo.com/enginemounts.html Under Hood Insulation 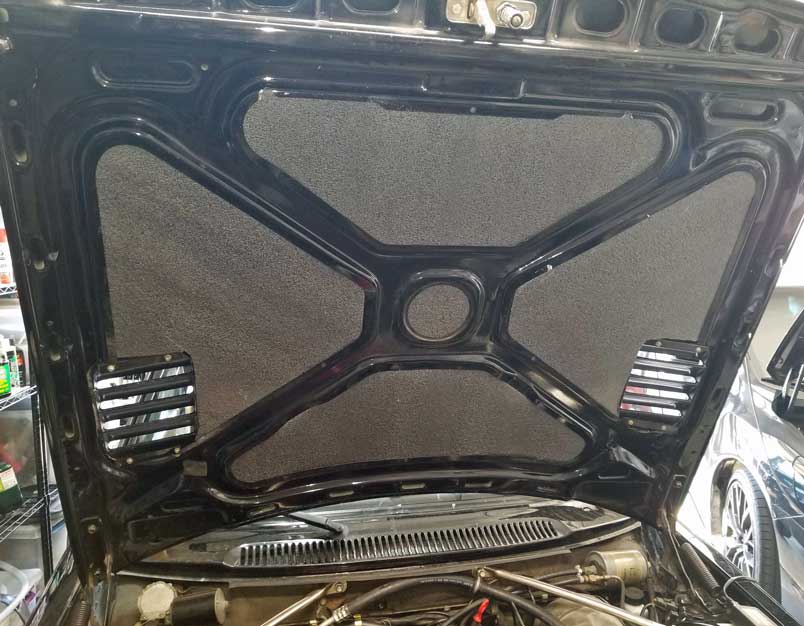 240 Hood Insulation: I've begun compiling some info for DIY hood insulation projects: CLICK HERE. SDS EFI ENGINE MANAGEMENT: This car original came with Bosch K-Jetronic fuel injection. This is a mechanical type of fuel injection, which was considered fairly advanced back then and it pre-dated electronic fuel injection (EFI). More than 20 years ago I converted the engine to EFI. The EFI I chose was SDS EFI, which is a programmable high-performance system for controlling fuel and spark. 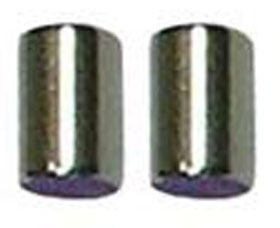 SDS uses a proprietary Hall sensor for sensing crank position timing. The Hall sensor reads a pair of small magnets (ABOVE), which were supplied by SDS. The magnets were embedded into my crank pulley. It can be as simple as drilling a couple holes and gluing them in, but for the B21 pulley I used, I felt the magnets needed a bit more material to hold onto, so I had a shop weld on two pads as shown below. 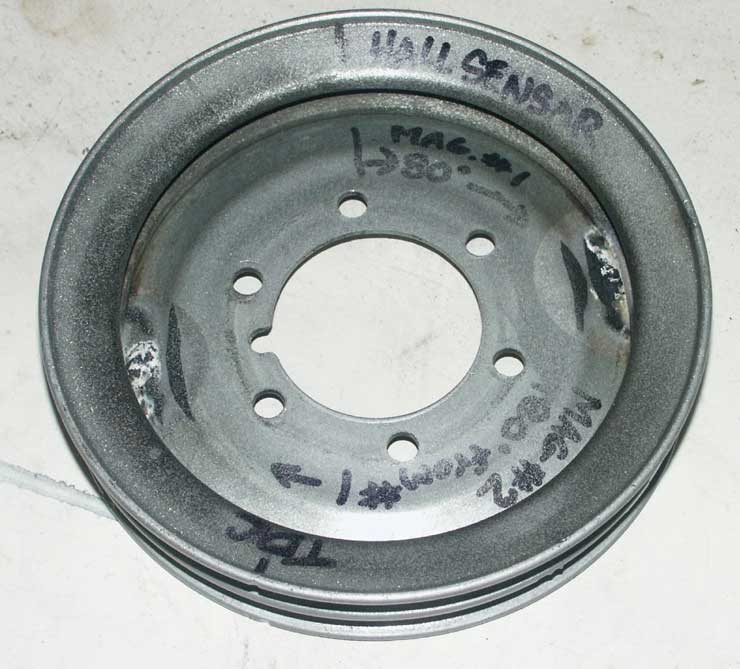 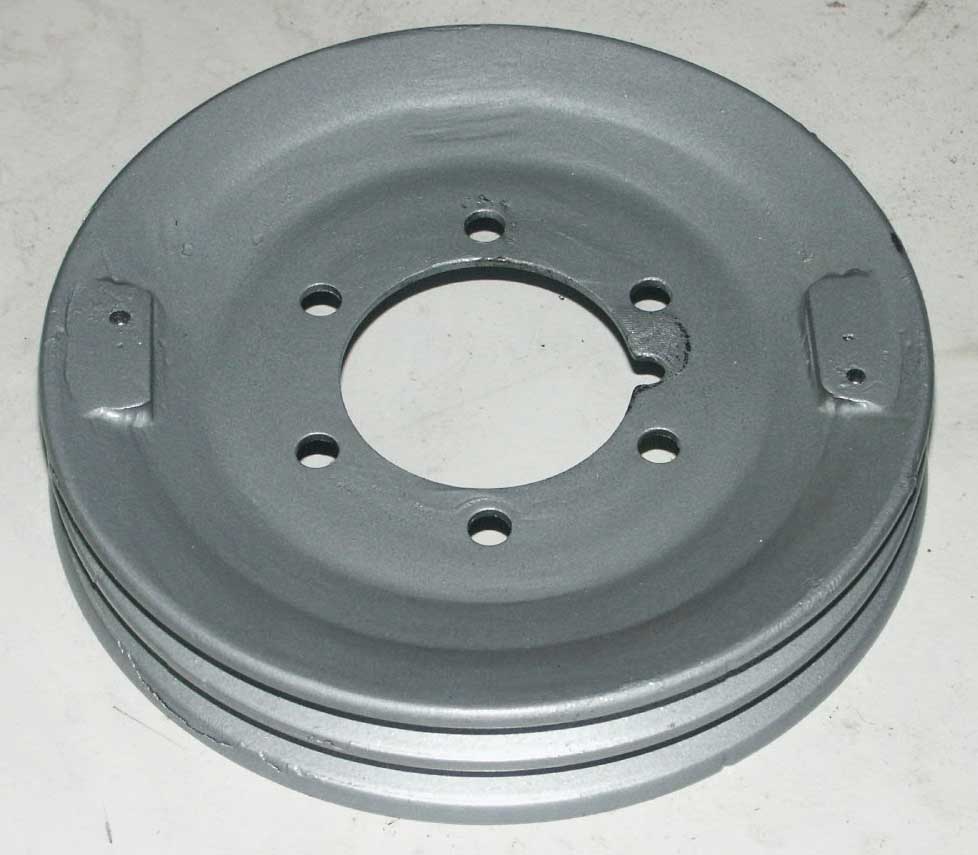 Since installing this on a Volvo engine was pretty much custom, I needed to make a custom bracket (BELOW) to hold the Hall sensor.  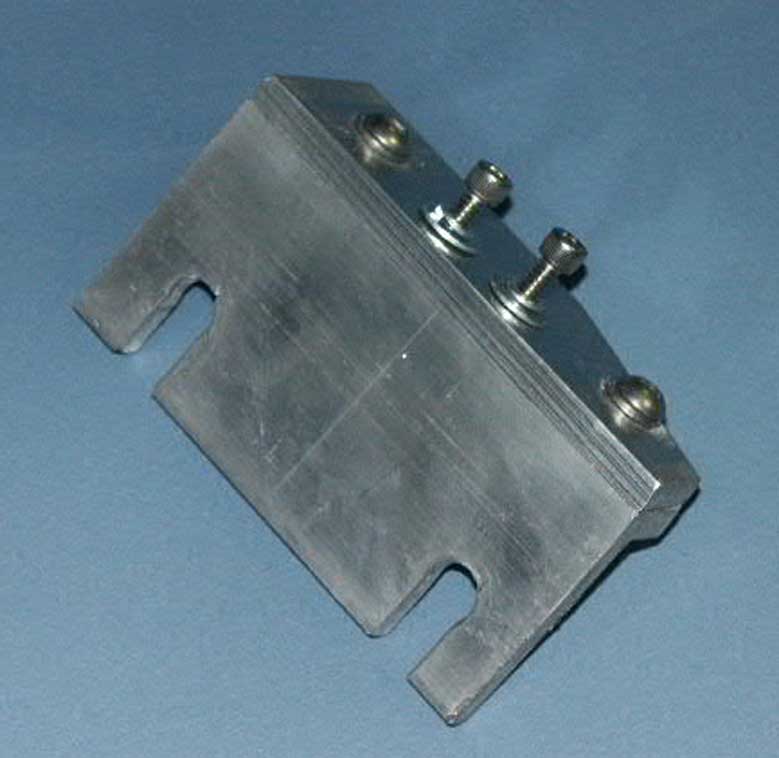 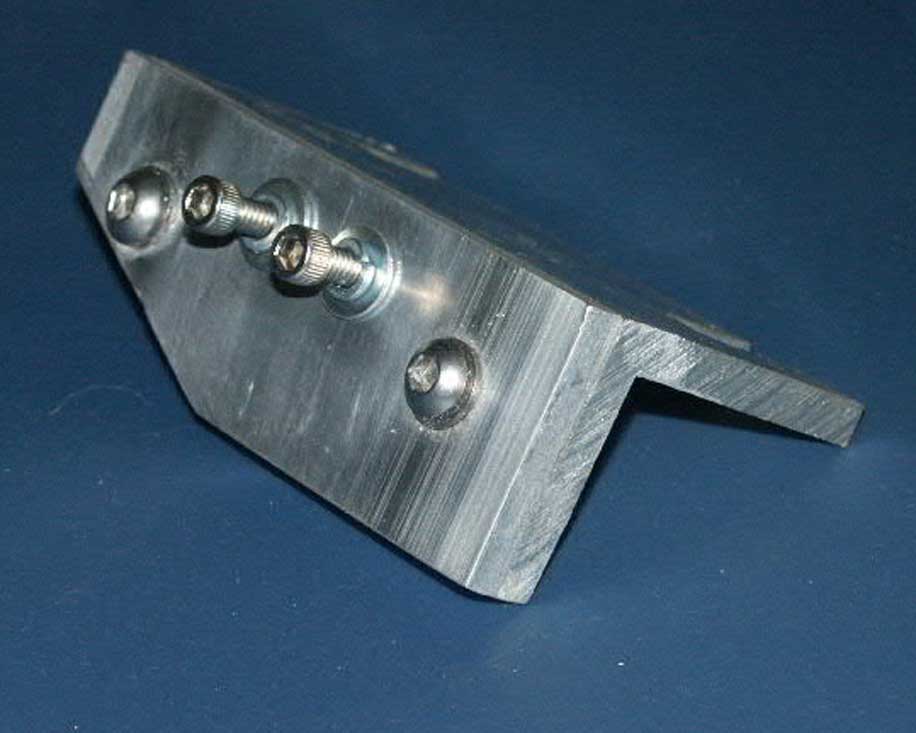 The Hall sensor bracket was a simple thing to create using a piece of 1/4 inch aluminum angle stock. I added slots to it so it could bolt onto two oil pan bolts on the front of the engine and still be adjustable. I also added an extra layer of aluminum to the front, since it needed to come out toward the pulley a little more. The result was a bracket that is rigid and fully adjustable and I could set it to space the Hall sensor the correct distance from the pulley magnets. 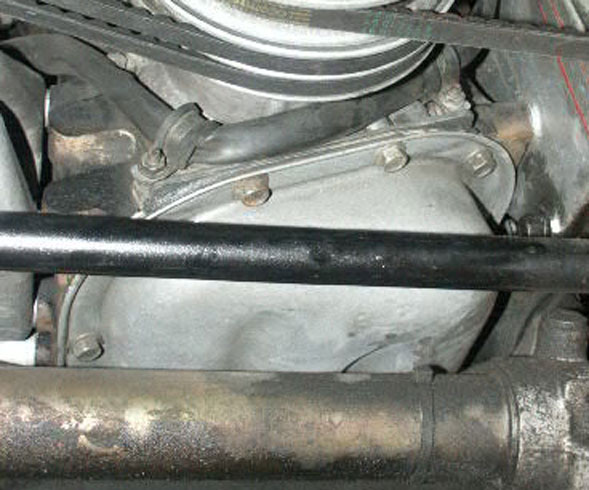  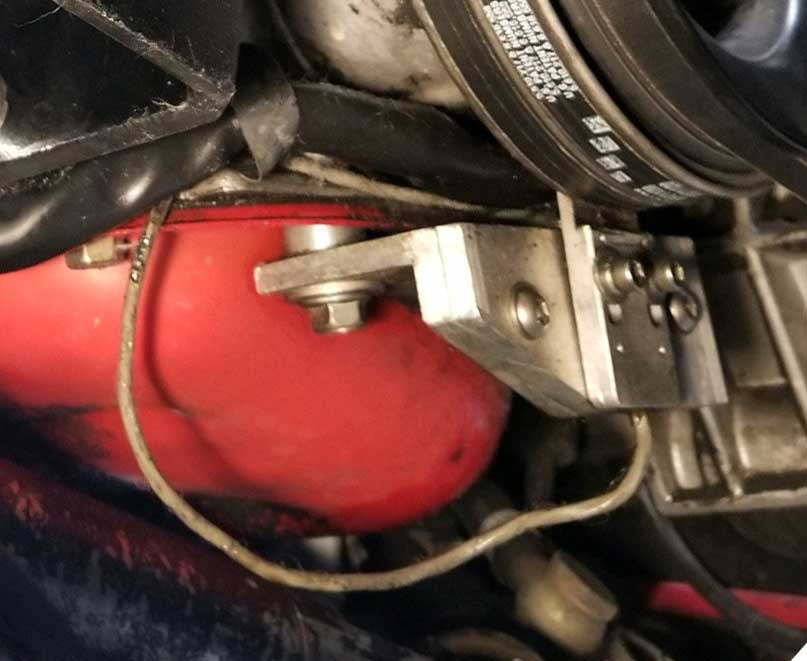 Here are some views ABOVE of the bracket installed on my engine. Seen in the last photo are two short spacers, which space the bracket downward from the oil pan about 1/4 inch so it clears the oil pan lip. SDS EFI uses a programmer as shown below to set parameters from the dash. No Laptop or tablet is used. There are some videos below that will show how the programmer works. Programmer Part 1: https://www.youtube.com/watch?v=vlhgz_vVMuM Programmer Part 2: https://www.youtube.com/watch?v=2iBNlYUAf9M&t=7s Hall Sensors: https://www.youtube.com/watch?v=p0eCX2AcM9w SDS EFI YouTube Channel: https://www.youtube.com/user/rv6ejguy/videos 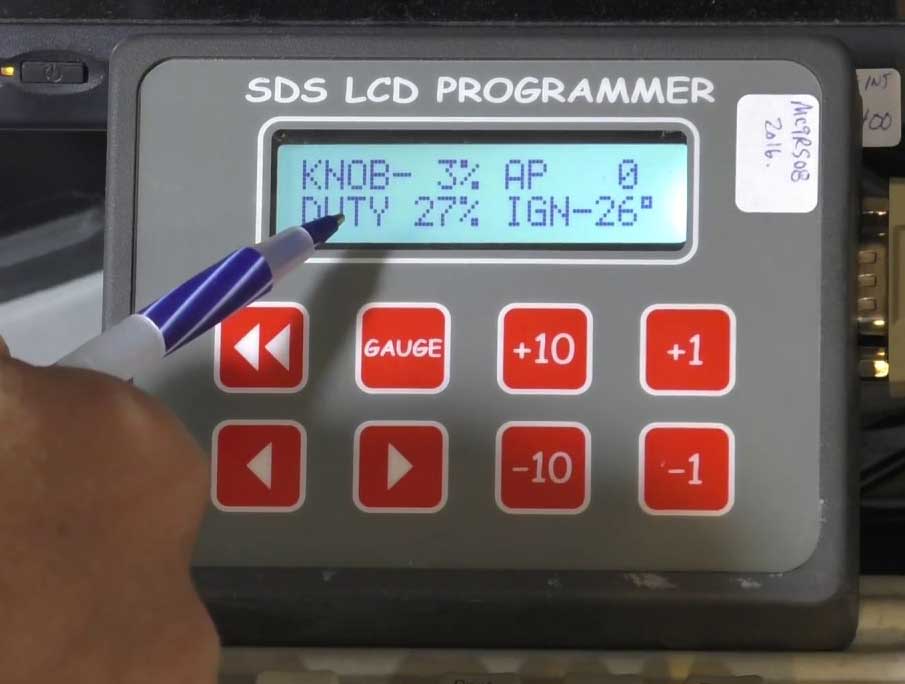 MSD Digital 6A Ignition Amplifier 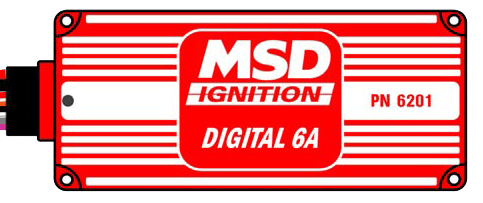 I've also been using an MSD ignition amplifier in my Volvo for more years than I can recall. It's very good at seriously improving ignition spark. I have more about that in my Ignition Page. |
| -
P A S T
V O L V
O S -
|
 Humble 245 beginnings..... This was my first 240 Turbo. I bought this 1984 245 Turbo back in March of 1997. I paid $3200 to who I think was the second owner in Rialto, California. It was completely stock and original. When I started to do a few little modifications, I really had no idea the direction it would eventually take. This was my first 240 Turbo, so I found myself in a strange new world when it came to understand things like K-Jetronic fuel injection. I had no clue what made it tick, but I was learning. By 1997 when I bought this 245, I had already been a customer of iPd for a number of years. They were the best source (often the only source) for Volvo performance improvement parts. So mods started getting done slowly as I could manage. |
|
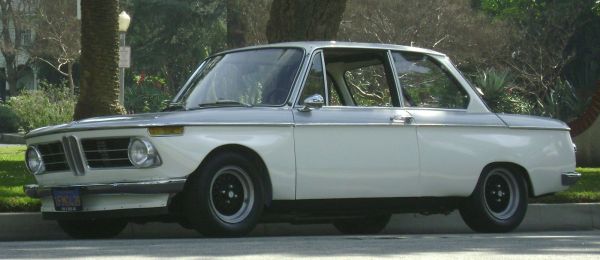
BIMMER
For
my second car a friend talked me into buying this 1967 BMW 1600ti
Alpina. It was the first year that Alpina built such a car. This one
was a former German
Group 3 race car, which was later imported
to the U.S.
I bought it in 1978. |
| CLICK HERE FOR NEXT PAGE - MORE ON PAST VOLVOS. |

|
|
|
|